
Understanding your travel trailer RV’s fuse panel diagram is essential. It helps ensure safe and efficient electrical operations.
Whether you’re a seasoned RV owner or a beginner, knowing the ins and outs of your fuse panel can save you from many headaches. The fuse panel is the heart of your RV’s electrical system. Each fuse protects different circuits, preventing overloads and potential hazards.
It’s crucial to familiarize yourself with this component to troubleshoot issues easily. In this blog, we’ll break down the essentials of reading and understanding your travel trailer RV fuse panel diagram. This guide aims to simplify the process, making it accessible even for those with limited electrical knowledge. So, let’s dive in and make your RV experience smoother and safer.
Introduction To Travel Trailer Rv Fuse Panels
Discover the basics of travel trailer RV fuse panels with an easy-to-follow diagram. Understand the layout, identify fuses, and maintain your RV’s electrical system efficiently.
Travel trailer RVs offer freedom and flexibility. They let you explore new places while enjoying the comforts of home. One vital component in your RV is the fuse panel. This essential part ensures all electrical systems run smoothly. From lights to appliances, the fuse panel manages electrical flow, protecting your RV from damage.
Importance Of Fuse Panels
Fuse panels are the heart of your RV’s electrical system. They prevent overloads by breaking the circuit if too much current flows. This action stops potential fires and damage. Each fuse in the panel corresponds to a specific circuit. If a fuse blows, it means there’s an issue in that circuit. Replacing the fuse restores function, but you must find and fix the problem to prevent it from happening again.
Common Issues
Common issues with fuse panels include blown fuses and loose connections. Blown fuses often occur due to short circuits or overloaded circuits. Identify the cause before replacing the fuse. Loose connections can cause intermittent power loss. Tighten connections to ensure a stable power supply. Corrosion on terminals can also be a problem. Clean terminals regularly to maintain good contact. Keeping your fuse panel in good condition ensures a safe and enjoyable travel experience. “`

Credit: www.pinterest.com
Components Of A Fuse Panel
Understanding the components of a fuse panel is essential for maintaining your travel trailer RV. The fuse panel protects your electrical system from overloads. It also helps ensure the safety of your RV’s electrical devices. Let’s break down the main components of a fuse panel.
Main Breaker
The main breaker is the heart of your fuse panel. It controls the power supply to your RV. When an overload occurs, the main breaker trips. This action cuts off power to prevent damage. It also protects you from electrical fires. Always check the main breaker first if you have power issues.
Individual Fuses
Individual fuses protect specific circuits in your RV. Each fuse is linked to a particular device or area. When a circuit overloads, the fuse blows. This prevents damage to the connected devices. To fix the issue, replace the blown fuse with a new one. Ensure the replacement fuse matches the original’s rating. This keeps your electrical system safe and functional.
Locating The Fuse Panel
Finding the fuse panel in your travel trailer RV is important. It helps you manage electrical issues quickly. This guide will help you locate the fuse panel easily. Follow the steps below to find it inside the RV or in exterior compartments.
Inside The Rv
The fuse panel is often inside the RV. Look under the dinette seats. It may also be behind a cabinet door. Check the owner’s manual for exact locations. Some RVs have the panel near the floor. Others have it at eye level.
Use a flashlight to check dark corners. Fuse panels are usually labeled. This helps identify the right fuse. Keep a screwdriver handy. You might need it to access the panel.
Exterior Compartments
Some RVs have fuse panels in exterior compartments. Look near the battery storage area. It might be behind a small access door. Check the compartment near the front of the RV.
Use the RV’s exterior diagram if available. This can guide you to the right spot. Exterior fuse panels are often weatherproof. This protects them from the elements.
| Location | Common Areas |
|---|---|
| Inside the RV | Under dinette seats, behind cabinet doors, near the floor |
| Exterior Compartments | Near battery storage, behind access door, front compartments |
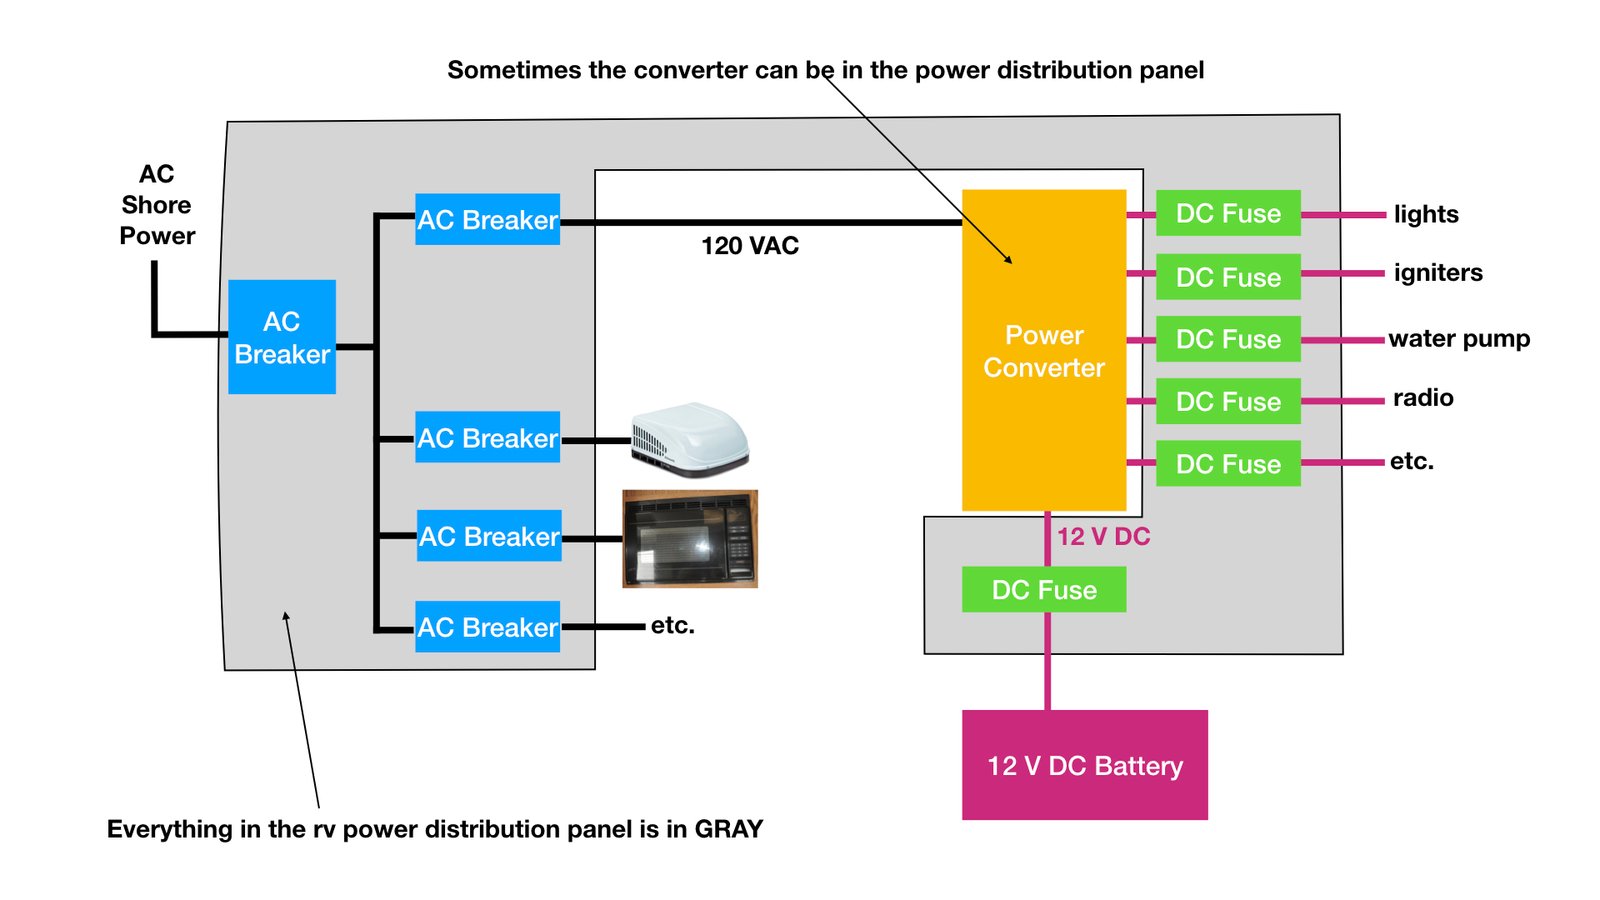
Reading A Fuse Panel Diagram
Understanding the fuse panel diagram of your travel trailer RV is vital. A fuse panel diagram helps you identify circuits and their respective fuses. This knowledge ensures safety and quick troubleshooting. Let’s dive into the key aspects of reading a fuse panel diagram.
Symbols And Labels
Fuse panel diagrams use various symbols and labels. These symbols represent different electrical components. For example, a light bulb symbol indicates lighting circuits. A battery symbol shows the main power source. Labels next to these symbols provide more details. They often include the name of the device or circuit. Knowing these symbols and labels helps you identify each component quickly.
Understanding Fuse Ratings
Fuse ratings are essential for the safe operation of your RV. Each fuse has a specific rating, measured in amps. This rating indicates the maximum current the fuse can handle. Using the correct fuse rating prevents electrical damage. If a fuse blows, it means the circuit has exceeded its safe limit. Replace it with a fuse of the same rating. Never use a higher-rated fuse, as it could cause serious issues. Always check the fuse panel diagram for correct ratings.
Wiring Setup Basics
Setting up the wiring for your travel trailer RV fuse panel can seem daunting. But with the right guidance, it becomes straightforward. This section will cover the basics of wiring setup. Following these steps ensures your RV’s electrical system functions safely and efficiently.
Tools Needed
- Wire Strippers: Essential for removing insulation from wires.
- Screwdrivers: Both flathead and Phillips for various screws.
- Multimeter: To test electrical connections.
- Crimping Tool: Useful for securing wire connections.
- Electrical Tape: For insulating wire connections.
- Wire Connectors: To join wires safely.
Safety Precautions
Before starting, ensure the power is off to avoid shocks. Use a multimeter to check for live wires. Always work in a dry environment to prevent accidents. Wear gloves and safety glasses for protection. Follow these precautions for safe and effective wiring setup.
- Turn off the main power switch.
- Use insulated tools to avoid electrical contact.
- Label wires to keep track of connections.
- Do not overload circuits to prevent overheating.
By following these steps and using the right tools, you can successfully set up your travel trailer RV fuse panel wiring. Always prioritize safety and accuracy in your work.
Step-by-step Wiring Guide
Setting up a travel trailer RV fuse panel can seem daunting. With a clear step-by-step guide, it becomes manageable. This guide will help you understand each part of the process.
Disconnect Power
First, turn off the power source to your RV. This ensures your safety and prevents any electrical accidents. Unplug the RV from any external power connections. Turn off the main breaker as well. Double-check to make sure there is no power running.
Connecting Wires
Next, identify the wires you need to connect. Typically, you will have positive and negative wires. Connect the positive wire to the corresponding terminal on the fuse panel. Secure it tightly to avoid any loose connections. Then, connect the negative wire to its terminal. Ensure all connections are firm.
After connecting the main wires, link the individual circuits. Each circuit will have its wire that needs to be connected to a specific fuse terminal. Follow the color codes and labels to make sure you connect them correctly.
Troubleshooting Fuse Panel Issues
Experiencing issues with your travel trailer RV fuse panel can be frustrating. Understanding how to troubleshoot these problems can save you time and hassle. This guide will help you identify and fix common fuse panel issues in your travel trailer RV.
Common Problems
Blown fuses are a frequent issue. They occur when there is a short circuit or an overloaded circuit. Dim or flickering lights can also signal a problem. This might be due to loose connections or a faulty fuse. Another common problem is the entire fuse panel losing power. This can happen because of a main fuse blowing or a wiring issue.
Fixes And Solutions
To fix a blown fuse, start by identifying the faulty fuse. Remove and replace it with a fuse of the same rating. Ensure the new fuse fits securely. For dim or flickering lights, check for loose connections. Tighten any loose wires or replace any damaged ones. If the entire fuse panel loses power, inspect the main fuse. Replace it if necessary. Also, check for any broken or disconnected wires.

Credit: nucamprv.freshdesk.com
Maintaining Your Fuse Panel
Keeping your travel trailer RV’s fuse panel in top shape is crucial. This ensures your electrical system runs smoothly. A well-maintained fuse panel prevents unexpected power failures. It also protects your RV’s appliances from damage. Regular inspections and timely replacements are key.
Routine Inspections
Regularly check your fuse panel to spot any issues early. Look for loose wires or corrosion. These can cause electrical problems. Make sure each fuse is seated properly. A loose fuse can create intermittent power issues.
Inspect the fuse panel for any signs of heat damage. Melted plastic or burnt areas indicate a problem. Address these issues immediately to prevent further damage. Use a flashlight if needed. It helps you see small details in the panel.
Replacing Fuses
Replacing a blown fuse is simple. First, turn off the power to the affected circuit. This prevents any electrical shocks. Next, locate the blown fuse. It will look burnt or broken.
- Remove the blown fuse carefully. Use a fuse puller if available.
- Check the amp rating on the fuse. Replace it with one of the same rating.
- Insert the new fuse into the slot. Make sure it is seated properly.
- Turn the power back on and test the circuit.
Always keep spare fuses on hand. This ensures you can quickly replace any blown fuses. Label each fuse with its function. This makes it easier to identify the correct one to replace.
Regular maintenance of your fuse panel is essential. It keeps your RV’s electrical system running smoothly. Routine inspections and timely fuse replacements are key steps. Follow these guidelines to avoid electrical issues on your travels.
Frequently Asked Questions
What Is A Travel Trailer Rv Fuse Panel Diagram?
A travel trailer RV fuse panel diagram shows the layout and function of each fuse. It helps in identifying and troubleshooting electrical issues in your RV.
Where Can I Find My Rv Fuse Panel?
The RV fuse panel is usually located near the electrical control center. It can be behind a cabinet or under a bed, depending on the RV model.
Why Is My Rv Fuse Panel Important?
The RV fuse panel protects your electrical system from overloads and short circuits. It ensures safe operation of all electrical components in your travel trailer.
How Do I Read A Fuse Panel Diagram?
Reading a fuse panel diagram involves identifying each fuse’s purpose. The diagram labels each fuse with its corresponding electrical component, making troubleshooting easier.
Conclusion
Understanding the RV fuse panel diagram is essential for every traveler. It helps you troubleshoot electrical issues quickly. With this knowledge, you can enjoy a stress-free journey. Regular checks ensure everything works smoothly. Keep this guide handy for future reference.
Safe travels on the road ahead!


