
Understanding the RV transfer switch wiring diagram is crucial for safe RV travel. It ensures power flows correctly and prevents electrical issues.
For RV enthusiasts, knowing how an RV transfer switch works is vital. This device manages power between your generator and shore power. A clear wiring diagram simplifies this task. It shows connections, components, and safety measures. This guide will help you read and use these diagrams.
Whether you’re a newbie or a seasoned RV owner, understanding this will enhance your RV experience. Let’s dive into the essentials of RV transfer switch wiring diagrams.
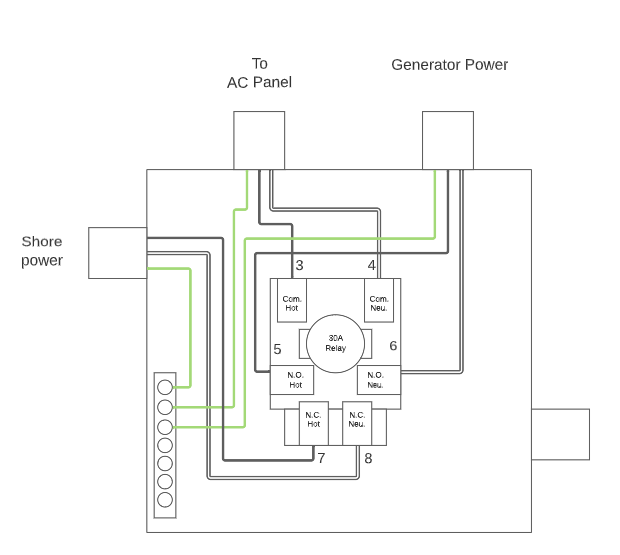
Credit: outsidesupply.com
Introduction To Rv Transfer Switches
Recreational vehicles (RVs) often need to switch between power sources. An RV transfer switch makes this transition smooth. It ensures that your RV appliances always have power. Understanding RV transfer switch wiring diagrams is crucial for safe and efficient operation.
Purpose And Function
An RV transfer switch automatically switches power sources. It shifts between shore power, generator, or inverter. This switch ensures that your RV gets uninterrupted power. Without manual intervention, it chooses the best power source available.
Here are the primary functions of an RV transfer switch:
- Prevent power source conflicts
- Ensure continuous power supply
- Protect electrical appliances from power surges
Common Types
There are different types of RV transfer switches. Each type suits different needs. Below are the common types:
| Type | Description |
|---|---|
| Automatic Transfer Switch | Switches power sources without manual input |
| Manual Transfer Switch | Requires manual switching between power sources |
| Hybrid Transfer Switch | Combines automatic and manual switching features |
Understanding these types helps in choosing the right switch. The right switch ensures safe and efficient power management for your RV.

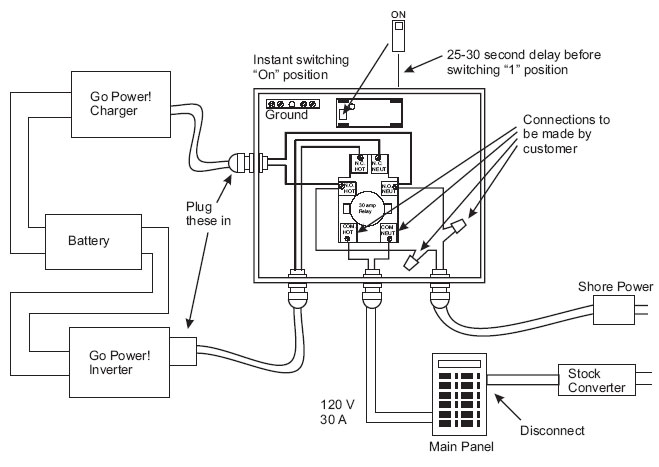
Credit: gopower.happyfox.com
Essential Tools And Materials
Before starting your RV transfer switch wiring project, you need to gather the essential tools and materials. Having the right items will make the job easier and safer.
Required Tools
- Wire Strippers: For stripping the insulation off wires.
- Screwdrivers: Both flathead and Phillips types.
- Multimeter: To measure voltage and ensure connections are correct.
- Drill: For making holes if needed.
- Pliers: For gripping and bending wires.
- Voltage Tester: To check for live wires.
- Safety Gloves: Protect your hands while working.
- Flashlight: For better visibility in dark areas.
Necessary Materials
- RV Transfer Switch: The main component for switching power sources.
- Wiring: Ensure you have the correct gauge for your needs.
- Wire Nuts: For securing wire connections.
- Electrical Tape: To insulate and protect wire connections.
- Circuit Breakers: For safety and preventing overloads.
- Conduit: To protect and route wiring.
- Mounting Hardware: Screws and brackets for mounting the switch.
- Labels: To mark wires and connections.
Below is a table summarizing the tools and materials for easy reference:
| Tools | Materials |
|---|---|
| Wire Strippers | RV Transfer Switch |
| Screwdrivers | Wiring |
| Multimeter | Wire Nuts |
| Drill | Electrical Tape |
| Pliers | Circuit Breakers |
| Voltage Tester | Conduit |
| Safety Gloves | Mounting Hardware |
| Flashlight | Labels |
Safety Precautions
Safety is crucial when dealing with RV transfer switch wiring. Understanding and following safety precautions can prevent accidents and ensure a smooth installation process. Below are some essential safety tips to keep in mind.
Basic Safety Tips
Always disconnect the power before starting. This prevents electric shocks. Use insulated tools to avoid accidental contact with live wires. Wear rubber-soled shoes to reduce the risk of grounding. Keep a fire extinguisher nearby. In case of emergencies, have a first aid kit ready.
Electrical Safety Measures
Inspect all wires for damage. Replace any frayed or broken wires. Use the correct gauge wire for your RV’s electrical load. Double-check connections to ensure they are secure. Label wires to avoid confusion during installation. Follow the manufacturer’s instructions closely.
Never work on electrical components in wet conditions. Water increases the risk of electric shock. Use a voltage tester to confirm the power is off. Avoid overloading circuits. This can cause overheating and fires. Ensure proper grounding of your RV’s electrical system.
Understanding The Wiring Diagram
Understanding the wiring diagram for an RV transfer switch is crucial. It helps ensure safe and efficient electricity management in your RV. A wiring diagram acts as a map, guiding you through the connections and components involved. This guide will simplify the process by breaking down key elements.
Key Components
The wiring diagram includes several key components. Each part plays a vital role. The main components are the transfer switch, power sources, circuit breakers, and load connections. The transfer switch connects to both shore power and the generator. It helps switch between these power sources. Circuit breakers protect your RV’s electrical system from overloads. Load connections distribute power to various appliances and outlets within the RV.
Diagram Symbols
Understanding diagram symbols is essential. Symbols represent different electrical components and connections. Common symbols include lines for wires, circles for connection points, and various shapes for switches, breakers, and power sources. A line with a break indicates a switch, while a solid line represents a continuous wire. Circles often show where wires connect. Familiarize yourself with these symbols to read the diagram effectively.
In summary, understanding the wiring diagram for an RV transfer switch involves recognizing key components and diagram symbols. This knowledge ensures a safe and efficient electrical system in your RV.
Step-by-step Installation
Installing an RV transfer switch can seem challenging. With the right guide, it’s a task anyone can complete. This step-by-step installation will help you get your RV transfer switch wired correctly and safely.
Preparation Steps
Before you start, gather all necessary tools and materials. Here is what you will need:
- Screwdrivers (Phillips and flathead)
- Wire strippers
- Voltage tester
- Electrical tape
- Transfer switch
Ensure your RV is turned off and unplugged. Safety first. Verify the power is off using a voltage tester.
Connecting The Wires
Now, let’s get into connecting the wires. Follow these steps:
- Open the transfer switch panel with a screwdriver.
- Identify the input and output terminals. They should be labeled.
- Strip the ends of the wires using wire strippers. About 1/2 inch should be enough.
- Connect the RV power cord to the transfer switch input terminals. Match the wire colors.
- Secure the wires tightly with the terminal screws.
- Connect the generator input wires to the transfer switch generator terminals.
- Connect the output wires from the transfer switch to the RV’s breaker panel.
- Double-check all connections for tightness and security.
Close the transfer switch panel and secure it with screws. Turn on the power and test the system. Ensure the transfer switch works correctly. Your RV transfer switch is now wired and ready to use.
Credit: www.progressivedyn.com
Testing The Transfer Switch
Testing the transfer switch in your RV is crucial. It ensures your electrical system works correctly. This test helps you identify any issues early on. Knowing how to conduct these tests yourself can save you time and money.
Initial Tests
Start with a visual inspection. Check all wires and connections. Look for signs of wear or damage. Ensure everything is tight and secure.
Next, use a multimeter to test the voltage. Set the multimeter to the AC voltage setting. Measure the voltage at the input terminals. You should see a reading between 110 and 120 volts. Record the results.
Now, test the output terminals. Again, you should see a reading between 110 and 120 volts. If the readings are off, there may be an issue.
Troubleshooting Tips
Sometimes, the transfer switch may not work as expected. Here are some common issues and solutions:
- No Power: Check the circuit breakers. Reset any tripped breakers.
- Low Voltage: Inspect the connections. Tighten any loose wires.
- Intermittent Power: Look for damaged wires. Replace any frayed or broken wires.
If these steps do not solve the issue, consider consulting a professional. Proper testing and troubleshooting ensure a reliable and safe electrical system in your RV.
Maintenance And Upkeep
Maintaining and keeping your RV transfer switch wiring diagram in top shape is crucial. Proper upkeep ensures your RV’s electrical system runs smoothly. This can prevent unexpected issues during your travels. Regular checks and addressing common issues can extend the lifespan of your RV’s transfer switch.
Routine Checks
Perform routine checks every few months. Inspect the transfer switch for any signs of wear. Look for loose wires or connections. Check for any corrosion on the terminals. Clean the switch area to prevent dust buildup. Verify that all wires are properly insulated. Test the switch to ensure it is working correctly. Regular maintenance can prevent bigger problems later.
Common Issues
Loose connections are a common problem. They can cause intermittent power loss. Tighten any loose screws or connectors. Corrosion can also be an issue. Use a contact cleaner to remove any buildup. Broken wires may occur due to wear and tear. Replace any damaged wires immediately. Sometimes, the switch itself may fail. If it does, consider replacing the switch. Regular monitoring can help identify these issues early.
Faqs And Common Questions
Understanding the wiring diagram for an RV transfer switch can be a complex task. Many RV owners have questions about the process and the components involved. Below, we address some of the most frequently asked questions to help you grasp the essentials of RV transfer switch wiring.
General Queries
What is an RV transfer switch?
An RV transfer switch automatically switches the power source between the generator and shore power. This ensures a seamless transition of power.
Why is a transfer switch necessary?
It prevents electrical back feed and protects your RV’s electrical system. Without it, manual switching can be error-prone and unsafe.
Technical Questions
How do I read an RV transfer switch wiring diagram?
Start by identifying key components: the generator, shore power, and the transfer switch itself. Follow the wiring paths carefully.
What tools do I need for wiring?
You’ll need a multimeter, wire strippers, and screwdrivers. Always ensure you have an updated wiring diagram specific to your RV model.
Can I install the transfer switch myself?
If you have basic electrical knowledge, you can. However, professional installation is recommended for safety. Incorrect wiring can lead to serious issues.
Technical Details
What is the typical wiring configuration?
The transfer switch connects to the generator, shore power, and RV breaker panel. The common wiring colors include black (hot), white (neutral), and green (ground).
How does the transfer switch know to switch power sources?
The transfer switch senses the presence of shore power. If shore power fails, it switches to generator power automatically.
What are common issues faced during installation?
Some common issues include incorrect wiring, loose connections, and inadequate grounding. Always double-check connections and consult the wiring diagram.
| Component | Function |
|---|---|
| Generator | Provides backup power |
| Shore Power | Primary power source |
| Transfer Switch | Switches power sources automatically |
Understanding these FAQs can help you with the RV transfer switch wiring process. Always prioritize safety and consult with professionals if unsure.
Frequently Asked Questions
What Is An Rv Transfer Switch?
An RV transfer switch automatically switches your RV’s power source between shore power and generator. It ensures a seamless transition.
How Do You Wire An Rv Transfer Switch?
Wiring an RV transfer switch involves connecting the generator, shore power, and RV’s electrical system. Always follow the manufacturer’s instructions.
Why Use A Transfer Switch In An Rv?
A transfer switch prevents electrical issues by managing power sources. It protects your RV’s electrical system from damage.
Can I Install An Rv Transfer Switch Myself?
Yes, you can install it yourself if you’re comfortable with electrical work. Otherwise, hire a professional.
Conclusion
Understanding RV transfer switch wiring is crucial for safe travels. This guide simplifies the process. Follow the steps carefully to ensure proper installation. A well-wired system ensures reliable power. Always prioritize safety when handling electrical components. Double-check connections to avoid issues.
With these tips, you can confidently wire your RV transfer switch. Enjoy your travels with peace of mind. Happy camping!


