
Replacing the floor of an RV slide-out can be costly. Knowing the expense helps in budgeting effectively.
RV slide-out floors can wear out over time. They face constant use and exposure to elements. Water damage, rot, and general wear and tear can cause issues. Replacing this floor can seem daunting, but understanding the costs involved is essential.
A detailed breakdown helps prepare for this necessary repair. Whether you’re a seasoned RV owner or new to the lifestyle, knowing the costs will save you from unexpected surprises. This guide will outline the factors affecting the replacement cost. It will also provide tips on managing expenses. Stay informed and make your RV adventures smooth and enjoyable.
Credit: rvhomeservice.com
Introduction To Rv Slide Out Floor Replacement
The RV lifestyle offers the freedom of the open road. But it comes with its own set of challenges. One of the common issues RV owners face is the need for slide out floor replacement. The slide out floor in an RV can wear out over time. This can lead to several problems. Understanding the cost and process of RV slide out floor replacement is vital.
Importance Of Floor Replacement
The slide out floor is a crucial part of your RV. It supports the weight of the slide out and its contents. A damaged or worn-out floor can lead to further damage. It can affect the structural integrity of the RV. Replacing the floor ensures safety and longevity. It also improves the overall comfort of your RV.
Common Issues In Rv Slide Out Floors
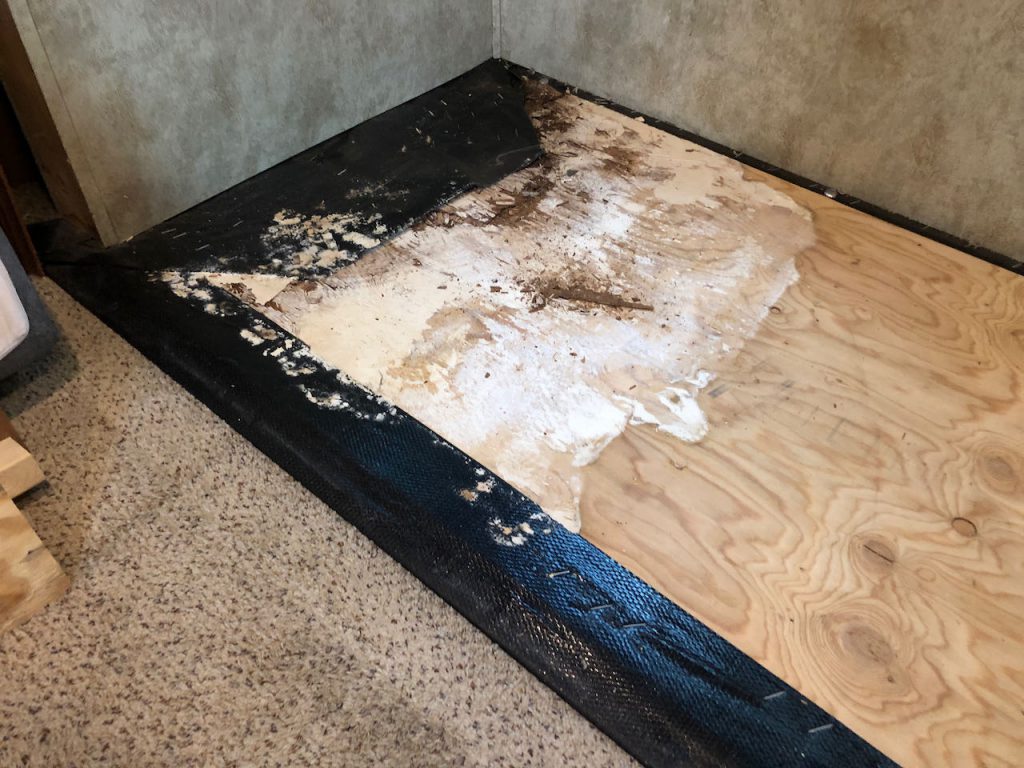
Several issues can arise with RV slide out floors. Water damage is one of the most common problems. Leaks can cause the wood to rot, weakening the floor. Another issue is wear and tear from constant use. The floor can become soft or saggy. In some cases, the floor may even crack. Addressing these issues promptly is essential.
Insects and pests can also cause damage to the floor. They can chew through the wood, creating holes and weak spots. Regular maintenance and inspections can help identify these problems early. This can save you time and money in the long run.
Estimating Replacement Costs
Estimating the cost of replacing your RV slide-out floor can be challenging. Knowing what to expect can help you budget effectively. This section will break down the main components of the cost, including material costs and labor expenses.
Material Costs
The cost of materials for RV slide-out floor replacement varies. It depends on the type of materials you choose. Plywood is a common choice and is relatively affordable. High-quality plywood can cost around $50 to $100 per sheet. Composite materials are another option but tend to be more expensive. These materials can cost between $100 to $200 per sheet.
In addition to the primary flooring material, you may need adhesives and sealants. These can add another $20 to $50 to your total cost. Finally, consider the cost of new flooring if you want to upgrade. Vinyl, laminate, or carpet can range from $1 to $5 per square foot.
Labor Expenses
Labor costs will depend on whether you choose to do the work yourself or hire a professional. DIY projects can save money but require time and skill. If you decide to go the DIY route, you might spend around $100 on tools and supplies.
Hiring a professional can be more costly but ensures quality work. Professionals usually charge between $75 to $150 per hour. The total labor cost can range from $500 to $1,500, depending on the job’s complexity. Remember that labor costs can vary by location.
Choosing Cost-effective Materials
Selecting budget-friendly materials for RV slide-out floor replacement can significantly lower costs. Quality alternatives ensure durability without breaking the bank.
Replacing the floor of your RV slide-out can be expensive. But choosing cost-effective materials can save you money. You need durable, affordable options. This section helps you find the best materials. Focus on balancing cost and durability.
Affordable Flooring Options
There are many affordable flooring options for your RV. Vinyl flooring is one choice. It is cheap and easy to install. Laminate flooring is another option. It looks good and costs less than hardwood. Carpet tiles are also a budget-friendly choice. They are easy to replace if damaged.
Durability Vs. Cost
Finding the right balance is key. Cheaper materials may not last as long. Vinyl and laminate are both durable and cost-effective. They can handle the wear and tear of RV life. Carpet tiles are less durable but easy to replace. Consider your budget and how long you need the floor to last. Investing a bit more now can save money later. “`
Diy Vs. Professional Replacement
Replacing the floor of an RV slide-out can be daunting. You must decide whether to do it yourself or hire a professional. Each option has its own set of advantages and disadvantages.
Pros And Cons Of Diy
- Cost Savings: Doing it yourself can save you money. You avoid labor costs.
- Learning Experience: You gain valuable skills and knowledge about your RV.
- Control: You oversee the entire project. You can ensure quality and attention to detail.
- Time-Consuming: DIY projects can take a lot of time. Especially if you are inexperienced.
- Risk of Mistakes: Errors can lead to more costs. You may need to redo the work.
- Tools and Materials: You need specific tools and materials. These can be expensive if you don’t already own them.
When To Hire A Professional
Complex Repairs: If the damage is extensive, hire a professional. They have the expertise to handle complex repairs.
Warranty Concerns: Some RV warranties require professional repairs. Check your warranty terms before starting a DIY project.
Time Constraints: If you lack time, a professional can complete the job faster. They have the experience and tools to work efficiently.
Quality Assurance: Professionals guarantee their work. This gives you peace of mind that the job is done correctly.
Step-by-step Diy Replacement Guide
Replacing the floor of your RV slide-out may seem daunting. But with a clear guide, you can do it yourself. This step-by-step DIY replacement guide will walk you through the process. You’ll learn about the tools and materials needed. Then, follow the instructions for a successful floor replacement.
Tools And Materials Needed
Before starting, gather all necessary tools and materials. This ensures a smooth process. Here’s what you’ll need:
- Measuring tape
- Pry bar
- Utility knife
- Drill and bits
- Wood glue
- Replacement flooring
- Screws
- Safety gear (gloves, goggles)
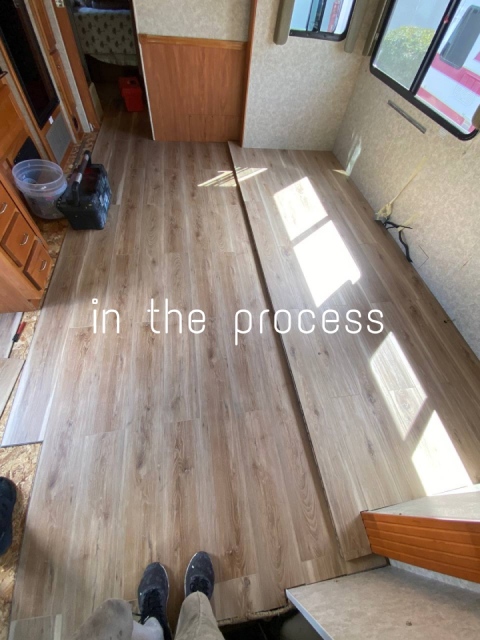
Step-by-step Instructions
Follow these steps for the replacement:
- Remove Furniture: Take out any furniture on the slide-out. This gives you a clear workspace.
- Measure the Area: Use the measuring tape. Note the dimensions of the slide-out floor.
- Remove Old Flooring: Use the pry bar and utility knife. Carefully remove the old flooring.
- Prepare the Surface: Clean the area. Ensure it’s free of debris and adhesive.
- Cut New Flooring: Cut the replacement flooring. Use your measurements for accuracy.
- Apply Wood Glue: Spread wood glue on the surface. This helps secure the new flooring.
- Install New Flooring: Lay the new flooring in place. Press firmly to ensure a good bond.
- Secure with Screws: Use screws to secure the flooring. Make sure they are evenly spaced.
- Reinstall Furniture: Once the flooring is secure, put the furniture back in place.
By following these steps, you can replace your RV slide-out floor. It takes patience and attention to detail. But the result is a sturdy, reliable floor.
Credit: custom-way.com
Tips For Reducing Costs
Replacing the floor of an RV slide-out can be expensive. To cut costs, consider some effective strategies. These tips can help you save money while ensuring quality results.
Buying Materials In Bulk
Buying materials in bulk can significantly reduce costs. Vendors often provide discounts for bulk purchases. Use this to your advantage.
Here’s a simple table to illustrate potential savings:
| Material | Price (per unit) | Bulk Price (per unit) | Potential Savings |
|---|---|---|---|
| Plywood | $30 | $25 | $5 |
| Sealant | $10 | $8 | $2 |
By buying in bulk, you ensure you have enough materials. This prevents delays and ensures consistency in quality.
Using Second-hand Materials
Second-hand materials can be a cost-effective alternative. Look for gently used items. Many are in excellent condition and much cheaper than new.
Consider these sources:
- Online marketplaces
- Local classifieds
- Garage sales
- Specialty stores
Using second-hand materials reduces waste. It also provides unique options you may not find new.
Follow these tips to find quality second-hand materials:
- Inspect for damage.
- Verify the size and fit.
- Negotiate prices.
By considering these tips, you can ensure a cost-effective and efficient RV slide-out floor replacement. Always prioritize quality to avoid future repairs.
Maintaining Your New Floor
Maintaining your new RV slide-out floor is essential for longevity and performance. Once you’ve invested in a replacement, taking care of it will save you money and stress. Let’s explore some practical tips for keeping your floor in top shape.
Preventative Maintenance Tips
Preventative maintenance is key to a long-lasting slide-out floor. Regular inspections and small fixes prevent bigger issues.
- Check for leaks: Inspect seals and weatherstripping to prevent water damage.
- Inspect the slide mechanism: Ensure smooth operation by lubricating moving parts.
- Monitor weight: Avoid overloading the slide-out to prevent stress on the floor.
Cleaning And Upkeep
Proper cleaning and upkeep keep your floor looking new and functioning well. Regular care is simple and effective.
- Vacuum regularly: Remove dirt and debris to prevent scratches.
- Use appropriate cleaners: Avoid harsh chemicals that can damage the floor.
- Wipe spills immediately: Prevent stains and water damage by addressing spills quickly.
Follow these maintenance tips to ensure your RV slide-out floor remains in excellent condition. Regular care will keep it functional and looking great for years.

Credit: thehappyglamper.co
Additional Budget-friendly Upgrades
When replacing the floor of your RV slide-out, it’s a good idea to consider other budget-friendly upgrades that can enhance the comfort and durability of your RV. These improvements can save you money in the long run and make your travel experience more enjoyable. Here are a few key upgrades to consider.
Insulation Improvements
Upgrading the insulation in your RV can improve comfort and energy efficiency. Better insulation keeps your RV warmer in winter and cooler in summer. It also reduces noise from outside. Consider these options:
- Foam board insulation: Easy to install and offers high R-value.
- Reflective insulation: Reflects heat and can be used on windows and walls.
- Spray foam: Fills gaps and cracks for airtight insulation.
Insulating your RV can lead to significant savings on heating and cooling costs over time.
Enhanced Waterproofing Solutions
Water damage is a common issue in RVs. Enhancing waterproofing can protect your investment and extend its lifespan. Consider these solutions:
| Product | Benefits |
|---|---|
| RV Roof Sealant | Prevents leaks and protects against UV rays. |
| Slide-Out Seal Protectant | Maintains the seals’ flexibility and prevents cracking. |
| Underbelly Coating | Protects against road debris and moisture. |
Using these products can prevent costly repairs and keep your RV in top condition.
Frequently Asked Questions
What Is The Cost Of Rv Slide Out Floor Replacement?
The cost of RV slide out floor replacement varies. It typically ranges from $500 to $1500, depending on materials and labor.
How Long Does Rv Slide Out Floor Replacement Take?
RV slide out floor replacement usually takes 1 to 3 days. The duration depends on the complexity and extent of damage.
Can I Replace My Rv Slide Out Floor Myself?
Yes, you can replace it yourself if you have DIY skills. However, professional help ensures better results and longevity.
What Materials Are Used For Rv Slide Out Floor Replacement?
Common materials include plywood, laminate, and vinyl. The choice depends on your budget and preference for durability.
Conclusion
Replacing an RV slide-out floor can be costly but necessary. Regular maintenance helps avoid unexpected expenses. Budgeting for repairs keeps your RV in top shape. Always seek professional advice for accurate cost estimates. Planning ahead ensures a smooth and enjoyable RV experience.
Stay informed, and your RV adventures will remain hassle-free. Prioritize quality repairs to extend your RV’s lifespan. Happy travels!


