
A leaking RV city water connection check valve can cause big problems. It may lead to water damage and other costly repairs.
Dealing with a leaking check valve is crucial for any RV owner. This small component plays a big role in maintaining water flow and pressure. Ignoring the issue can lead to significant water damage inside your RV. In this blog post, we will explore why this valve might leak and what you can do about it.
We will also provide some practical tips to help you fix the problem and prevent future leaks. Stay tuned to learn how you can keep your RV in top shape and enjoy your travels without worrying about water issues.
Identifying A Leaking Check Valve
Identifying a leaking check valve in your RV’s city water connection is essential. A leaking check valve can cause water damage and reduce water pressure. Understanding the signs of a leak and knowing the tools needed for inspection can save you time and money. This guide will help you identify a leaking check valve and provide steps to inspect it.
Signs Of A Leak
One clear sign of a leaking check valve is water dripping from the connection point. You might also notice water pooling around the base of the valve. Another sign is a sudden drop in water pressure inside your RV. If you hear a hissing sound near the valve, it could indicate a leak.
Sometimes, you may find water stains or damp spots around the connection area. These signs suggest that the check valve might be leaking. Pay close attention to any unusual water behavior in your RV. Early detection can prevent bigger problems.
Tools Needed For Inspection
To inspect the check valve, you will need a few basic tools. A flashlight can help you see into tight spaces. A wrench or pliers will help you loosen and tighten connections. A bucket or towel can catch any water that spills during inspection.
A pressure gauge can measure water pressure and help identify leaks. Having a spare check valve on hand is also wise. In case the old one needs replacement. Keep a few basic tools in your RV for such inspections. Being prepared will make the process smoother.

Credit: www.youtube.com
Causes Of Check Valve Leakage
Understanding the causes of RV city water connection check valve leakage helps in maintaining your RV’s water system. This knowledge prevents potential water damage and ensures a smooth trip.
Wear And Tear
Check valves experience regular use. Over time, this leads to wear and tear. The constant opening and closing can degrade the valve’s components. This degradation often results in leaks. Regular inspections and timely replacements help mitigate this issue.
Debris And Blockages
Small particles and debris can enter the water system. These particles can get stuck in the check valve. Blockages prevent the valve from sealing properly. This improper sealing causes leaks. Cleaning the water system regularly helps to avoid this problem.
Preparing For Repair
When your RV city water connection check valve starts leaking, it’s important to act quickly. Ensuring your valve is functioning properly prevents further damage to your RV’s water system. Before you start the repair, it’s essential to prepare thoroughly. This section will guide you through gathering necessary tools and taking safety precautions.
Gathering Necessary Tools
Having the right tools at hand is crucial for a smooth repair process. Here’s a list of tools you will need:
- Adjustable wrench
- Pipe tape
- Screwdrivers
- Replacement check valve
- Bucket or container
- Clean cloths or towels
Ensure all tools are within reach before starting the repair. This will save time and reduce frustration.
Safety Precautions
Safety is paramount when working on your RV’s water system. Follow these safety tips:
- Turn off the main water supply to your RV.
- Drain any remaining water from the system using a bucket.
- Wear protective gloves to avoid cuts and scrapes.
- Ensure the area is well-ventilated.
- Keep a first aid kit nearby in case of minor injuries.
By following these safety precautions, you can minimize risks and complete your repair more efficiently.
Step-by-step Repair Guide
Fixing a leaking check valve in your RV’s city water connection might seem daunting. But with the right guide, it’s straightforward. Follow these steps to repair the check valve and stop the leak.
Shutting Off Water Supply
First, you need to shut off the water supply to your RV. This prevents water from flowing while you work on the valve.
- Locate the main water supply valve for your RV.
- Turn the valve clockwise to shut off the water.
- Open a faucet inside the RV to release any remaining pressure.
Removing The Faulty Check Valve
Next, you will remove the faulty check valve. This step requires some tools and patience.
- Using a wrench, unscrew the check valve from the water line.
- Be careful to avoid damaging the surrounding pipes.
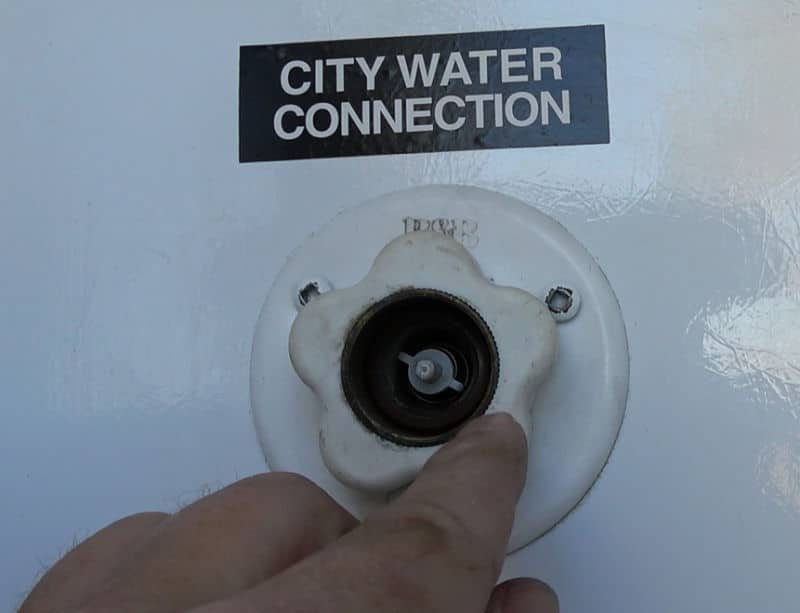
- Once removed, inspect the valve for visible damage or debris.
Installing The New Check Valve
Now, it’s time to install the new check valve. Make sure you have the correct replacement part.
- Align the new check valve with the water line.
- Use Teflon tape on the threads to ensure a tight seal.
- Screw the valve into place using a wrench.
- Tighten it until it is secure but not overly tight.
Testing The Repair
Finally, you need to test the repair to ensure the leak is fixed.
- Turn the main water supply back on by rotating the valve counterclockwise.
- Check for any leaks around the new check valve.
- Open a faucet inside the RV and observe the water flow.
- If there are no leaks and the water flows correctly, the repair is successful.
By following these steps, you can fix a leaking RV city water connection check valve efficiently.
Preventive Maintenance
Preventive maintenance plays a vital role in keeping your RV’s water connection in top shape. Regular check-ups and care can prevent leaks and ensure a smooth water supply. This section covers essential steps for maintaining your RV city water connection check valve.
Regular Inspections
Inspect your RV’s water connection check valve frequently. Look for signs of wear or damage. Check for leaks around the valve. Detecting issues early can save you from bigger problems later. Use a flashlight to see any hidden cracks or corrosion. Always ensure the valve is properly sealed.
Cleaning And Lubrication
Clean the check valve regularly to remove dirt and debris. Use a soft brush and mild soap. Rinse thoroughly and dry before reassembling. Lubricate the valve to ensure smooth operation. Use a silicone-based lubricant for best results. Avoid petroleum-based products as they can damage the valve. Regular lubrication helps prevent sticking and leaks.

Credit: www.escapeforum.org
When To Seek Professional Help
Leaking check valves in RV city water connections can be a major headache. While some issues can be fixed on your own, there are times when you must call in a professional. Knowing when to seek help can save you time and stress.
Complex Repairs
Some leaks are easy to fix. Others are not. If the leak is inside the wall, it’s a complex repair. You may need special tools. Incorrect fixes can lead to bigger problems. A professional knows how to handle these situations.
Persistent Issues
Leaks that keep coming back are a red flag. You may have fixed the symptom, not the cause. Persistent leaks can damage your RV. Water damage is costly. A professional can find the root cause and fix it for good.

Credit: www.loveyourrv.com
Frequently Asked Questions
Why Is My Rv City Water Connection Check Valve Leaking?
A leaking check valve often results from wear and tear, debris, or improper installation. Regular maintenance and inspection can prevent this issue.
How Can I Fix A Leaking Rv Check Valve?
To fix a leaking check valve, replace the faulty valve, tighten connections, and ensure proper installation. Regular maintenance helps prevent leaks.
What Are The Signs Of A Failing Rv Check Valve?
Common signs include water leaks, inconsistent water pressure, and unusual noises. Regular inspections can help identify and address issues early.
Can I Prevent My Rv Check Valve From Leaking?
Yes, regular maintenance and inspections can prevent leaks. Keep the valve clean, and ensure proper installation to avoid problems.
Conclusion
Fixing a leaking RV city water connection check valve is essential. Regular checks and maintenance help avoid bigger problems. Always inspect the connection for leaks. Replace faulty parts promptly. This will ensure a smooth and enjoyable RV experience. Remember, small leaks can lead to bigger issues.
Take action now to prevent costly repairs later. Keep your RV water system in top shape. Safe travels!


