
An RV air conditioner leaking water inside can be a frustrating problem. It can damage the interior and make trips uncomfortable.
RV owners love hitting the open road, but unexpected issues can arise. A common problem is water leaking from the air conditioner. This issue can lead to bigger troubles if not addressed quickly. Understanding the reasons behind the leaks is essential.
It helps in preventing damage and ensures a smooth journey. This blog post will explore common causes and provide solutions. You will learn how to keep your RV cool and dry. Read on to find out more about this important topic and keep your travels worry-free.
Common Causes
Experiencing water leaks from your RV air conditioner can be frustrating. Identifying the cause is key to fixing the issue. This section highlights the common causes of an RV air conditioner leaking water inside.
Clogged Drain Pipe
A clogged drain pipe is a frequent cause of water leaks. The drain pipe is responsible for directing water outside. Over time, dirt and debris can accumulate, blocking the pipe. When blocked, water backs up and leaks inside the RV.
Regular maintenance can prevent this issue. Check and clean the drain pipe periodically. Use a soft brush or compressed air to remove any blockages. Keeping the drain pipe clear ensures proper water flow and prevents leaks.
Loose Or Damaged Seals
Loose or damaged seals can also cause leaks. The seals around the air conditioner prevent water from entering your RV. Over time, seals can wear out or become loose. When this happens, water seeps through and causes leaks inside.
Inspect the seals regularly. Look for cracks, gaps, or any signs of wear. If you find any, replace the seals immediately. This simple step can help keep your RV dry and comfortable.
| Common Causes | Solutions |
|---|---|
| Clogged Drain Pipe | Clean the drain pipe |
| Loose or Damaged Seals | Inspect and replace seals |
Initial Inspections
Experiencing water leaking inside from your RV air conditioner can be frustrating. To solve this problem, start with initial inspections. Identifying the root cause early can save you time and money. Below are key areas to examine.
Check The Drain Pipe
The drain pipe is crucial for an air conditioner’s functioning. It channels condensation away from the unit. If the pipe is blocked, water can back up and leak inside your RV.
- Inspect the pipe for visible blockages.
- Ensure the pipe is not kinked or damaged.
- Use a thin wire or a pipe cleaner to remove any clogs.
Regular maintenance of the drain pipe can prevent leaks and keep your air conditioner running smoothly.
Examine The Seals
Seals around your air conditioner keep water out. Over time, they can wear out or get damaged. Damaged seals can let water seep inside your RV.
- Check the seals for any cracks or gaps.
- Feel for any loose or missing sealants around the unit.
- Replace damaged seals immediately to prevent leaks.
Ensuring the seals are intact can prevent water leakage and protect your RV’s interior.
Cleaning The Drain Pipe
Is your RV air conditioner leaking water inside? Often, the culprit is a clogged drain pipe. Cleaning the drain pipe can help fix this issue. Here’s a simple guide to help you clean the drain pipe and prevent water leaks.
Tools Needed
- Screwdriver
- Wet/Dry Vacuum
- Pipe Cleaner or Brush
- Bucket
- Rags
Step-by-step Guide
- Turn off the Air Conditioner: Safety first! Ensure the unit is off and unplugged.
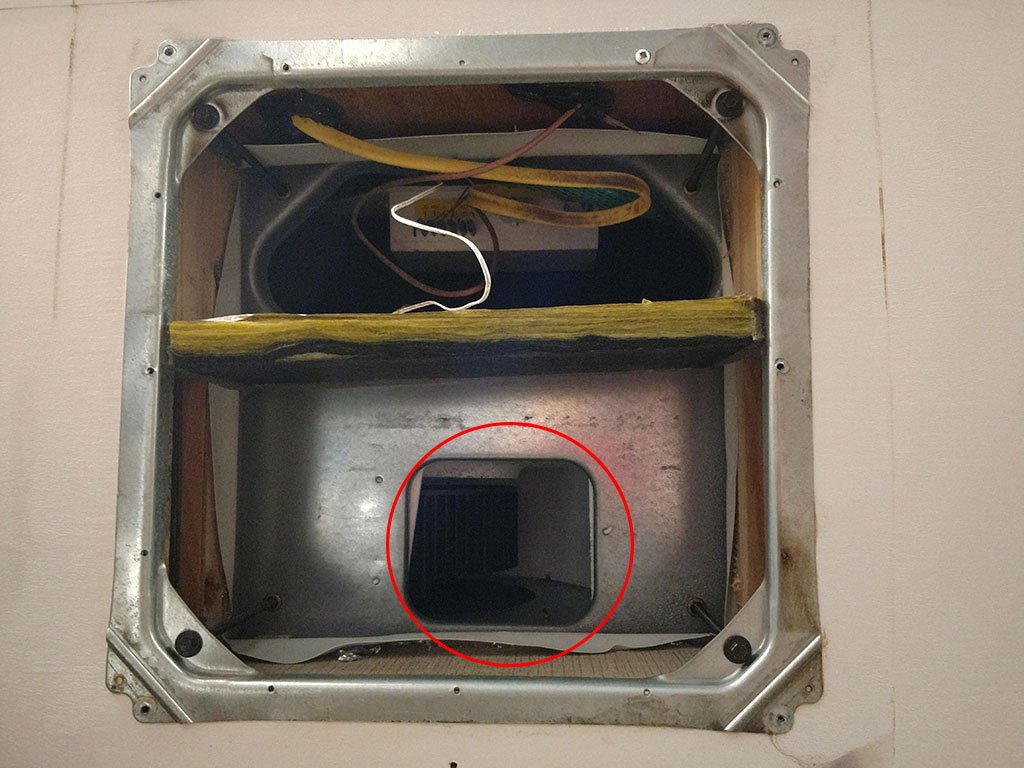
- Access the Drain Pipe: Use the screwdriver to remove the cover of the air conditioner. Locate the drain pipe.
- Check for Blockages: Inspect the pipe for any visible blockages. Use a flashlight if needed.
- Clean the Pipe: Use the pipe cleaner or brush to remove any debris. Push through the pipe gently.
- Use a Wet/Dry Vacuum: Attach the vacuum to the end of the pipe to suck out any remaining blockage. Use the bucket to collect any water.
- Dry the Area: Use rags to dry any water around the air conditioner.
- Reassemble the Unit: Place the cover back on the air conditioner and secure it with screws.
- Test the Air Conditioner: Plug in the unit and turn it on. Check for leaks.
Regularly cleaning the drain pipe can prevent water leaks inside your RV. Keep these tools handy and follow this guide to maintain a leak-free air conditioner.
Fixing Loose Seals
Experiencing water leaking from your RV air conditioner can be frustrating. One common cause is loose seals. Properly identifying and fixing these seals can save you from a lot of trouble. Ensuring the seals are tight will keep your RV dry and comfortable.
Identifying Loose Seals
First, check the edges of your air conditioner. Look for any gaps or cracks. Loose seals often show visible signs of damage. Also, feel for any drafts or air leakage. This can indicate a weak seal.
Another method is to use a flashlight. Shine it around the seals at night. If light passes through, the seal is loose. You can also use soapy water. Apply it around the seal and look for bubbles. Bubbles mean air is escaping, indicating a loose seal.
Resealing Methods
Resealing is straightforward but needs attention to detail. Here are some methods:
- Remove old sealant: Use a putty knife or scraper. Clean the area thoroughly.
- Apply new sealant: Choose a high-quality RV sealant. Apply evenly around the edges.
- Use sealant tape: This can be a quick fix. Apply the tape over the damaged seal.
- Check for leaks: After resealing, test for leaks. Use soapy water again. Look for bubbles to ensure a tight seal.
Following these steps will help you fix loose seals effectively. Keeping your RV air conditioner in good condition is key to a comfortable trip.
Replacing Damaged Seals
Is your RV air conditioner leaking water inside? It may be due to damaged seals. Replacing these seals can prevent further leaks and save you from costly repairs. Properly sealing your unit ensures efficient operation and a comfortable environment inside your RV.
Choosing The Right Sealant
Using the right sealant is crucial for the longevity of your air conditioner. Not all sealants are created equal. Some are designed specifically for RVs and provide a better seal.
Consider these factors when choosing a sealant:
- Weather resistance: Must withstand extreme temperatures.
- Flexibility: Allows for movement without cracking.
- Durability: Long-lasting and resistant to wear and tear.
Popular options include silicone-based and polyurethane-based sealants. Silicone sealants are flexible and waterproof. Polyurethane sealants are strong and durable but may be harder to apply.
Application Tips
Applying the sealant correctly is as important as choosing the right one. Follow these steps for a successful seal:
- Clean the surface: Ensure the area is free of dirt and debris.
- Remove old sealant: Use a scraper or utility knife.
- Apply new sealant: Use a caulking gun for even application.
- Smooth the sealant: Use a wet finger or tool to smooth it out.
- Let it cure: Allow the sealant to dry completely before use.
Proper application prevents leaks and ensures your RV air conditioner works efficiently. Double-check your work to ensure there are no gaps or uneven areas.
Replacing damaged seals on your RV air conditioner can be a simple yet effective solution. Choose the right sealant and apply it correctly to keep your RV cool and dry.
Preventative Maintenance
Preventative maintenance can keep your RV air conditioner from leaking water inside. Regular checks and simple routines help avoid problems and save money. Follow these easy steps to ensure your AC unit works well.
Regular Cleaning Schedule
Dust and debris build up over time. Clean the filters every two weeks. Remove the cover and wash the filters with warm, soapy water. Let them dry completely before putting them back. This keeps air flowing smoothly and prevents leaks.
Wipe down the exterior of the unit monthly. Use a damp cloth to remove dust and grime. This helps the unit work efficiently. It also reduces the chance of water leakage inside your RV.
Seal Inspection Routine
Check the seals around the AC unit often. Look for cracks or gaps. Seals can wear out and cause leaks. Use a flashlight to inspect hard-to-see areas. If you find any damage, replace the seals immediately.
Examine the roof and the area where the AC unit sits. Water can seep in through cracks. Use a high-quality sealant to fix any issues. Regular inspections keep your RV dry and comfortable.
Professional Help
Dealing with an RV air conditioner leaking water inside can be frustrating. Sometimes, you need professional help. Expert technicians can identify and fix the problem quickly. This saves you time and stress.
When To Call A Professional
Some issues need immediate professional attention. Is your RV air conditioner leaking heavily? Water damage can be serious. You should call a technician. Are you noticing electrical issues along with the leak? This is another sign to seek help. Professionals have the tools to handle these situations safely.
Choosing A Reliable Technician
Finding the right technician is important. Start by researching local services. Read reviews and ask for recommendations. Look for technicians with experience in RV air conditioners. Check their qualifications. A certified technician ensures quality work. Ask about their warranty policy. A good technician will offer a guarantee on their service.
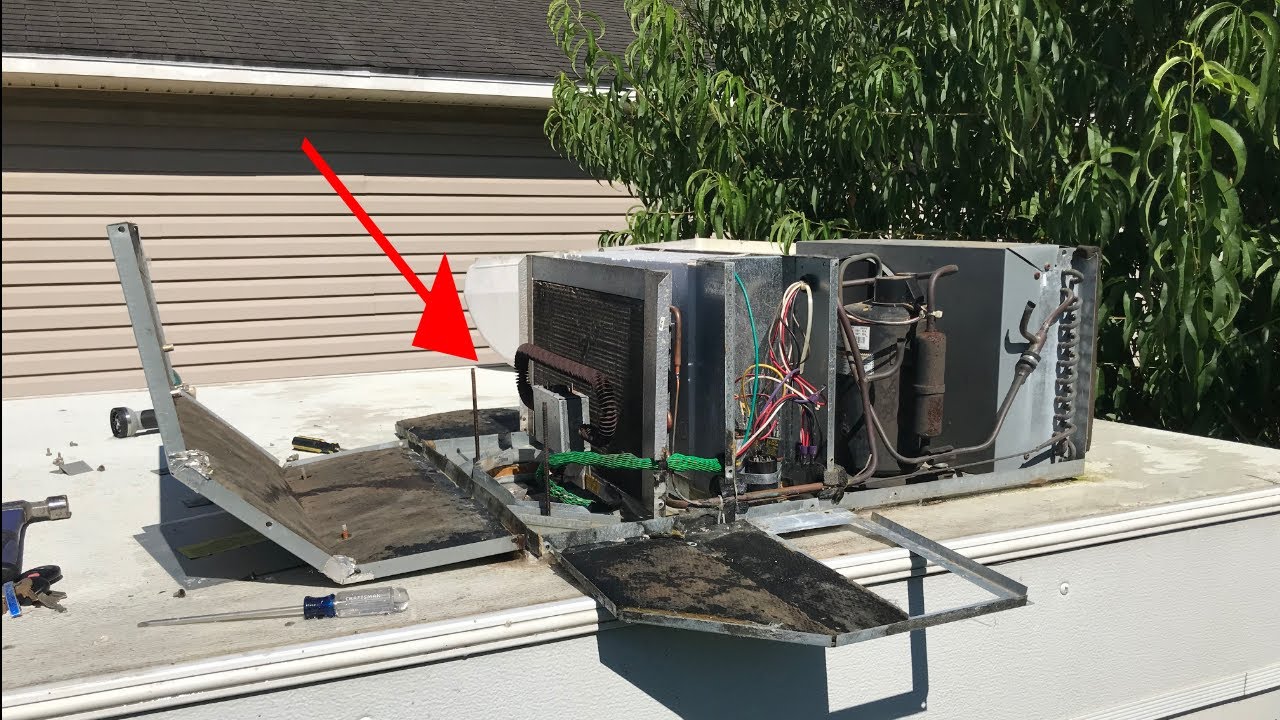
Credit: www.youtube.com
Additional Tips
Dealing with a leaking RV air conditioner can be frustrating. Fortunately, there are simple steps to prevent this issue. Here are some additional tips to help you keep your RV air conditioner working properly.
Proper Rv Leveling
Ensure your RV is level. This helps the air conditioner drain correctly. If the RV tilts, water can pool inside. Use leveling blocks or ramps to keep your RV stable and level.
Climate Considerations
Climate plays a role in air conditioner performance. In humid areas, the air conditioner works harder. This can lead to more condensation. Check and empty the water collection tray often. In dry climates, the unit might need less attention. But always keep an eye on it.
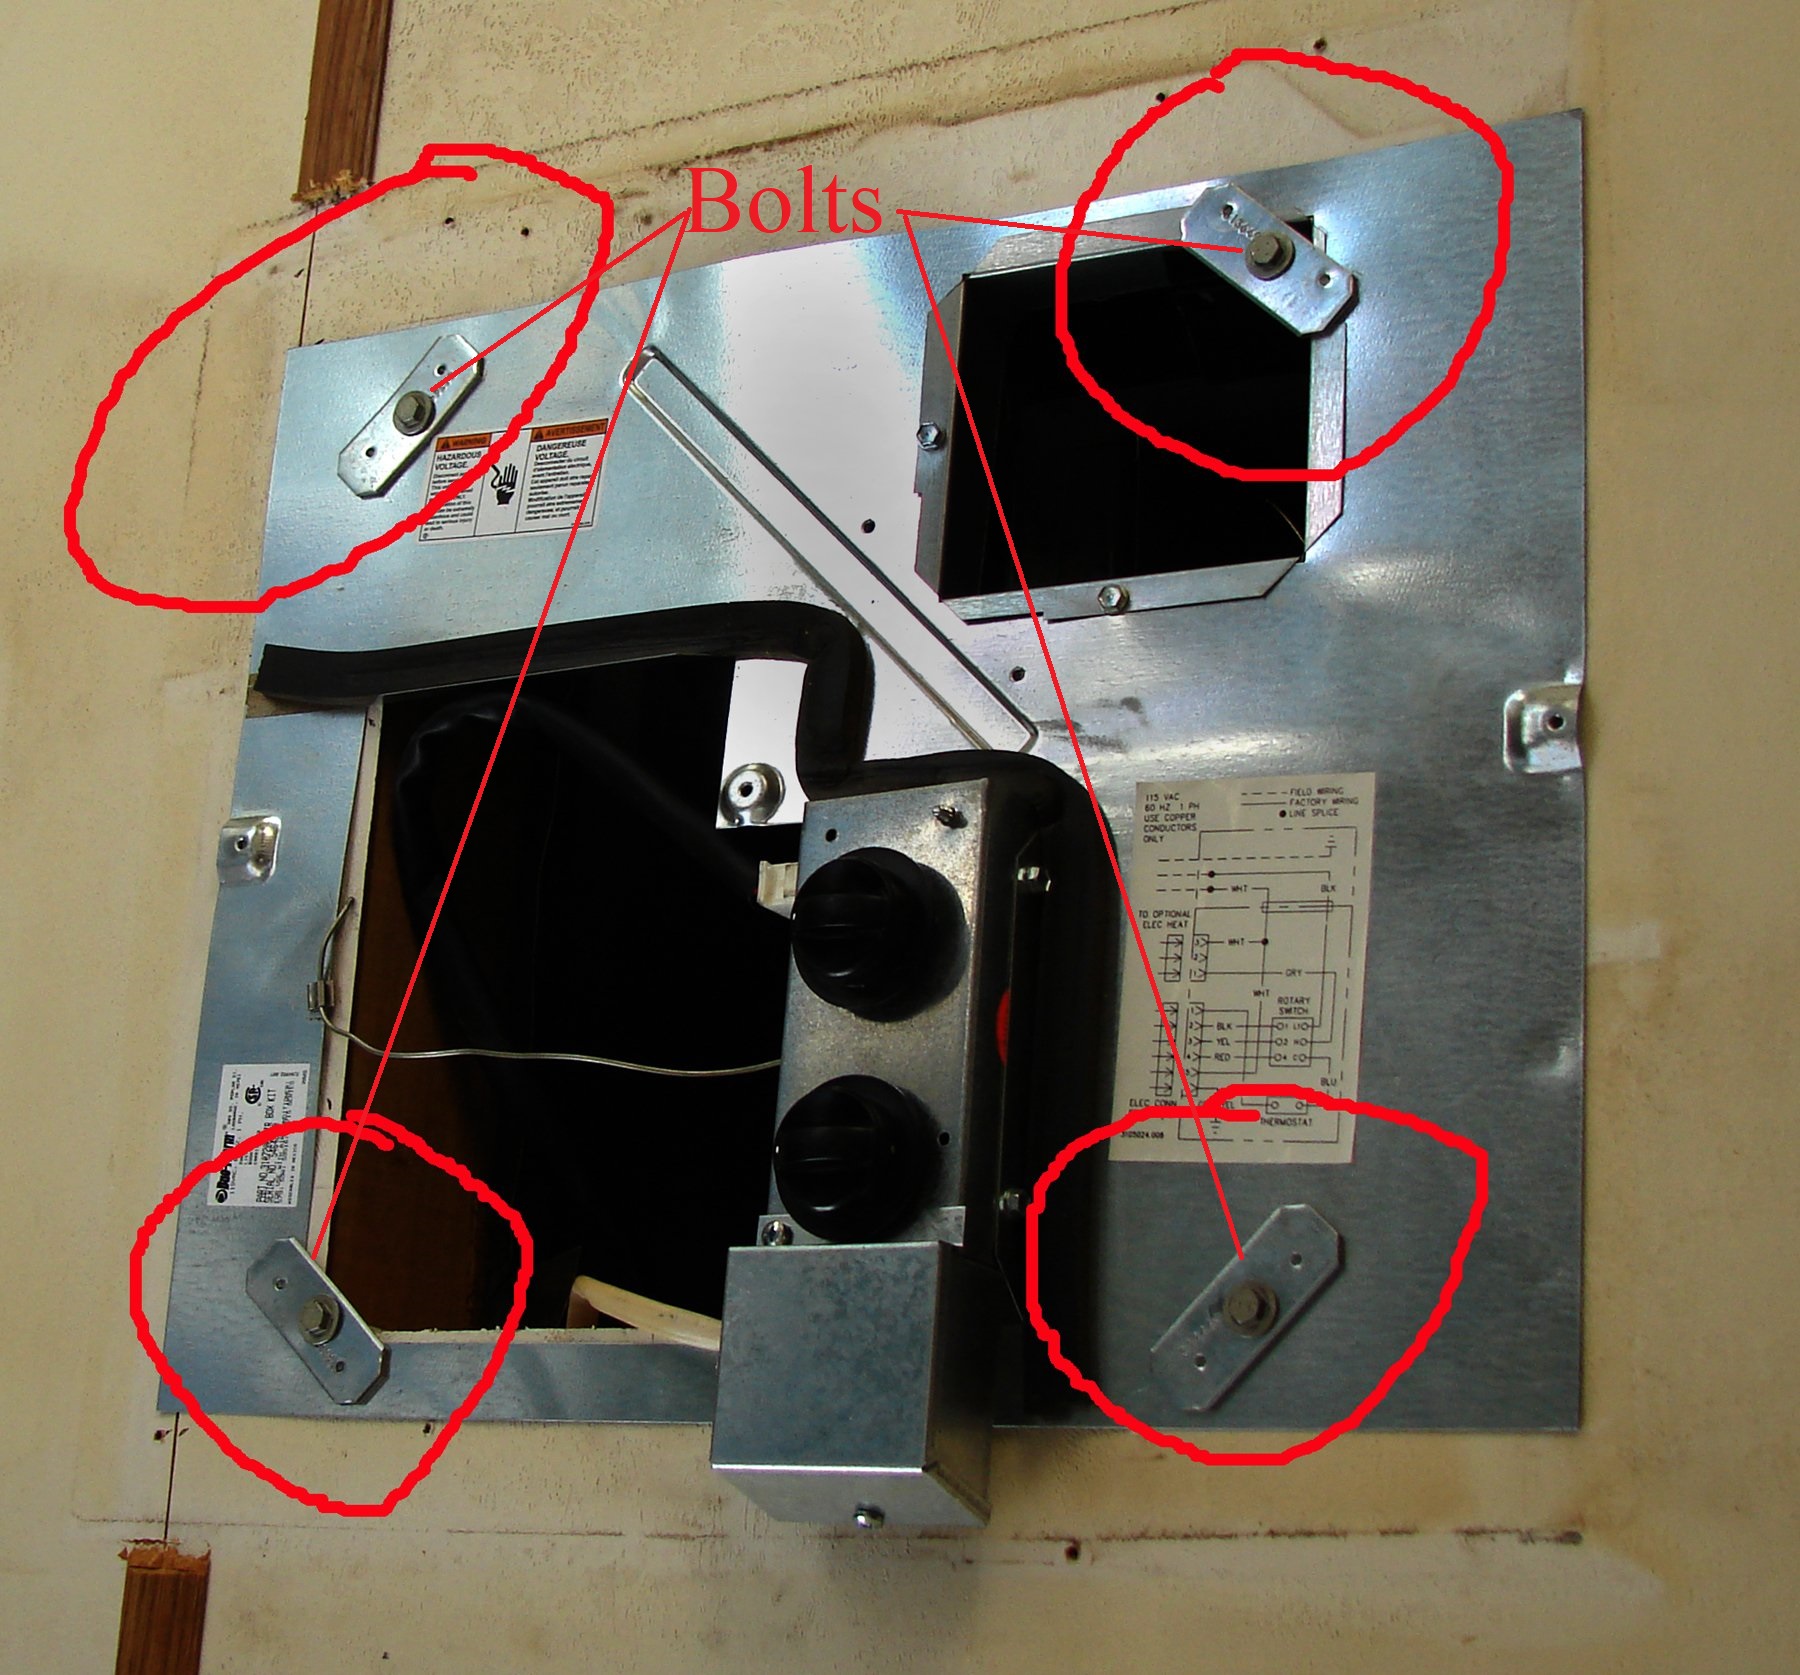
Credit: www.doityourselfrv.com
Frequently Asked Questions
Why Is My Rv Air Conditioner Leaking Water Inside?
An RV air conditioner leaks water inside due to clogged drain holes, dirty filters, or improper installation. Regular maintenance and cleaning can prevent these issues.
How Do I Fix A Leaking Rv Ac Unit?
To fix a leaking RV AC unit, clean the drain holes, replace filters, and check for proper installation. Regular maintenance helps.
Can A Dirty Filter Cause Ac Water Leaks?
Yes, a dirty filter can cause water leaks by restricting airflow. This leads to condensation buildup inside the unit.
How Often Should I Clean My Rv Ac Filters?
Clean your RV AC filters every month during heavy use. Regular cleaning prevents blockages and ensures efficient operation.
Conclusion
Fixing your RV air conditioner leak is crucial. It prevents water damage. Regular maintenance helps avoid future issues. Check for blockages and clean filters. Tighten loose connections. Address leaks promptly. Your RV’s comfort depends on it. Happy travels!


