
Outlets on one side of your RV not working? This issue can be quite frustrating.
You rely on those outlets for many daily tasks. Imagine you’re on a road trip and suddenly, half your RV outlets stop working. This situation can disrupt your plans and comfort. Why does this happen? There are several reasons, from tripped breakers to faulty wiring.
Understanding the cause can help you fix it quickly and get back to enjoying your adventure. In this post, we will explore common reasons for this problem and offer practical solutions. By the end, you’ll be better equipped to handle this common RV issue. Let’s dive in and troubleshoot this together!
Common Causes
Experiencing outlets on one side of your RV not working can be frustrating. It’s important to identify the common causes to fix the issue. Let’s discuss some possible reasons for this problem.
Tripped Circuit Breakers
One of the most common causes is tripped circuit breakers. Circuit breakers protect your RV from electrical overloads. If too many appliances run at once, the breaker can trip. This stops the flow of electricity to prevent damage. Check the breaker panel and reset any tripped breakers. If the problem continues, there could be a more serious issue.
Blown Fuses
Another common cause is blown fuses. Fuses serve as a safety device that protects the electrical circuits. They blow when there is a surge in electricity. Inspect the fuse box to see if any fuses are blown. Replace any blown fuses with the same type and rating. If replacing the fuse doesn’t solve the problem, the issue might lie deeper in the electrical system.

Credit: www.amazon.com
Initial Checks
Dealing with outlets on one side of your RV not working can be frustrating. Before diving into complex solutions, start with some initial checks. These steps are simple and can often resolve the issue quickly.
Power Source Verification
First, ensure your RV is properly connected to a power source. Check if the main power plug is securely connected. Sometimes, a loose plug can cause power issues.
| Check | Action |
|---|---|
| Power Cord Connection | Ensure the cord is firmly plugged in |
| Power Supply | Verify the power supply is active |
If the power cord and supply are fine, proceed to the next step.
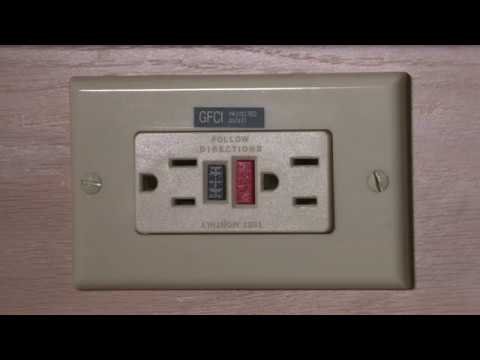
Gfci Outlet Reset
Most RVs have GFCI outlets to protect against electrical faults. If one trips, outlets on the same circuit will stop working.
- Locate the GFCI outlet, usually in the kitchen or bathroom.
- Press the reset button on the outlet.
- Check the outlets again to see if they are working.
If the reset button does not fix the issue, there might be a deeper electrical problem. Consider checking other components or seeking professional help.
Inspecting Circuit Breakers
If outlets on one side of your RV stop working, the circuit breakers might be the issue. Inspecting circuit breakers is a straightforward process. It involves checking the breaker panel and resetting any tripped breakers. This can often restore power to the affected outlets. Follow these steps to inspect and reset your RV’s circuit breakers.
Locating The Breaker Panel
First, locate the breaker panel in your RV. This panel is usually near the main door or in a storage compartment. It contains several switches, each controlling different electrical circuits in your RV.
Look for a small metal or plastic door. Open it to reveal the breaker panel. If you cannot find it, check your RV’s manual. It should have detailed instructions and a diagram showing the panel’s location.
Resetting Breakers
Once you have found the breaker panel, look for any tripped breakers. A tripped breaker will be in the middle position. It won’t be fully on or off.
To reset a tripped breaker, switch it off first. Then, turn it back on. This simple action can often restore power to the outlets on the affected side of your RV.
If the breaker trips again, there might be a deeper electrical issue. In this case, consider consulting a professional electrician for help. Regularly checking and resetting breakers can prevent many electrical issues in your RV.
Testing Outlets
Testing outlets is crucial when half of your RV’s outlets stop working. Identifying the faulty outlets requires some basic tools and a systematic approach. Below, we’ll cover the steps to test your outlets. This will help you pinpoint the issue and get your RV back to full functionality.
Using A Multimeter
A multimeter is an essential tool for testing electrical outlets. It measures voltage, current, and resistance. To test your RV outlets, set your multimeter to the AC voltage setting. Insert the probes into the outlet’s slots. The multimeter should display a reading of around 120 volts. If not, the outlet may be faulty or not receiving power.
Testing For Continuity
Testing for continuity helps identify broken connections within the outlet. Set your multimeter to the continuity setting. Place one probe on the outlet’s hot terminal and the other on the neutral terminal. A beep or a low resistance reading indicates a good connection. No sound or a high resistance reading suggests a broken circuit. Repeat this test with the ground terminal to ensure a complete check.
Examining Wiring
One of the common issues with RV outlets is wiring problems. Outlets on one side may stop working due to faulty wiring. Examining the wiring can help identify and fix the issue. This section will guide you through a visual inspection and how to address loose connections.
Visual Inspection
Start by turning off the power to the RV. Use a flashlight to inspect the outlets and wiring. Look for any burnt wires, broken connections, or other visible damage. A burnt wire might indicate an overload or short circuit. Ensure the wires are not frayed or damaged.
Check the breaker box. Verify that all breakers are in the correct position. A tripped breaker can stop power to outlets. Reset any tripped breakers and see if the outlets start working.
Addressing Loose Connections
Loose connections can disrupt the flow of electricity. Carefully unscrew the outlet covers. Examine the wires connected to the terminals. Ensure all connections are tight and secure. Loose wires can cause outlets to malfunction.
Use a voltage tester to confirm power is reaching the outlet. If there’s no power, the issue might be further up the line. Tighten any loose connections and check if the outlets work properly.
If the problem persists, consult a professional electrician. Working with electricity can be dangerous. Safety should always be a priority.

Credit: es.pinterest.com
Professional Help
Experiencing outlet issues in your RV can be frustrating. You might fix some problems on your own, but others need a professional’s expertise. Knowing when to seek professional help can save you time and ensure safety.
When To Call An Electrician
There are certain situations where you should call an electrician. If you notice a burning smell, it indicates a serious issue. Sparks or smoke from outlets are also red flags. These signs point to potential fire hazards.
If your outlets still don’t work after resetting the circuit breaker, call a professional. Continuous tripping of the circuit breaker is another sign. It usually means there’s a deeper electrical problem. Professionals can diagnose and fix it safely.
Finding A Qualified Technician
Finding a qualified technician is crucial. Start by asking for recommendations from fellow RV owners. Online reviews can also help you identify trusted electricians. Look for professionals with good ratings and reviews.
Ensure the technician is licensed and insured. This guarantees they have the right skills and knowledge. It also protects you from any liabilities during the repair process. Verify their credentials before hiring.
Check their experience with RV electrical systems. RVs have unique electrical setups compared to homes. An experienced technician will understand these differences. They can quickly identify and fix the issue.
Preventive Measures
Outlets on one side of your RV not working can be frustrating. Preventive measures can help avoid such issues and ensure your electrical system remains functional.
Regular Maintenance
Regular maintenance is key to preventing electrical issues in your RV. Inspect your outlets and wiring every few months. Look for signs of wear or damage. Replace any faulty components immediately.
Clean your outlets and plugs. Dust and debris can cause poor connections. Use a soft brush or cloth. Avoid using water or liquids. Check for loose connections. Tighten any screws or fittings. Regular checks can help you spot problems early.
Surge Protectors
Surge protectors can protect your RV’s electrical system. They prevent damage from power surges. Use a surge protector for your main power supply. This will safeguard all your outlets and appliances.
Choose a surge protector with a high joule rating. This ensures better protection. Install it properly and check it regularly. Surge protectors can wear out over time. Replace them as needed.
These preventive measures can help keep your RV’s electrical system in good working order. Regular maintenance and surge protectors are simple steps that can prevent bigger problems down the road.
Safety Precautions
When dealing with electrical problems in your RV, safety must be your top priority. Outlets not working on one side of the RV can pose serious risks. Following safety precautions is essential to protect yourself and your RV.
Turning Off Power
Always turn off the power before beginning any electrical work. This prevents accidental shocks and further damage to your RV. Locate the main power switch or disconnect the RV from its power source. Verify that the power is off by checking that devices do not turn on.
Using Insulated Tools
Use insulated tools to protect yourself from electrical shocks. Insulated tools have handles covered in non-conductive materials. These tools are designed to safeguard you while working with electrical components. Ensure your tools are in good condition. Damaged tools can be dangerous.

Credit: www.amazon.com
Frequently Asked Questions
Why Are Outlets On One Side Of My Rv Not Working?
Outlets on one side of your RV may not work due to a tripped breaker, blown fuse, or loose wiring. Check the RV’s electrical panel and reset any tripped breakers. Inspect and replace any blown fuses. If the issue persists, consult a professional electrician.
How Do I Reset A Tripped Breaker In My Rv?
Locate the electrical panel in your RV. Identify the tripped breaker, which will be in the “off” position. Switch it completely to “off” and then back to “on”. This should restore power to the affected outlets. If the breaker trips again, there may be an underlying issue.
Can A Blown Fuse Cause Rv Outlets To Stop Working?
Yes, a blown fuse can cause RV outlets to stop working. Check your RV’s fuse panel and identify any blown fuses. Replace them with the correct type and rating. If fuses keep blowing, there might be a deeper electrical problem that needs professional attention.
What Should I Do If Rv Outlets Are Still Not Working?
If RV outlets are still not working, check all connections and wiring for damage. Ensure all breakers and fuses are functioning. If the issue persists, consult a professional electrician for a thorough inspection and repair.
Conclusion
Resolving outlets issues on one side of your RV can seem daunting. Simple checks help. Start with the breaker panel. Look for tripped breakers. Reset them if needed. Examine the GFCI outlet. Press the reset button. Inspect connections and wiring.
Seek professional help if unsure. Regular maintenance prevents future problems. Enjoy a hassle-free RV experience. Safe travels!


