
Connecting your motorhome RV battery might seem tricky at first. A clear picture can make the process much easier.
Understanding how to hook up an RV battery is crucial for your travels. This ensures your motorhome has the power it needs for various appliances and systems. By following a clear guide with pictures, you’ll find the process less intimidating.
In this post, we’ll break down the steps to hook up your RV battery. We’ll provide simple instructions and helpful images to guide you. Whether you’re a beginner or need a refresher, this guide will help you connect your RV battery confidently. Let’s get started on making your motorhome adventures smooth and worry-free!

Credit: five2go.com
Introduction To Rv Battery Setup
Getting your RV battery set up correctly is crucial. A proper setup ensures your motorhome runs smoothly. This guide will help you understand the basics.
Importance Of Proper Hook Up
Proper hook up of your RV battery is important. It ensures safety and longevity. Incorrect connections can cause damage. You may also face power issues.
Correct installation helps in maintaining battery health. It provides a stable power supply to your motorhome. Your appliances will run without interruption.
Safety Precautions
Safety must be your top priority during installation. Always wear protective gear. Gloves and goggles are essential.
Follow the manufacturer’s instructions. This will prevent mishaps. Also, avoid working near flammable materials.
- Check for any damages on the battery.
- Ensure the area is well-ventilated.
- Keep children and pets away.
Here’s a simple checklist for safety:
| Safety Measure | Description |
|---|---|
| Wear Protective Gear | Gloves and goggles |
| Check for Damage | Inspect the battery |
| Ventilation | Ensure proper airflow |
| Keep Area Clear | No flammable materials |

Credit: www.pinterest.com
Types Of Rv Batteries
Choosing the right RV battery is essential for your motorhome’s performance. Different types of batteries have unique features and benefits. Understanding these types will help you make an informed decision.
Lead-acid Batteries
Lead-acid batteries are the most common type used in RVs. They are reliable and cost-effective. There are two main types of lead-acid batteries:
- Flooded Lead-Acid Batteries: These require regular maintenance. You need to check the water levels and keep them clean.
- Sealed Lead-Acid Batteries: These are maintenance-free. They are also known as AGM (Absorbent Glass Mat) batteries.
Lead-acid batteries have a shorter lifespan compared to other types. They are also heavier and take longer to charge. But they are a good choice for budget-conscious RVers.
Lithium-ion Batteries
Lithium-ion batteries are becoming increasingly popular. They offer many advantages over lead-acid batteries:
- They have a longer lifespan. They can last up to 10 years.
- They are lightweight and compact.
- They charge faster and have a higher energy density.
Lithium-ion batteries are more expensive upfront. But their long-term benefits often outweigh the initial cost. They are a great option for those who value efficiency and longevity.
| Feature | Lead-Acid Batteries | Lithium-Ion Batteries |
|---|---|---|
| Cost | Lower | Higher |
| Lifespan | Shorter | Longer |
| Weight | Heavier | Lighter |
| Maintenance | Higher | Lower |
Choose the battery that best fits your needs and budget. Both lead-acid and lithium-ion batteries have their pros and cons. Consider your priorities and make the best choice for your RV adventures.
Tools And Materials Needed
When planning to hook up your motorhome RV battery, having the right tools and materials is crucial. This ensures a smooth and efficient process. Below, we outline the essential tools and recommended materials needed for a successful battery hook-up.
Essential Tools
To begin, gather these essential tools:
- Screwdrivers: Both flathead and Phillips types are necessary.
- Wrench Set: Different sizes to fit various bolts and nuts.
- Wire Strippers: For removing insulation from the battery cables.
- Multimeter: To check the voltage and ensure connections are secure.
- Protective Gloves: Safety first, to avoid injuries from sharp edges or electrical shocks.
Recommended Materials
Besides tools, you will need these materials:
- Battery Cables: Ensure they are the correct length and gauge.
- Battery Terminals: Connect the cables securely to the battery posts.
- Electrical Tape: To secure and protect connections.
- Cable Ties: For organizing and securing cables.
- Corrosion Inhibitor: Apply on terminals to prevent corrosion.
With these tools and materials ready, your motorhome RV battery hook-up will be straightforward and safe.

Credit: www.youtube.com
Preparing The Battery Compartment
Before installing a motorhome RV battery, prepare the battery compartment. This ensures a smooth and safe installation. Follow these steps to get the compartment ready.
Cleaning The Compartment
First, clean the battery compartment. Remove any dirt, dust, or debris. This helps prevent any electrical issues. Use a brush or a vacuum to clean the area thoroughly. Wipe it down with a damp cloth.
Ensure the compartment is dry before placing the battery. Moisture can cause corrosion and damage. A clean compartment ensures a better connection and longer battery life.
Inspecting For Damage
Next, inspect the compartment for damage. Check for any signs of rust or corrosion. Look at the battery tray and connections. If you see any damage, repair it before proceeding.
Examine the cables and terminals. They should be free of cracks or fraying. Replace any damaged parts to ensure a secure connection. This step is crucial for safe battery installation.
Connecting The Batteries
Connecting the batteries in your motorhome or RV is a crucial task. The right setup ensures a steady power supply and extends the life of your batteries. Whether you’re a seasoned RV owner or a beginner, understanding the connection process is essential.
Series Vs. Parallel
When connecting RV batteries, you have two main options: series and parallel.
Series Connection: This increases the voltage while keeping the same capacity. For example, connecting two 6V batteries in series will give you 12V.
Parallel Connection: This keeps the voltage the same but increases the capacity. For instance, connecting two 12V batteries in parallel will still give you 12V but with double the capacity.
Step-by-step Connection Process
Follow these steps to connect your RV batteries:
- Ensure the RV is turned off. Safety first.
- Identify the positive and negative terminals on each battery.
- For series connection:
- Connect the positive terminal of the first battery to the negative terminal of the second battery.
- Use a jumper wire for the connection.
- The remaining positive and negative terminals will connect to your RV.
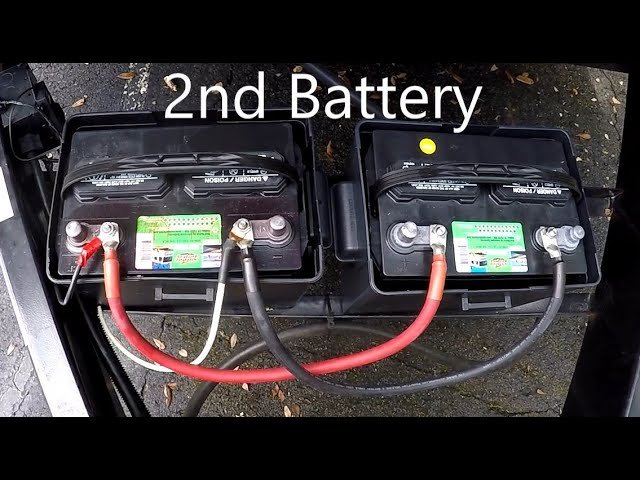
- For parallel connection:
- Connect the positive terminals of both batteries together.
- Connect the negative terminals of both batteries together.
- Use jumper wires for these connections.
- Attach the RV’s positive and negative cables to the respective terminals.
- Double-check all connections for tightness and security.
- Turn on your RV to test the setup.
By following these steps, you will ensure a reliable power supply for your motorhome adventures.
Securing The Batteries
Properly securing the batteries in your motorhome RV is crucial. It ensures safety and extends battery life. Batteries should be stable and protected to avoid any damage. Let’s dive into the steps for securing the batteries effectively.
Using Battery Trays
Battery trays are essential for holding the batteries in place. They prevent movement during travel. Choose a tray that fits your battery size. Secure the tray to the RV floor using bolts. Ensure the tray is tight and does not wobble. Place the battery in the tray and fasten it with straps or clamps. This setup keeps the battery stable and safe.
Applying Terminal Covers
Terminal covers protect the battery terminals from debris and moisture. They also prevent accidental short circuits. First, clean the battery terminals with a brush. Slide the terminal covers over the terminals. Ensure the covers fit snugly. This simple step adds an extra layer of protection. It keeps your battery connections clean and secure.
Testing The Setup
After hooking up your motorhome RV battery, testing the setup is crucial. This ensures everything works well and safely. Proper testing helps you avoid issues during your travels.
Voltage Testing
Start by checking the voltage of your RV battery. Use a digital multimeter for accurate results. Set the multimeter to DC voltage. Attach the positive lead to the battery’s positive terminal. Next, connect the negative lead to the negative terminal. A fully charged battery should read around 12.6 volts. If the reading is lower, your battery may need charging.
Load Testing
Load testing is another important step. This test shows how well your battery performs under load. Use a battery load tester for this purpose. Connect the tester to the battery terminals. Apply a load equal to half the battery’s CCA (Cold Cranking Amps) rating. The voltage should stay above 9.6 volts during the test. If it drops below this, the battery might be weak or faulty.
Maintaining Your Rv Batteries
Maintaining your RV batteries is essential for a smooth and reliable journey. Proper care ensures they last longer and perform better. Here are some tips on how to keep your RV batteries in top shape.
Regular Inspection
Regular inspection of your RV batteries is crucial. Check for any signs of wear or damage. Look for corrosion on the terminals. Clean them if needed. Ensure all connections are tight and secure.
- Inspect batteries every month.
- Check electrolyte levels if using lead-acid batteries.
- Look for cracks or bulges in the battery case.
Proper Storage Tips
Proper storage of your RV batteries can extend their life. Store them in a cool, dry place. Keep them fully charged when not in use. If possible, disconnect them to prevent drain.
- Store at temperatures between 32°F and 80°F.
- Charge batteries fully before storage.
- Disconnect from the RV to avoid parasitic drain.
Follow these tips to ensure your RV batteries are always ready for your next adventure.
Troubleshooting Common Issues
Experiencing issues with your motorhome RV battery hook up? It’s common to face some challenges. Here, we will discuss how to troubleshoot these problems effectively.
Battery Not Charging
A common issue is the battery not charging. First, check all connections. Loose or damaged cables can prevent charging. Ensure all terminals are tight and secure. Next, inspect the battery itself. A dead or faulty battery won’t hold a charge. Test the battery with a multimeter. If the voltage is low, consider replacing it.
Corrosion Problems
Corrosion can affect the battery’s performance. Check the terminals for any buildup. Corrosion appears as a white, powdery substance. Clean the terminals using a mixture of baking soda and water. Use a brush to scrub the terminals gently. Rinse with clean water and dry thoroughly. Apply a terminal protector to prevent future corrosion.
Frequently Asked Questions
How Do I Hook Up My Rv Battery?
First, connect the positive cable to the positive terminal. Then, connect the negative cable to the negative terminal. Ensure all connections are tight.
Can I Use A Car Battery In My Rv?
No, RVs require deep cycle batteries. Car batteries provide short bursts of energy, whereas RV batteries provide sustained power.
What Type Of Battery Is Best For Motorhomes?
Deep cycle batteries are best. They provide consistent power over long periods, ideal for RV applications.
How Often Should I Check My Rv Battery?
Check your RV battery monthly. Regular checks help maintain battery health and prevent unexpected failures.
Conclusion
Hooking up your motorhome RV battery is essential for smooth trips. Proper connections ensure reliable power. Follow the steps outlined to avoid issues. Always prioritize safety while working with batteries. Regular checks can prevent problems. Keep a simple guide handy for quick reference.
Enjoy your travels with confidence, knowing your battery setup is correct. Safe journeys and happy camping!


