

Removing a propane tank from an RV seems tricky but is simple. Safety first is key.
Propane tanks power many RV appliances, from stoves to heaters. Knowing how to remove them safely is crucial for RV maintenance. This task, while essential, can be done by anyone with basic knowledge and the right steps. In this blog, we’ll guide you through the process, ensuring your safety and the proper handling of your propane tank.
Follow these steps to make sure your RV stays in top condition and you stay safe on your travels. Ready to learn? Let’s get started!
Safety Precautions
Removing a propane tank from an RV requires careful attention to safety. Propane is a flammable gas, and mishandling it can be dangerous. Follow these safety precautions to ensure a safe and successful removal process.
Wear Protective Gear
Always wear protective gear before removing the propane tank. This includes:
- Gloves to protect your hands from potential burns and cuts.
- Safety goggles to shield your eyes from any gas that might escape.
- Long sleeves and pants to cover your skin from any accidental contact with propane.
Check For Leaks
Before you start, ensure there are no leaks in the tank. Here’s how:
- Turn off all propane appliances in the RV.
- Shut off the propane valve on the tank.
- Mix a solution of soap and water.
- Apply the solution to the valve and connections.
- Look for bubbles which indicate a leak.
If you find any leaks, do not proceed. Contact a professional for assistance.

Credit: www.youtube.com
Gather Necessary Tools
Before you start removing your propane tank from your RV, it’s important to gather the necessary tools. Having the right tools on hand will make the process smoother and safer. Let’s look at the essential tools you will need.
Wrenches And Pliers
First, you’ll need a set of wrenches. These will help you loosen the connections. Make sure to have both adjustable and fixed wrenches. Pliers are also crucial. They help grip and turn smaller parts. Both tools ensure you have a firm hold on the fittings.
Propane Leak Detector
A propane leak detector is a must. This tool helps you find any gas leaks. Safety is key, and this tool ensures you avoid dangerous situations. Before you remove the tank, check for leaks. Use the detector around all connections and fittings.
Turn Off Propane Supply
Removing a propane tank from your RV starts with turning off the propane supply. This step is crucial for safety. It ensures no gas leaks during the removal process. Follow these simple steps to turn off the propane supply effectively.
Locate The Valve
First, find the propane tank on your RV. Typically, it’s mounted on the exterior, often in a compartment. Look for the valve, which is usually on top of the tank. The valve controls the gas flow.
Close The Valve
Once you locate the valve, turn it clockwise to close it. This stops the flow of propane from the tank. Ensure the valve is tightly closed to prevent leaks. Double-check the valve to confirm it is fully shut.

Credit: www.amazon.com
Disconnect The Propane Tank
Removing a propane tank from your RV may seem challenging. But with the right steps, it can be straightforward and safe. One important step is disconnecting the propane tank. This process involves a few simple tasks. Let’s break them down.
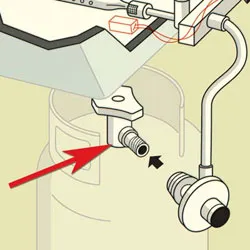
Unscrew The Regulator
First, you need to unscrew the regulator. The regulator controls the flow of propane from the tank. Find the regulator attached to the tank. Use a wrench to loosen the connection. Turn the wrench counterclockwise. Once loose, unscrew the regulator by hand.
Remove The Hose
Next, you need to remove the hose. The hose connects the regulator to the RV’s propane system. Start by inspecting the hose for any damage. Then, use the wrench again. Loosen the connection between the hose and the regulator. Turn the wrench counterclockwise. Finally, disconnect the hose by hand.
Remove The Tank From Mount
Removing a propane tank from your RV can seem challenging. But with a few simple steps, you can do it safely and quickly. This guide will walk you through the process to ensure you handle everything correctly.
Release The Clamps
First, locate the clamps that hold the propane tank in place. These are usually found around the base of the tank. Use a wrench or screwdriver to loosen the clamps. Turn them counterclockwise to release their grip. Make sure the tank is stable while you do this.
Once the clamps are loose, you can remove them. Place them in a safe spot. You will need them later to secure the new tank.
Lift The Tank
After releasing the clamps, you can lift the tank. Use both hands to get a firm grip. Be cautious, as the tank might be heavy. Lift with your legs, not your back, to avoid injury.
Place the tank on a flat surface. Make sure it is secure and will not roll away. Now, your propane tank is free from its mount, ready for whatever comes next.
Inspect The Tank
Before removing a propane tank from your RV, you must first inspect the tank. This process ensures safety and prevents accidents. A thorough inspection helps identify any potential issues that could cause harm.
Check For Damage
Carefully inspect the tank for any signs of damage. Look for dents, rust, or corrosion. Use a flashlight to check hard-to-see areas. If you find any damage, do not attempt to use or remove the tank. Instead, contact a professional for assistance.
| Inspection Area | What to Look For |
|---|---|
| Surface | Dents, rust, corrosion |
| Valve | Leaks, cracks |
| Hoses | Wear, tear |
Ensure Proper Disposal
Proper disposal of a propane tank is crucial. Never dispose of it in regular trash. Contact your local waste management authority for guidance.
Here are some options for disposal:
- Recycling centers
- Hazardous waste disposal sites
- Propane suppliers
Each option ensures the tank is safely disposed of, protecting the environment and the community.
Install A New Tank
Once you’ve removed your old propane tank, it’s time to install a new tank. This process is crucial for ensuring your RV has a safe and steady supply of propane. Follow these steps to make sure your new tank is installed correctly and securely.
Position The Tank
First, find the correct spot for the new tank. The tank should sit in the designated area where the old one was. Make sure it is level and stable. A wobbly tank can be dangerous. Check that all connections are within reach.
Next, align the tank’s valve with the regulator. This makes it easier to connect later. Ensure there is enough space around the tank. This allows for proper ventilation and easy access for maintenance.
Secure With Clamps
Once the tank is in position, you need to secure it with clamps. Use the provided clamps that came with your RV or new tank. Tighten the clamps around the tank to hold it firmly in place. This prevents any movement during travel.
Check the clamps for any signs of wear and tear. Replace old or rusty clamps immediately. A secure tank is essential for safety. Double-check that all clamps are tightened properly.
Finally, test the stability of the tank. Give it a gentle shake to ensure it does not move. If the tank shifts, readjust the clamps and tighten them again. Your tank should now be secure and ready for use.
Reconnect The Propane System
After removing the old propane tank, you need to reconnect the propane system. This process ensures your RV has a steady supply of propane. Follow these steps to safely and efficiently reconnect the propane system.
Attach The Hose
First, locate the propane hose. Ensure it is clean and free from debris. Align the hose connector with the propane tank valve. Push the hose connector into the valve. Turn the connector clockwise to secure it in place. Make sure it is tight but not overly forced.
Tighten The Regulator
Next, find the regulator on the hose. The regulator controls the propane flow. Use a wrench to tighten the regulator. Turn it clockwise until it is snug. This ensures a secure connection and prevents leaks. Double-check to ensure all connections are secure.
Test The Connection
Testing the connection of your propane tank ensures safety and efficiency. Proper connections prevent leaks and guarantee a smooth propane flow. This guide will help you test the connection step by step.
Turn On The Valve
First, locate the propane tank valve. It is usually on top of the tank. Turn the valve counterclockwise to open it. This allows propane to flow from the tank. Be gentle to avoid damaging the valve.
Check For Leaks
Once the valve is open, you need to check for leaks. Leaks are dangerous and can cause harm. Use a simple soap and water solution to check. Mix equal parts of liquid soap and water in a spray bottle.
Spray the solution on all connections and fittings. Look for bubbles forming around the connections. Bubbles indicate a leak. If you see bubbles, turn off the valve immediately. Tighten the connections and try again.
If leaks persist, the hose or connection may need replacement. Always prioritize safety and fix leaks promptly.
Credit: www.admiralpropane.com
Frequently Asked Questions
How Do You Safely Disconnect A Propane Tank?
First, turn off the RV’s propane supply valve. Then, disconnect the regulator from the tank. Always check for leaks.
What Tools Are Needed To Remove A Propane Tank?
You usually need a wrench to loosen the fittings. Gloves and safety goggles are recommended for protection.
Can I Remove A Propane Tank By Myself?
Yes, but ensure you follow safety protocols. If unsure, consult a professional.
How Often Should Rv Propane Tanks Be Replaced?
Generally, replace RV propane tanks every 10-12 years. Always check the tank’s expiration date for safety.
Conclusion
Removing a propane tank from your RV is a simple task. Follow these steps carefully to ensure safety. Always wear protective gloves and eyewear. Double-check for any gas leaks before disconnecting. Secure the tank properly once removed. Now, you can enjoy your RV adventures safely.
Practice these steps, and it will become routine. Stay safe and happy travels!


