
Connecting your motorhome RV battery can be tricky. A clear diagram helps.
This guide will show you how to hook up your RV battery safely and correctly. Understanding how to connect your RV battery is crucial for every motorhome owner. A detailed diagram not only makes the process easier but also ensures you do it right the first time.
In this post, we’ll explain each part of the battery hookup process, step by step. Whether you’re a seasoned RV enthusiast or a beginner, this guide will help you connect your battery with confidence. Ready to get started? Let’s dive into the details and make sure your motorhome is powered up and ready for your next adventure.
Credit: ca.renogy.com
Introduction To Rv Battery Hook Up
Setting up your RV battery correctly is crucial for a smooth journey. A well-connected battery ensures your motorhome functions efficiently. This guide will help you understand the basics of RV battery hook up.
Importance Of Proper Setup
A proper RV battery setup is essential for several reasons. It ensures the longevity of your battery. It also prevents electrical issues in your RV. A good setup means your appliances work smoothly. Your lights, fridge, and other electronics will function without interruptions. Proper setup also avoids draining your battery too fast.
Safety Precautions
Safety is paramount when dealing with RV batteries. Always wear protective gear like gloves and goggles. Ensure the battery is off before starting any work. Keep flammable materials away from the battery area. Use the correct tools for connecting wires. Double-check all connections to prevent short circuits. Follow the manufacturer’s guidelines for the best results. Regularly inspect the battery for leaks or damage.
Types Of Rv Batteries
Choosing the right RV battery is essential for your motorhome’s performance. Different types of RV batteries offer various benefits. Each has unique features and maintenance needs. Let’s explore the common types of RV batteries.
Lead-acid Batteries
Lead-acid batteries are the most traditional type. They come in two main types: flooded and sealed. Flooded lead-acid batteries require regular maintenance. You need to check water levels often. Sealed lead-acid batteries are maintenance-free. They last a bit longer than flooded ones. Lead-acid batteries are affordable. They are easy to find at most stores. They have a shorter lifespan compared to other types.
Lithium-ion Batteries
Lithium-ion batteries are newer technology. They are lighter and more efficient. Lithium-ion batteries charge faster. They also have a longer lifespan. These batteries are more expensive upfront. They require less maintenance over time. Lithium-ion batteries are safer. They are less likely to overheat. They are great for those who need reliable power. They work well for long trips.
Tools And Materials Needed
Connecting a motorhome RV battery can seem daunting. With the right tools and materials, it becomes a manageable task. This section covers everything you need to ensure a successful battery hook-up.
Required Tools
- Screwdrivers: Both flathead and Phillips screwdrivers are essential.
- Wrench Set: A set of wrenches to handle various bolt sizes.
- Wire Cutters: For trimming and cutting wires to length.
- Wire Strippers: To remove insulation from the ends of wires.
- Multimeter: To test the voltage and ensure connections are correct.
- Battery Terminal Cleaner: To clean the battery terminals thoroughly.
- Safety Gear: Gloves and safety glasses to protect yourself.
Necessary Materials
- Battery: Ensure it matches the specifications of your RV.
- Battery Cables: High-quality cables to connect the battery to the RV.
- Connectors: Various connectors for securing cable ends.
- Fuse Box: To protect the electrical system from short circuits.
- Electrical Tape: For insulating and securing wire connections.
- Battery Terminals: Connectors to attach cables to the battery posts.
| Tool | Function |
|---|---|
| Screwdrivers | For loosening and tightening screws |
| Wrench Set | For securing bolts |
| Wire Cutters | For cutting wires |
| Wire Strippers | For removing wire insulation |
| Multimeter | For measuring voltage |
| Battery Terminal Cleaner | For cleaning battery terminals |
| Safety Gear | For personal protection |
Preparing The Rv For Battery Installation
Preparing your RV for battery installation is a crucial task. It ensures your motorhome runs smoothly. This guide will help you understand the essential steps for a successful setup.
Choosing The Installation Location
Select a dry and ventilated area for the battery. Avoid places with extreme heat. The location should be easy to access. This will make maintenance simpler. Check the owner’s manual for recommended spots.
Ensure the battery is close to the power connections. This reduces the length of cables needed. Shorter cables reduce power loss. They also help in keeping the setup tidy.
Disconnecting Existing Power
Safety first! Disconnect the RV from any external power source. Turn off all appliances and lights. This prevents any accidental shocks. Remove the negative cable from the old battery first. This minimizes the risk of sparks.
Next, remove the positive cable. Take care not to touch the terminals together. Use insulated tools for added safety. Store the cables in a safe place while working.
Connecting The Batteries
Connecting the batteries in your RV or motorhome is essential for a reliable power supply. Proper connections ensure that you can enjoy all the comforts of home while on the road. This section will guide you through the process of connecting your RV batteries.
Series Vs. Parallel Connections
Understanding the difference between series and parallel connections is crucial. These two methods affect the voltage and capacity of your battery setup.
Series connections increase the voltage but keep the capacity the same. For example, connecting two 12V batteries in series results in 24V.
Parallel connections maintain the voltage but increase the capacity. Connecting two 12V batteries in parallel results in 12V, but with double the capacity.
Step-by-step Connection Process
Follow these steps to safely connect your RV batteries:
- Safety first: Wear protective gear and ensure the RV is off.
- Identify battery terminals: Locate the positive (+) and negative (-) terminals on each battery.
- Choose connection type: Decide if you need a series or parallel connection.
- Connect batteries: Use appropriate cables based on your connection choice.
Here’s a detailed breakdown of each step:
| Step | Series Connection | Parallel Connection |
|---|---|---|
| Step 1 | Connect the positive terminal of Battery 1 to the negative terminal of Battery 2. | Connect the positive terminal of Battery 1 to the positive terminal of Battery 2. |
| Step 2 | Connect the positive terminal of Battery 2 to the RV’s positive cable. | Connect the negative terminal of Battery 1 to the negative terminal of Battery 2. |
| Step 3 | Connect the negative terminal of Battery 1 to the RV’s negative cable. | Connect the RV’s positive cable to the positive terminal of Battery 1. |
| Step 4 | Ensure all connections are tight and secure. | Connect the RV’s negative cable to the negative terminal of Battery 1. |
Remember to double-check all connections before turning on the power. Proper setup ensures a safe and efficient power system for your RV or motorhome.
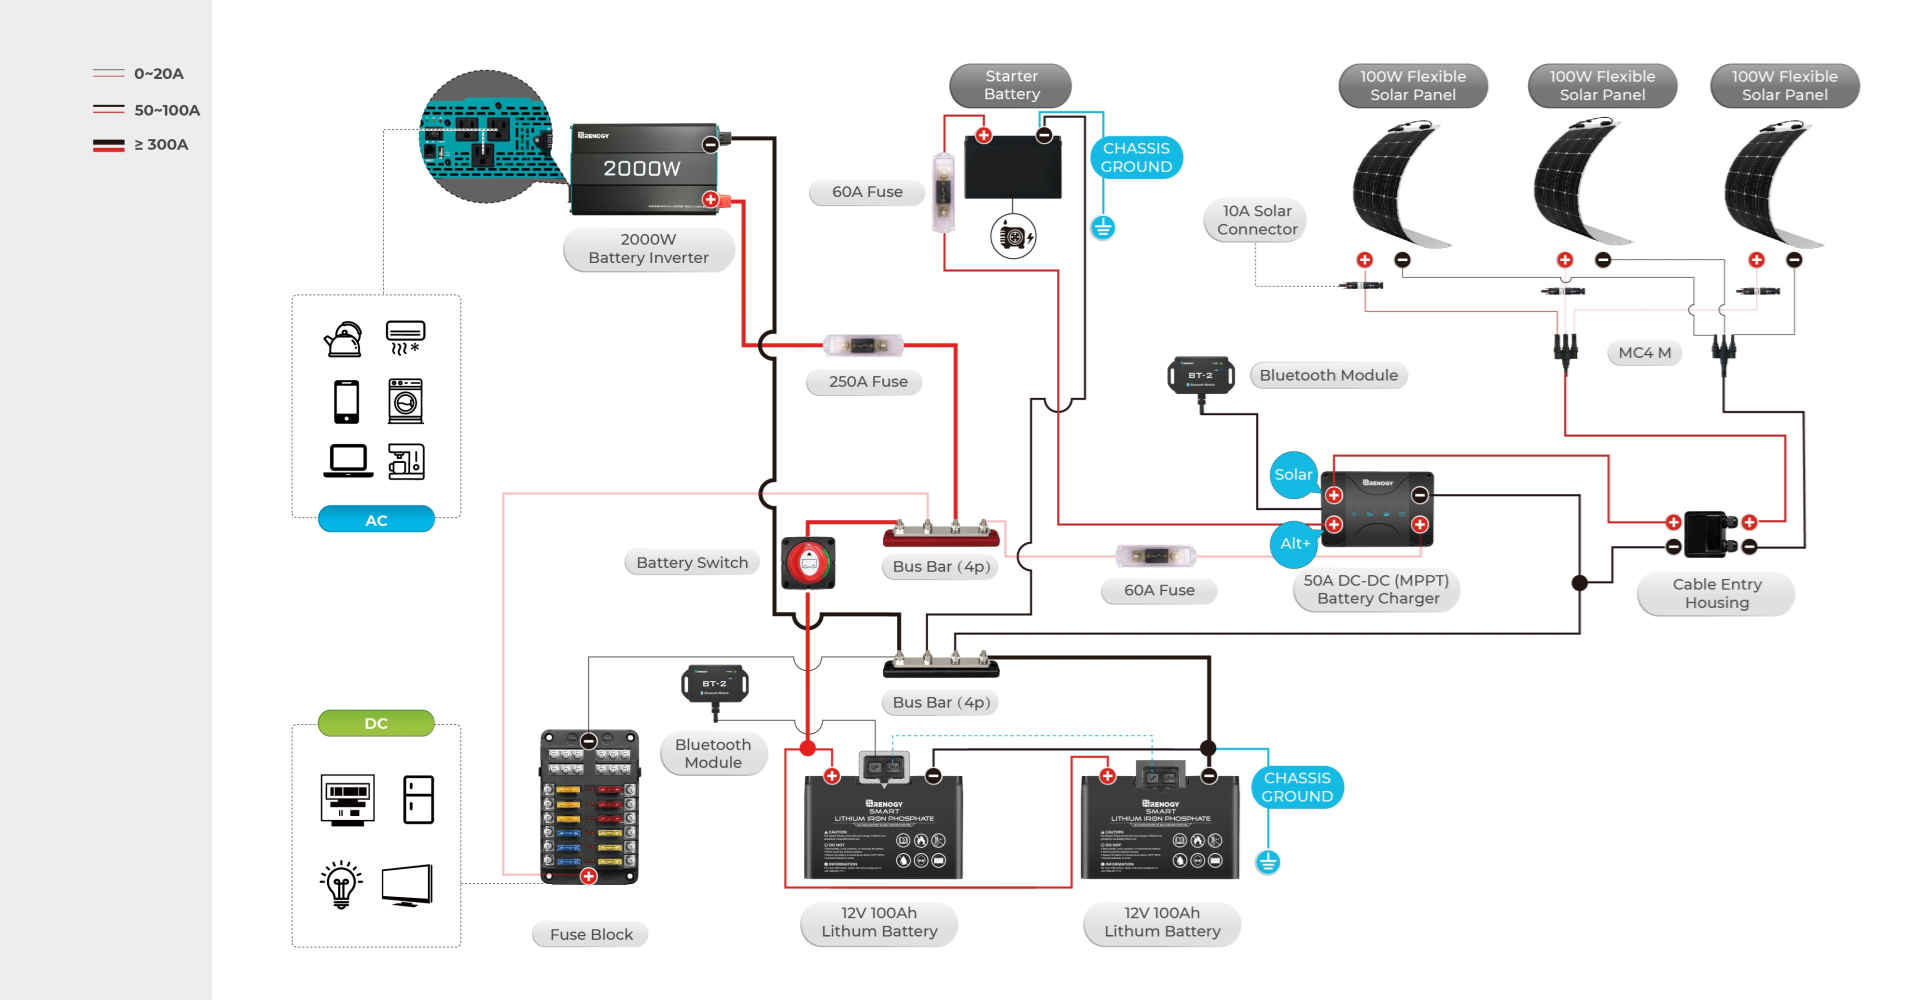
Wiring The System
Setting up the battery system in your motorhome or RV is crucial for reliable power. Proper wiring ensures your appliances and devices work correctly. It also prevents electrical issues. Let’s dive into the key aspects of wiring your RV battery system.
Connecting To Inverter
The inverter converts DC power from the batteries to AC power. This allows you to use household appliances in your RV.
- Begin by identifying the positive and negative terminals on your battery.
- Connect the positive terminal to the positive input on the inverter.
- Do the same for the negative terminal.
- Use thick, high-quality cables to ensure a secure connection.
Properly connect the inverter to avoid short circuits. Always double-check connections before powering up.
Grounding The Batteries
Grounding is vital for safety. It protects your system from electrical faults.
- Locate a suitable grounding point on your RV chassis.
- Attach a grounding cable to the negative terminal of your battery.
- Secure the other end of the cable to the chosen grounding point.
Ensure the grounding point is free of paint and corrosion. This helps maintain a solid connection. Regularly inspect the grounding cable for wear and tear.
By following these steps, you ensure a safe and efficient battery setup in your motorhome or RV. Happy travels!
Testing The Setup
Once you have connected your motorhome RV battery, testing the setup is crucial. This step ensures everything is functioning correctly. It helps prevent potential issues on the road. Follow these steps for a smooth and safe testing process.
Initial Power On
Start by switching on the main power. Observe any immediate signs of problems. Check for any unusual noises or smells. Verify that the power indicators are on. This initial check is vital to confirm the setup is safe.
Checking For Proper Functionality
Next, ensure all electrical components are working. Turn on lights, fans, and other appliances. Test each item individually. This helps identify any weak connections. It also ensures all parts receive adequate power.
Check the battery charge levels. Ensure the battery is charging correctly. Use a multimeter to confirm voltage levels. This is crucial for long-term battery health. Proper functionality ensures a smooth camping experience.

Credit: ar.pinterest.com
Maintenance Tips
Proper maintenance of your motorhome RV battery is crucial for its longevity and performance. Regular care ensures your battery remains efficient, providing you with a reliable power source during your travels. Below are some essential maintenance tips to keep your RV battery in top shape.
Regular Inspections
Regular inspections help identify potential issues before they become serious problems. Check the battery terminals for corrosion, which can impede performance. Use a wire brush to clean any corrosion.
Ensure the connections are tight and secure. Loose connections can lead to power loss or even damage to the battery. Inspect the battery casing for any cracks or leaks. If you find any, replace the battery immediately.
Troubleshooting Common Issues
Even with regular maintenance, problems can arise. Here are common issues and their solutions:
| Issue | Solution |
|---|---|
| Battery not holding charge | Check for parasitic drains or replace the battery if old |
| Corroded terminals | Clean with a wire brush and apply a protective coating |
| Loose connections | Tighten all connections and ensure a secure fit |
By following these tips and troubleshooting common issues, you can extend the life of your RV battery and enjoy worry-free travels.

Credit: www.youtube.com
Frequently Asked Questions
How Do You Hook Up A Motorhome Battery?
To hook up a motorhome battery, connect the positive terminal first, then the negative terminal. Ensure all connections are tight and secure. Use appropriate tools and safety gear.
What Is The Correct Rv Battery Wiring Diagram?
The correct RV battery wiring diagram shows the positive terminal of one battery connected to the negative terminal of the next. This is for a series connection. Follow manufacturer guidelines.
Why Is Rv Battery Hookup Important?
RV battery hookup is crucial for powering your motorhome’s electrical system. Proper hookup ensures safety and efficient energy use.
Can I Install Rv Batteries Myself?
Yes, you can install RV batteries yourself. Follow the manufacturer’s instructions and safety guidelines. Ensure proper connections.
Conclusion
Connecting your motorhome RV battery correctly is vital. This guide simplifies the process. Follow the steps closely for a safe setup. Correct hookups ensure your RV runs smoothly. Keep this diagram handy for future reference. Proper battery connections extend battery life.
Enjoy more stress-free adventures on the road. Happy travels!


