
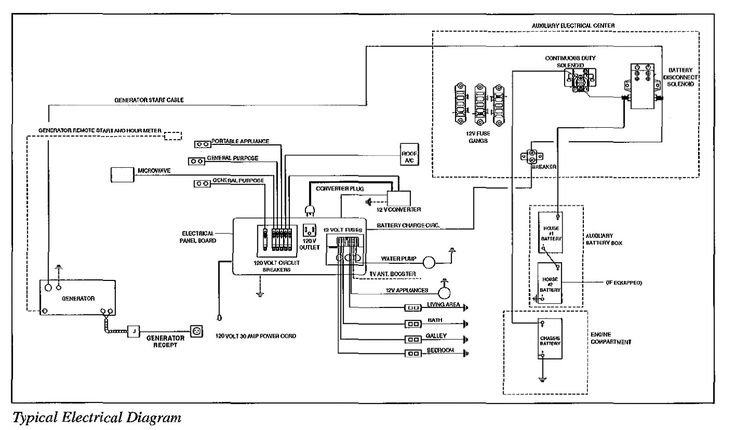
Understanding the battery wiring in a Fleetwood RV can be challenging. It’s essential for maintaining your vehicle’s electrical system.
RVs rely heavily on their electrical systems to power everything from lights to appliances. Proper wiring ensures that your Fleetwood RV runs smoothly and safely. In this guide, we will break down the electrical schematic for your RV’s battery system.
Whether you’re a seasoned RV owner or a newbie, this information will help you understand how to wire and maintain your batteries correctly. Let’s dive into the basics and make sure your Fleetwood RV stays powered up and ready for your next adventure.
Types Of Batteries
When dealing with Fleetwood RV electrical schematics, understanding the types of batteries is crucial. Different battery types impact your RV’s performance, maintenance, and longevity. Here, we explore two primary types: Lead-Acid Batteries and Lithium-Ion Batteries.
Lead-acid Batteries
Lead-Acid batteries are the most common choice for RVs. They are cost-effective and reliable. These batteries are known for their durability. They can handle deep discharges and have a long lifespan.
There are two types of Lead-Acid batteries: flooded and sealed. Flooded batteries require regular maintenance. You need to check water levels and top them off. Sealed batteries need less maintenance. They are also safer since there is no risk of spillage.
Lithium-ion Batteries
Lithium-Ion batteries are becoming popular in RVs. They are lighter and more efficient than Lead-Acid batteries. These batteries charge faster and last longer. They also deliver consistent power output.
Although Lithium-Ion batteries cost more upfront, they save money over time. Their longer lifespan and efficiency justify the price. They require less maintenance and are safer due to their design.
Battery Configurations
Understanding battery configurations is vital for your Fleetwood RV’s electrical system. Proper wiring ensures efficiency and safety. Let’s explore the most common configurations: Series Wiring and Parallel Wiring.
Series Wiring
In series wiring, batteries are connected end-to-end. The positive terminal of one battery connects to the negative terminal of the next. This setup increases the voltage while keeping the capacity (amp hours) the same. For example:
- Two 12V batteries in series will produce 24V.
- Capacity remains the same as a single battery.
This configuration is useful for systems that require higher voltage. Be cautious not to exceed the voltage rating of your equipment.
Parallel Wiring
Parallel wiring involves connecting batteries side-by-side. The positive terminals are connected together, and the negative terminals are also connected together. This setup increases the capacity while keeping the voltage the same. For example:
- Two 12V batteries in parallel will still produce 12V.
- Capacity doubles, providing more amp hours.
This setup is ideal for applications needing longer battery life. It allows devices to run longer without needing a recharge.
Using the right configuration can greatly enhance your RV’s performance. Select the configuration that best suits your electrical needs.
Essential Tools And Materials
Understanding the battery wiring Fleetwood RV electrical schematic can be complex. Having the right tools and materials simplifies the process. This section covers the essential tools and materials needed.
Required Tools
The correct tools are crucial for a smooth wiring process. Below is a list of required tools:
- Wire Cutters: For cutting wires to the correct length.
- Wire Strippers: To strip the insulation off wires.
- Multimeter: To measure voltage, current, and resistance.
- Crimping Tool: For securing connectors to wires.
- Screwdrivers: Both flathead and Phillips types.
- Pliers: For gripping and bending wires.
- Soldering Iron: For joining wires securely.
- Heat Gun: To shrink heat shrink tubing.
- Cable Ties: For bundling wires together.
Necessary Materials
Using the right materials ensures durability and safety. Here’s a list of necessary materials:
- Wiring: Different gauges of wire for various connections.
- Connectors: Like ring terminals, butt connectors, and spade connectors.
- Heat Shrink Tubing: To insulate and protect wire connections.
- Electrical Tape: For insulating electrical wires and other material.
- Fuse Blocks: To protect electrical circuits.
- Battery Terminals: Connect the wiring to the battery securely.
- Circuit Breakers: To protect the electrical system from overload.
Having these tools and materials ready makes the wiring process straightforward. This ensures your Fleetwood RV’s electrical system functions correctly and safely.
Step-by-step Wiring Guide
Ensuring your Fleetwood RV’s electrical system is in top shape is crucial. Follow this step-by-step wiring guide to replace your batteries efficiently. This guide will help you disconnect the old system and connect the new batteries seamlessly.
Disconnecting The Old System
Before starting, ensure your RV is parked safely and the engine is off. Safety first.
- Locate the battery compartment. It’s usually under the RV or in a side compartment.
- Use a wrench to disconnect the negative cable first. This prevents sparks.
- Next, disconnect the positive cable. Mark the cables to avoid confusion later.
- Remove the old batteries carefully. They may be heavy, so use proper lifting techniques.
Connecting The New Batteries
Installing new batteries can be straightforward. Follow these steps for a smooth process.
- Place the new batteries in the compartment. Ensure they are secure and stable.
- Connect the positive cable first. Ensure the connection is tight and secure.
- Next, connect the negative cable. Double-check for a solid connection.
- Inspect all connections. Ensure there are no loose wires or corrosion.
- Power on the RV and test the electrical system. Everything should work smoothly.
By following these steps, your Fleetwood RV’s battery system will be ready for your next adventure. Proper maintenance and regular checks are key to a reliable electrical system.
Safety Precautions
Ensuring safety while working with your Fleetwood RV’s electrical schematic is crucial. Proper precautions can prevent accidents and ensure smooth operation. This section highlights the essential safety measures you need to follow.
Handling Batteries Safely
Working with RV batteries requires special care. Always wear protective gear such as gloves and safety goggles. This protects you from harmful chemicals and potential sparks. Ensure the area around the battery is clean and dry. A wet or cluttered space can increase the risk of accidents.
Disconnect the negative terminal first to prevent short circuits. Secure the battery in place to avoid movement during travel. This prevents damage and potential hazards. Regularly check for corrosion and clean the terminals. Corrosion can affect battery performance and safety.
Preventing Electrical Hazards
Always turn off the main power supply before working on the electrical system. This prevents accidental shocks. Use insulated tools to avoid electrical contact. Double-check connections to ensure they are secure and correct.
Avoid overloading circuits. This can cause overheating and potential fires. Label all wires clearly. This helps in identifying circuits and avoiding mistakes. Regularly inspect the wiring for any signs of wear or damage. Replace any damaged wires immediately.
Keep flammable materials away from electrical components. This reduces the risk of fire. Install a smoke and carbon monoxide detector in your RV. These devices can alert you to potential dangers early on.
Troubleshooting Common Issues
Understanding and troubleshooting common issues with your Fleetwood RV’s electrical system can save time and frustration. This guide will help you address some of the most frequent problems encountered in RV battery wiring.
Battery Not Charging
If your battery is not charging, begin by checking the connections. Loose or corroded connections can prevent the battery from charging. Use a wire brush to clean the terminals. Ensure all connections are tight.
Next, verify the output of your RV’s converter. Use a multimeter to check the voltage at the battery terminals. The reading should be between 13.6 and 14.4 volts. If the voltage is low, the converter may be faulty.
Another common issue is a blown fuse. Check the fuse box for any blown fuses and replace them if necessary. Also, inspect the wiring for any visible damage.
If the problem persists, the battery itself might be the issue. Test the battery with a load tester. If it fails the test, it may need replacement.
Inconsistent Power Supply
An inconsistent power supply can be frustrating. Begin by checking the battery connections. Ensure they are tight and free of corrosion.
Next, inspect the wiring. Look for any loose or damaged wires. Repair or replace any faulty wiring. Use a multimeter to check for continuity in the wiring.
Check the ground connections. Poor grounding can cause power fluctuations. Clean the ground connections and ensure they are secure.
Finally, test the appliances. A faulty appliance can cause power issues. Disconnect each appliance one at a time to isolate the problem. Replace or repair the faulty appliance.
By following these steps, you can troubleshoot and resolve common issues with your Fleetwood RV’s electrical system. Regular maintenance and inspections can help prevent these problems from occurring.
Maintenance Tips
Keeping your Fleetwood RV’s electrical system in top shape is crucial. Proper maintenance ensures your RV runs smoothly. Here are some essential maintenance tips for battery wiring in your Fleetwood RV.
Regular Inspections
Inspect your RV’s battery wiring regularly. Look for any signs of wear or damage. Check for loose connections. Tighten any loose wires. Replace damaged wires immediately. Regular inspections help prevent bigger issues. They keep your RV’s electrical system safe and functional.
Cleaning Battery Terminals
Clean the battery terminals every few months. Dirty terminals can cause poor connections. Disconnect the battery before cleaning. Use a mixture of baking soda and water. Scrub the terminals with a brush. Rinse with clean water. Dry the terminals thoroughly. Reconnect the battery securely. Clean terminals ensure better battery performance. They also help extend battery life.

Credit: community.fmca.com
Frequently Asked Questions
How Do I Read An Rv Electrical Schematic?
Reading an RV electrical schematic involves understanding symbols and connections. Start with the legend, follow the wiring paths, and identify components. Familiarize yourself with common symbols and their meanings.
What Is The Role Of A Battery In An Rv?
The battery in an RV provides power to electrical components when off-grid. It powers lights, appliances, and other devices. Proper battery wiring ensures efficient power distribution and reliability.
How To Wire A Fleetwood Rv Battery System?
To wire a Fleetwood RV battery system, follow the manufacturer’s schematic. Connect positive and negative terminals correctly. Use appropriate gauge wires and secure connections. Consult a professional if needed.
Why Is Proper Rv Battery Wiring Important?
Proper RV battery wiring ensures safe and efficient power distribution. It prevents short circuits and potential damage. Correct wiring maximizes battery life and performance, ensuring reliable power supply.
Conclusion
Understanding battery wiring in a Fleetwood RV is crucial. Proper wiring ensures safety and efficiency. Follow the schematic closely for best results. Regular maintenance is key. Check connections and battery health often. This helps avoid unexpected issues. A well-wired RV enhances your travel experience.
Happy and safe travels!


