
Understanding the Atwood RV water heater switch wiring diagram can be daunting. But it doesn’t have to be.
Whether you are a seasoned RV enthusiast or a newcomer, knowing how to wire the heater switch is crucial. This knowledge ensures you can handle repairs or installations confidently. An RV water heater switch controls the heating element, providing hot water for showers, cooking, and cleaning.
Proper wiring is essential for safety and efficiency. This guide will simplify the process, breaking down each step to make it easy to follow. By the end, you’ll be equipped with the know-how to manage your RV’s water heater switch wiring effortlessly. Let’s dive in and demystify the wiring diagram together.
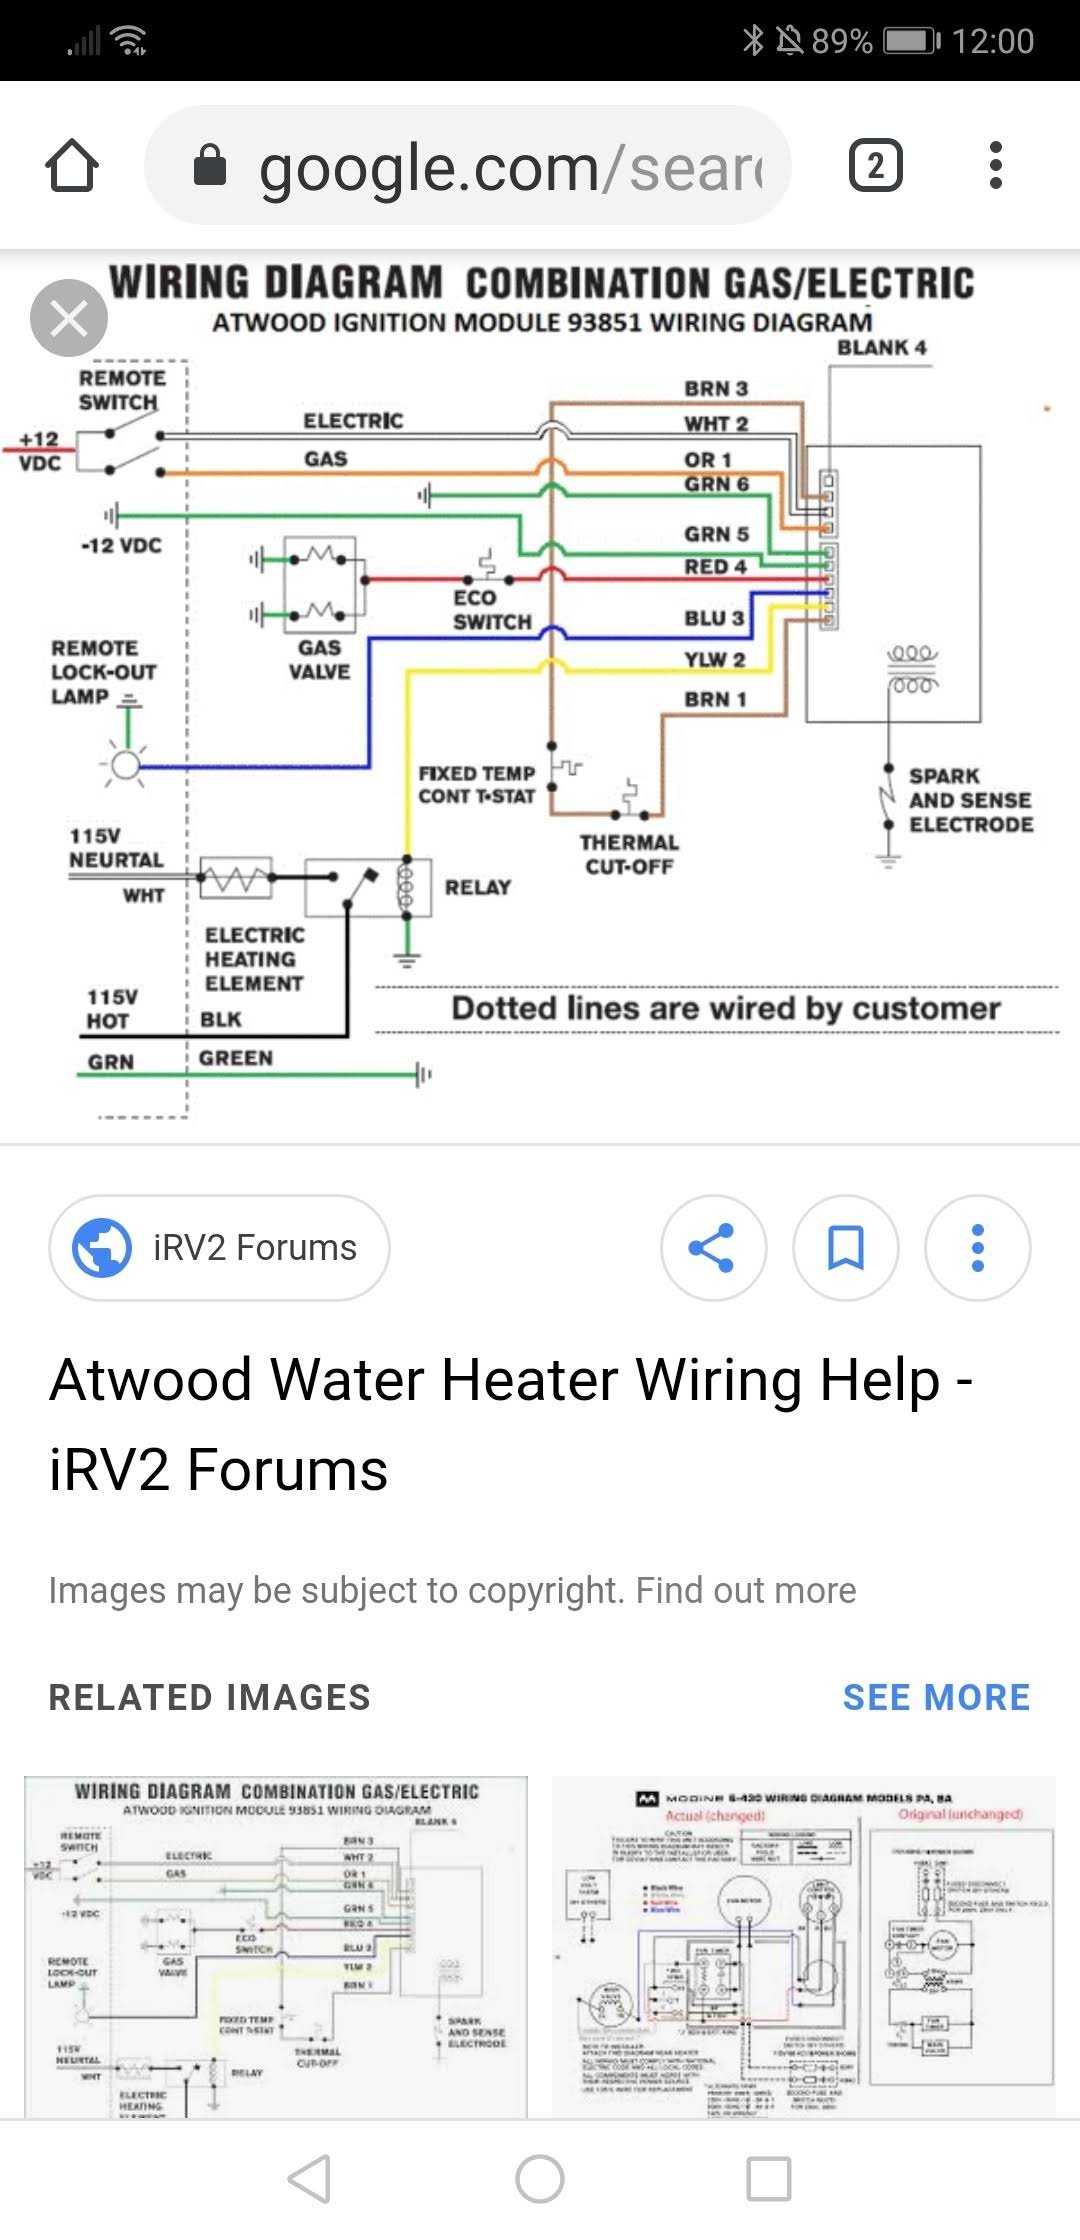
Credit: www.etrailer.com
Tools And Materials
Understanding the tools and materials required for wiring an Atwood RV water heater switch is essential. This section will guide you through the necessary tools and materials. Let’s dive into the details to ensure you are well-prepared for the task.
Essential Tools
Having the right tools makes the wiring process smoother. Here are the essential tools you need:
- Screwdriver Set: A set with both flathead and Phillips screwdrivers.
- Wire Strippers: For stripping insulation from the wires.
- Multimeter: To test electrical connections and ensure proper voltage.
- Crimping Tool: For securing wire connectors.
- Drill: Necessary for making holes for mounting.
- Voltage Tester: To ensure power is off before working.
Required Materials
In addition to tools, certain materials are essential for the wiring process. Here is a list of required materials:
- Wiring Diagram: A detailed diagram specific to your Atwood RV model.
- Wire Connectors: For connecting wires securely.
- Electrical Tape: To insulate and protect wire connections.
- Heat Shrink Tubing: For protecting and insulating wire joins.
- Wire: Suitable gauge wire for the connections.
- Switch: The specific switch for your Atwood water heater.

Credit: www.pinterest.com
Safety Precautions
Working with the Atwood RV water heater switch wiring diagram requires caution. Safety precautions are essential to prevent accidents and damage. Follow these guidelines to ensure a safe and successful installation.
Electrical Safety
Turn off the RV’s power supply before starting any wiring work. Verify the power is off using a voltage tester. Wear rubber-soled shoes to reduce the risk of electric shocks.
Use tools with insulated handles to protect yourself from electrical currents. Avoid working in wet or damp conditions to prevent short circuits. Keep the wiring area dry and clean.
General Safety Tips
Read the Atwood RV water heater manual thoroughly before starting. Understand the wiring diagram and follow the instructions step-by-step. Use the correct wire gauge as specified in the manual.
Label each wire during the disconnection process to avoid confusion later. Double-check all connections to ensure they are secure and correct. If unsure about any step, consult a professional electrician.
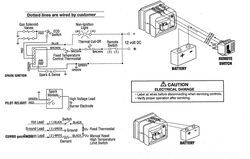
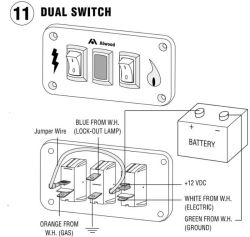
Understanding The Wiring Diagram
Understanding the wiring diagram of an Atwood RV water heater switch is essential for any RV owner. This diagram provides a clear visual representation of the electrical connections required for the water heater to function. Knowing how to read and interpret these diagrams ensures proper installation and maintenance of your water heater system. Let’s dive into the components and color codes of the wiring diagram.
Diagram Components
The wiring diagram consists of several key components. Each component plays a crucial role in the operation of the water heater. Here are the main parts you will find in the diagram:
- Switch: Controls the power to the water heater.
- Thermostat: Regulates the temperature of the water.
- Heating Element: Heats the water in the tank.
- Power Source: Provides electrical energy to the system.
- Wiring: Connects all components and allows the flow of electricity.
Each of these components is represented by specific symbols and lines in the diagram. Understanding these symbols is key to reading the wiring diagram correctly.
Color Codes
Color codes in the wiring diagram help identify different wires and their functions. Each color represents a specific type of wire or electrical connection. Here’s a table summarizing common color codes:
| Color | Function |
|---|---|
| Black | Power or hot wire |
| White | Neutral wire |
| Green | Ground wire |
| Red | Second hot wire (in 240V circuits) |
Proper identification of these color codes ensures safe and accurate wiring. Always double-check the color codes before making any connections.
Step-by-step Wiring Instructions
Understanding the Atwood RV water heater switch wiring diagram is essential for proper installation. This guide will walk you through the step-by-step wiring instructions. Follow these simple steps to ensure a smooth and safe connection.
Preparation
Before starting, gather all necessary tools and materials. You will need wire cutters, strippers, electrical tape, and a multimeter. Check that your RV is disconnected from any power source.
Next, locate the wiring diagram for your specific Atwood RV water heater model. This diagram will guide you in identifying the correct wires. Ensure you have a clean and well-lit workspace.
Connecting Wires
Start by identifying the power supply wires in your RV. These are usually red or black. Use the wire cutters to strip about half an inch of insulation from the ends of these wires.
Next, find the corresponding wires on your Atwood water heater switch. Typically, these are marked on the switch itself. Match the colors of the wires from the power supply to the switch.
Connect each wire by twisting the exposed ends together. Secure the connection with electrical tape. For added safety, use wire connectors if available.
After connecting the wires, use a multimeter to check for continuity. This ensures that the connections are secure and there are no breaks in the circuit.
Finally, mount the switch in its designated place. Make sure all wires are tucked away neatly to prevent any damage.
Testing The Installation
Testing the installation of your Atwood RV water heater switch wiring is crucial. It ensures everything works correctly and safely. This step will help you identify any issues and fix them. Let’s dive into the details.
Initial Checks
First, ensure that all connections are secure. Check for any loose wires. Verify that the power supply is off. This prevents any accidental shocks. Inspect the wiring for any visible damage. Look for cuts or abrasions on the wires.
Next, turn on the power supply. Observe the water heater switch. It should light up or indicate power. Listen for any unusual sounds. A steady hum is normal. Anything else might suggest a problem.
Troubleshooting
If the switch does not work, double-check your wiring. Make sure all connections follow the diagram. Ensure that the wires are correctly matched. Sometimes, even a small error can cause issues.
If the water heater does not turn on, test the power supply. Use a multimeter to check for voltage. If there is no power, inspect the fuses and circuit breakers. Replace any blown fuses or reset the breakers.
In case of persistent issues, consult the manual. It may have specific troubleshooting steps. You can also contact customer support for help. They can provide additional guidance.
Common Issues And Fixes
Dealing with Atwood RV water heater switch wiring can be challenging. Common issues often disrupt the system’s functionality. Understanding these problems and knowing their fixes helps maintain a smooth operation.
Frequent Problems
Many users face similar issues with their Atwood RV water heater switches. One common problem is a faulty switch. This can result in the heater not turning on. Another issue is loose wiring connections. These can cause intermittent functionality. A third problem is a blown fuse. This stops the heater from working completely.
Simple Solutions
Fixing these issues does not have to be difficult. For a faulty switch, replacing it is the best solution. Make sure to use a compatible switch. For loose wiring, check all connections. Tighten any that seem loose. This ensures a steady connection. If you find a blown fuse, replace it. Ensure the new fuse matches the required specifications.
Maintenance Tips
Proper maintenance of your Atwood RV water heater switch wiring diagram is essential. Regular upkeep ensures the system runs smoothly. It also extends the lifespan of your water heater. Follow these tips to maintain your water heater efficiently.
Regular Inspections
Perform regular inspections of your water heater. Check the wiring connections for any signs of wear. Look for loose wires or corrosion. Tighten any loose connections you find. Inspect the switch for any damage or malfunction.
Check for any unusual sounds or smells. These can indicate potential issues. If you spot any problems, address them immediately. Regular inspections help catch issues early. This prevents costly repairs later.
Preventative Measures
Take preventative measures to protect your water heater. Use a surge protector. This guards against electrical surges. Surges can damage the wiring and switch. Install a water heater cover. This protects the unit from dust and debris.
Keep the area around your water heater clean. Remove any flammable materials. This reduces the risk of fire. Make sure the ventilation is clear. Good airflow prevents overheating. Following these measures keeps your water heater in top shape.
Credit: www.etrailer.com
Frequently Asked Questions
What Is An Atwood Rv Water Heater Switch?
An Atwood RV water heater switch controls the power to your RV’s water heater. It helps in turning the heater on and off.
How To Wire An Atwood Rv Water Heater Switch?
To wire the switch, follow the diagram provided in the manual. Ensure you connect the wires correctly to avoid issues.
Where To Find Atwood Rv Water Heater Switch Diagram?
You can find the wiring diagram in the user manual. Alternatively, check the manufacturer’s website for detailed diagrams.
Why Is My Atwood Rv Water Heater Not Working?
Check if the switch is wired correctly. Ensure the power supply is functioning. Refer to the wiring diagram for troubleshooting.
Conclusion
Understanding the Atwood RV water heater switch wiring diagram is essential. It ensures safe and efficient operation of your RV water heater. Correct wiring can prevent potential issues and save time. Always follow the diagram closely for accurate connections. Double-check all connections before powering up.
This helps avoid any unwanted surprises. Proper wiring extends the heater’s lifespan. Enjoy hot water during all your RV adventures. Happy travels!


