
Dealing with a Dometic RV toilet leaking at the base can be frustrating. This issue can lead to water damage and unpleasant odors.
Understanding why your RV toilet is leaking is the first step to fixing it. A leak at the base of your toilet is often due to a worn-out seal or a loose connection. In this blog post, we’ll explore common reasons for these leaks and offer practical solutions.
We’ll help you identify the problem and guide you through the repair process. Whether you’re on the road or parked, fixing this issue promptly will ensure a clean and comfortable RV experience. Let’s dive into the details and keep your RV in top shape.

Credit: heartlandowners.org
Identifying The Leak
A leaking RV toilet can cause many problems. Identifying the source is crucial. This will help you fix it quickly. Sometimes, the leak might seem minor. But it can lead to bigger issues. Let’s explore how to identify a leak in your Dometic RV toilet.
Signs Of A Leak
Water around the base is a clear sign. You might notice a small puddle. This could mean there’s a problem. Another sign is a musty smell. This could indicate trapped moisture.
Check for discoloration. The area around the base may change color. This can be due to water damage. Also, listen for unusual sounds. A hissing sound might mean a leak.
Tools Needed
Gathering the right tools is important. You will need a wrench. This helps in tightening bolts. A towel is also useful. It helps in cleaning up water.
A flashlight can help too. It allows you to see dark areas. Don’t forget a pair of gloves. They keep your hands clean. Lastly, have a bucket ready. It catches any leaking water.
Credit: www.reddit.com
Safety Precautions
Dealing with a dometic RV toilet leaking at the base can be a stressful experience. Ensuring safety while addressing this issue is vital. Below are some safety precautions to keep in mind. These steps will help you handle the problem effectively.
Turning Off Water Supply
The first step is to turn off the water supply. Locate the valve near the toilet. Turn it clockwise to shut off the water. This prevents further leakage and water damage. Ensure the water is completely off before proceeding.
Wearing Protective Gear
Wearing protective gear is crucial for your safety. Use gloves to protect your hands from germs and chemicals. Wear safety glasses to protect your eyes. This gear ensures you stay safe while working on the leak.
| Gear | Purpose |
|---|---|
| Gloves | Protect hands |
| Safety Glasses | Protect eyes |
Following these safety precautions ensures a secure and effective repair process. It minimizes risks and helps you focus on fixing the dometic RV toilet leak efficiently.
Removing The Toilet
Removing the toilet is necessary when dealing with a leaking Dometic RV toilet. The process isn’t overly complex but requires careful steps. Let’s dive into the detailed steps to safely remove your RV toilet.
Disconnecting Water Lines
First, turn off the water supply to your RV. This is crucial to avoid any water damage. Find the shut-off valve near the toilet and turn it clockwise to close it.
Next, disconnect the water line from the back of the toilet. Use a wrench to loosen the nut connecting the water line. Be prepared for a small amount of water to spill out, so keep a towel handy.
Unscrewing From The Floor
Locate the bolts securing the toilet to the floor. These are usually covered with plastic caps. Remove the caps to expose the bolts.
Use a wrench or a socket set to unscrew the bolts. Keep the bolts safe as you’ll need them when reassembling the toilet. Carefully lift the toilet off the floor, ensuring not to damage the seal.
Once the toilet is removed, clean the area around the flange. This ensures a proper seal when reinstalling the toilet.
Inspecting The Base
Inspecting the base of your Dometic RV toilet is essential. A leak at the base can cause major damage. It can also lead to unpleasant odors. Let’s look at the steps to inspect the base.
Checking For Cracks
First, check the base for any visible cracks. Even small cracks can cause leaks. Use a flashlight for a better view. Run your hand over the surface. Feel for any uneven areas. Cracks can be hard to spot. Pay close attention to the corners. Water can collect there and cause damage.
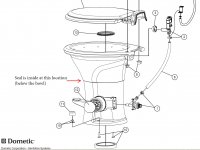
Examining The Seal
The seal is a crucial part of the toilet. It prevents leaks at the base. Inspect the seal for wear and tear. Look for any signs of damage. A damaged seal can cause leaks. Check if the seal is properly aligned. Misalignment can also lead to leaks. Replace the seal if needed. A new seal can fix many leak issues.
Replacing The Seal
A leaking Dometic RV toilet at the base often means a worn-out seal. Replacing the seal can stop the leak and prevent further damage. Simple tools and a new seal make the fix easy.
Replacing the seal on your Dometic RV toilet can solve many leaking issues. A worn-out seal can cause water to leak at the base. This problem not only wastes water but also damages your RV floor. Fixing it is simple if you follow the right steps.
Choosing The Right Seal
Finding the correct seal is crucial. Check your RV toilet model number. Each model may require a different type of seal. Many seals are rubber-based. Some are foam-based. The material must match your toilet type. Read reviews from other RV owners. Their experiences can guide your choice. Buying a high-quality seal can save you from future leaks.
Proper Installation
Installation must be precise. Begin by turning off the water supply. Flush the toilet to empty the bowl. Remove the old seal carefully. Clean the area thoroughly. Dirt and residue can cause new leaks. Place the new seal in position. Ensure it fits snugly. Reconnect the water supply and test your toilet. Check for leaks. If installed properly, the leaking should stop.
Reinstalling The Toilet
Reinstalling your Dometic RV toilet can seem daunting. But with some guidance, it’s manageable. This process involves securing the toilet to the floor and reconnecting water lines. Both steps are crucial to stop the leak at the base.
Securing To The Floor
Ensure the toilet flange is clean and dry. This helps create a tight seal. Place a new wax ring or gasket on the flange. Carefully lower the toilet onto the flange. Align the bolt holes with the flange bolts.
Press the toilet down firmly. This compresses the wax ring and creates a seal. Tighten the bolts evenly. Avoid over-tightening as this can crack the porcelain. Check the toilet for stability. It should not rock or move.
Reconnecting Water Lines
Locate the water supply line. Attach it to the toilet’s water inlet. Ensure the connection is tight but not over-tightened. Turn on the water supply slowly. Check for any leaks around the connection.
Flush the toilet several times. This checks for proper operation and leaks. If you notice any leaks, tighten the connections slightly. Make sure all parts are properly aligned and secured.
With these steps, your Dometic RV toilet should be leak-free. Regular maintenance can prevent future issues. Enjoy your leak-free bathroom on your RV adventures.
Testing For Leaks
Experiencing a leaking Dometic RV toilet at the base can be frustrating. Identifying and testing for leaks early can save you from bigger problems. Let’s go through simple steps to test for leaks.
Turning On Water Supply
First, turn on the water supply. Ensure the shut-off valve is fully open. This step allows water to flow through the toilet. Observe the toilet closely for any signs of leakage.
Monitoring For Drips
Next, monitor for drips. Place a dry paper towel around the base of the toilet. Wait for a few minutes and check the towel. If it gets wet, you have a leak. Repeat this step to confirm.
Preventative Maintenance
Preventative maintenance is essential to keep your Dometic RV toilet in good condition. Regular maintenance can help you avoid leaks at the base. By following a few simple steps, you can ensure your toilet functions properly and lasts longer.
Regular Inspections
Regular inspections are crucial. Check the toilet base for any signs of leaks. Look for water stains or damp spots. These could indicate a leak. Inspect the mounting bolts. Tighten them if they are loose. This can prevent water from seeping out.
Examine the seal between the toilet and the floor. If it looks worn, replace it. A good seal is vital to avoid leaks. Regular checks can catch issues early. This saves you time and money on repairs.
Proper Cleaning
Proper cleaning is another important aspect. Clean the toilet and surrounding area regularly. Use mild cleaning agents. Harsh chemicals can damage the seals and gaskets. This can lead to leaks.
Pay attention to the base of the toilet. Dirt and grime can accumulate here. This can affect the seal. Clean the base thoroughly. This helps maintain a good seal and prevents leaks.
By following these simple steps, you can keep your Dometic RV toilet in top condition. Regular inspections and proper cleaning can go a long way in preventing leaks at the base.
Credit: heartlandowners.org
Frequently Asked Questions
Why Is My Dometic Rv Toilet Leaking At The Base?
A Dometic RV toilet may leak at the base due to a faulty seal or gasket. These components can wear out over time. Check for damage and replace if necessary.
How Do I Fix A Leaking Rv Toilet Base?
To fix a leaking RV toilet base, first, turn off the water supply. Then, replace the damaged seal or gasket. Ensure all connections are tight.
Can A Loose Toilet Cause Leaks In An Rv?
Yes, a loose RV toilet can cause leaks. Ensure the toilet is securely fastened to prevent any movement that might cause leaking.
What Tools Are Needed To Fix A Leaking Rv Toilet?
To fix a leaking RV toilet, you typically need a wrench, screwdriver, and replacement seals or gaskets. Always follow the manufacturer’s instructions.
Conclusion
Fixing a leaking Dometic RV toilet base is crucial. It prevents water damage. Address the issue promptly. Check seals and bolts regularly. Replace worn parts as needed. Simple maintenance can save you money. Enjoy peace of mind on your travels.
A dry, functioning toilet makes RV life better. Follow these tips for a hassle-free experience.


