
Recharging an RV air conditioner is not as hard as it seems. With the right tools and steps, you can do it yourself.
An RV air conditioner keeps your travels cool and comfortable. But, like any appliance, it can lose its efficiency over time. This often means it needs a recharge. Understanding how to recharge an RV air conditioner can save you both time and money.
It also ensures your road trips remain pleasant. In this blog, we will guide you through the simple steps needed to recharge your RV air conditioner. You’ll learn what tools are required, how to use them, and tips to keep your AC running efficiently. Let’s dive in and make sure your RV stays cool on your next adventure!
Safety Precautions
Recharging an RV air conditioner is a task that requires careful attention. Prioritizing safety is essential to prevent accidents. Understanding the necessary safety precautions will ensure a smooth process.
Essential Safety Gear
Before starting, gather the right safety gear. Wear safety goggles to protect your eyes from potential refrigerant leaks. Use gloves to prevent skin contact with harmful chemicals. A mask can safeguard you from inhaling any dangerous fumes.
Common Hazards To Avoid
Be aware of common hazards. Do not overcharge the system. It can lead to system failure or damage. Avoid working in wet conditions to prevent electrical shocks. Always disconnect the power source before starting any work. This reduces the risk of electric shock. Keep flammable materials away from your workspace. Refrigerants can be flammable, posing a fire risk.
Gathering Necessary Tools
Before recharging your RV air conditioner, gather all the necessary tools. This ensures a smooth and successful process. Having the right tools on hand saves time and prevents potential issues.
Required Equipment And Supplies
Here is a list of the required equipment and supplies for recharging your RV air conditioner:
- Refrigerant: Ensure you have the correct type for your AC unit.
- Gauge Set: A manifold gauge set is essential for checking pressure levels.
- Leak Detector: Detect any leaks before recharging.
- Safety Glasses: Protect your eyes from potential hazards.
- Gloves: Safeguard your hands while handling refrigerant.
- Wrench Set: Useful for loosening and tightening connections.
Where To Purchase Tools
You can purchase these tools and supplies from various sources:
- Local Hardware Stores: Visit stores like Home Depot or Lowe’s.
- Auto Parts Stores: Check stores like AutoZone or O’Reilly Auto Parts.
- Online Retailers: Websites like Amazon or eBay offer a wide selection.
- Specialty RV Stores: These stores carry RV-specific tools and supplies.
Ensure that the tools and supplies you buy are of high quality. This will make the recharging process smoother and safer.
Preparing Your Rv
Before you start recharging your RV air conditioner, it’s essential to prepare your RV properly. This ensures safety and efficiency throughout the process. Below are the key steps to prepare your RV.
Parking And Stabilizing The Rv
First, find a flat, level surface to park your RV. This helps maintain stability while working. Ensure the area is well-ventilated and away from traffic.
Next, engage the parking brake. Use wheel chocks to prevent any movement. Stabilize your RV with leveling blocks if needed. This ensures a safe and steady workspace.
Shutting Down The Air Conditioner
Turn off the RV air conditioner completely. Unplug your RV from any power sources. This step is crucial for safety.
Wait for the unit to cool down before starting any work. This prevents burns and other injuries. Locate the circuit breaker and switch it off to ensure no power flows to the air conditioner.
Now, you’re ready to begin the recharging process. Always follow safety guidelines and manufacturer instructions.
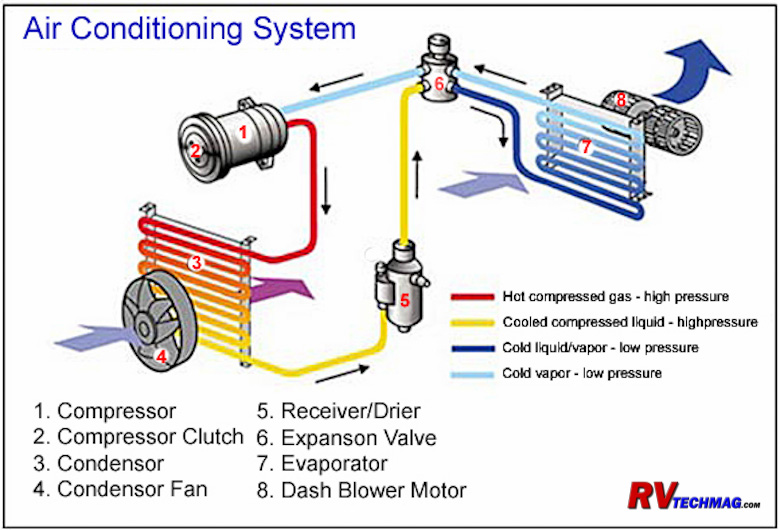
Credit: www.rvtechmag.com
Locating The Air Conditioning Unit
Locating the air conditioning unit in your RV is the first step in ensuring it functions properly. It might seem daunting, but it’s quite straightforward. Knowing where to find the AC unit will help you address any issues faster.
Understanding The Ac System
An RV air conditioning system works by removing heat and humidity from the air. It uses a refrigerant that circulates through coils. The fan then blows the cool air into your living space.
The main components include the compressor, condenser, evaporator, and fan. Familiarizing yourself with these parts helps you understand the system better.
Identifying Key Components
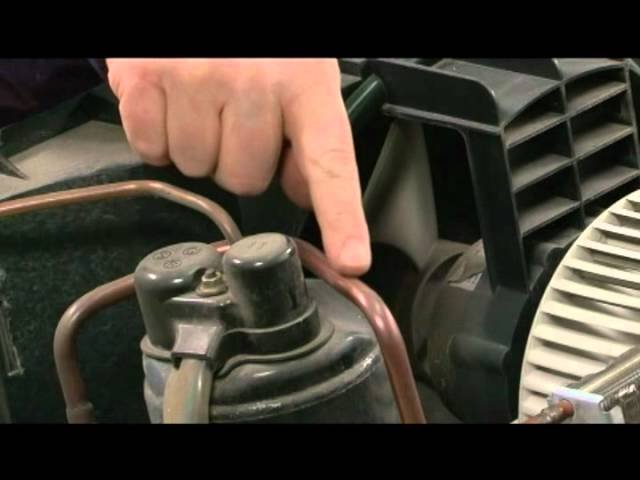
First, identify the compressor. It’s usually in a metal box on the roof. This part compresses the refrigerant, making it hot.
Next, locate the condenser. This is near the compressor and helps cool the refrigerant. The fan is also on the roof and circulates air through the system.
Lastly, find the evaporator inside the RV. It absorbs heat from the air, making it cool.
Checking Refrigerant Levels
Checking the refrigerant levels in your RV air conditioner ensures it works efficiently. Low refrigerant levels can cause the AC to blow warm air. Regular checks help you avoid discomfort during your trips.
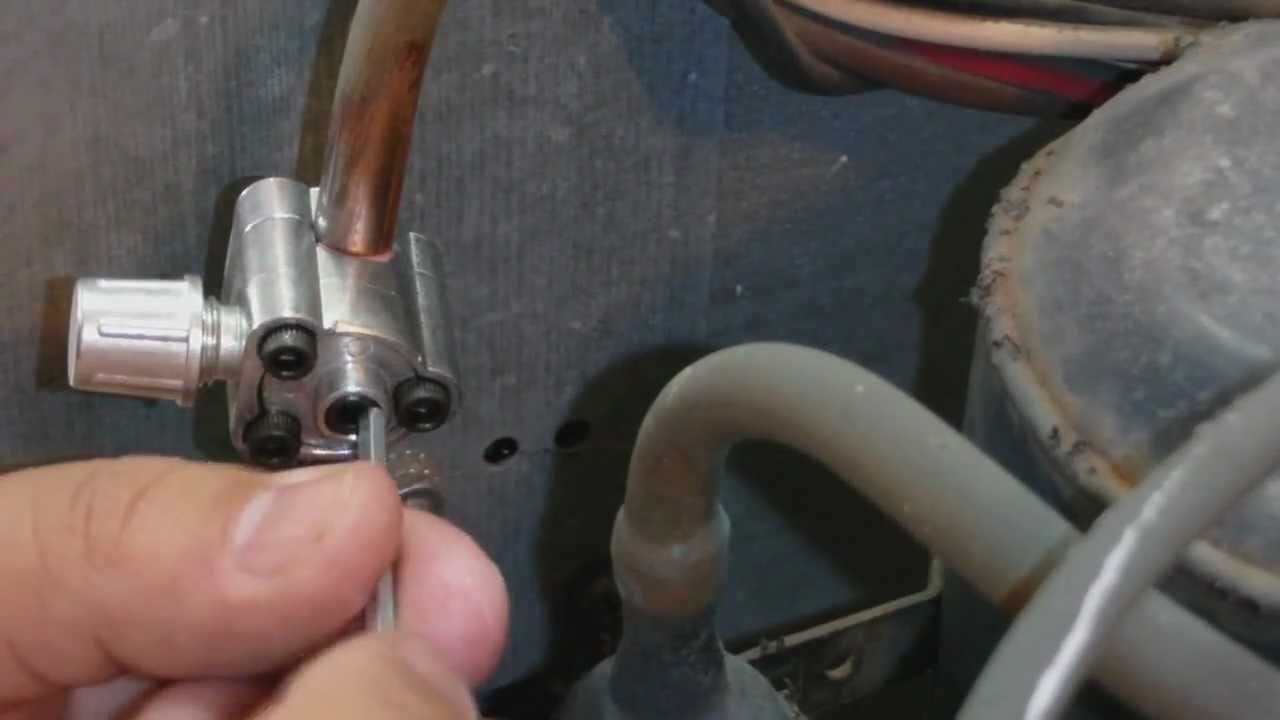
Using The Pressure Gauge
A pressure gauge is essential for checking refrigerant levels. Here’s how to use it:
- First, turn off the RV air conditioner.
- Next, locate the service port on the AC unit.
- Attach the pressure gauge to the service port.
- Turn on the AC and let it run for a few minutes.
Interpreting Gauge Readings
Understanding the gauge readings is crucial to know the refrigerant levels:
- If the pressure is too low, the AC might not cool properly.
- High pressure readings can indicate overfilled refrigerant.
- Ideal readings vary, so check your AC’s manual for specific numbers.
Here’s a quick reference table for common refrigerant types:
| Refrigerant Type | Ideal Pressure (PSI) |
|---|---|
| R-22 | 60-80 |
| R-410A | 110-130 |
Keep an eye on these readings to maintain your RV air conditioner. Regular maintenance ensures a comfortable journey.
Adding Refrigerant
Adding refrigerant to your RV air conditioner can seem daunting. It’s a crucial step to keep your unit working efficiently. This guide simplifies the process, ensuring your air conditioner runs smoothly.
Connecting The Refrigerant Canister
First, turn off the air conditioner. Locate the service port on the unit. It’s usually covered with a cap. Remove the cap and attach the hose from the refrigerant canister. Ensure the connection is secure to prevent leaks. This step is essential for a safe recharge.
Proper Filling Techniques
With the canister connected, start the air conditioner. Set it to the lowest temperature. Slowly open the valve on the canister. Allow the refrigerant to flow into the system. Monitor the pressure using a gauge. Stop filling once you reach the recommended level. Overfilling can damage the unit.
Always follow the manufacturer’s instructions. Each air conditioner may have specific requirements. Properly filling the unit ensures optimal performance and longevity.
Testing The Air Conditioner
After recharging your RV air conditioner, testing it is essential. This step ensures your unit works properly and efficiently. Follow these simple tests to confirm everything is in order.
Running A Performance Test
Start by turning on the RV air conditioner. Set it to the lowest temperature. Let it run for 15 minutes. Measure the air coming from the vents. It should be cold and consistent. Check the outside unit. Ensure the fan is running smoothly. Listen for unusual noises. These can indicate problems.
Troubleshooting Common Issues
If the air isn’t cold, there might be a problem. Check the thermostat settings. Ensure they are correct. Look at the air filter. A dirty filter can block airflow. Clean or replace it if needed. Inspect the condenser coils. Dirt and debris can cause issues. Clean them carefully.
If the unit still doesn’t cool, there might be a refrigerant leak. Look for signs of oil or refrigerant around the unit. Call a professional if you suspect a leak. It’s crucial to handle refrigerants safely. Never try to fix a leak yourself.
Credit: www.youtube.com
Maintaining Optimal Performance
Keeping your RV air conditioner in good shape ensures a cool and comfortable journey. Regular maintenance helps in avoiding expensive repairs and keeps the unit running efficiently. Let’s dive into some essential tips to maintain optimal performance.
Regular Maintenance Tips
Performing regular maintenance on your RV air conditioner can extend its life and improve performance. Here are some tips to follow:
- Clean the Filters: Dirty filters reduce airflow and efficiency. Clean or replace them every month.
- Check the Coils: Evaporator and condenser coils should be clean. Dirt reduces their ability to absorb heat.
- Inspect the Fins: Aluminum fins on the coils can bend. Use a fin comb to straighten them.
- Clear the Drain Line: A clogged drain line can cause water damage. Ensure it is clear of debris.
- Test the Thermostat: Ensure the thermostat is working correctly. Faulty thermostats can cause temperature issues.
When To Seek Professional Help
Sometimes, despite regular maintenance, issues can arise. Here’s when you should call a professional:
- Strange Noises: Unusual sounds can indicate serious problems. Seek expert help if you hear grinding or squealing.
- Weak Airflow: Poor airflow might mean a problem with the motor or other components.
- Leaking Refrigerant: Low refrigerant levels can harm the unit. Only professionals should handle refrigerant.
- Frequent Cycles: If the unit turns on and off too often, it might be overworking. This needs professional diagnosis.
- High Energy Bills: A sudden increase in energy bills can indicate inefficiency. An expert can identify the issue.
Keeping your RV air conditioner in top shape ensures you stay cool on your adventures. Regular maintenance and knowing when to seek help can save you time and money.
Frequently Asked Questions
How Do I Know If My Rv Ac Needs Recharging?
If your RV air conditioner isn’t cooling effectively, it might need recharging. Check for warm air, unusual noises, or leaks. Regular maintenance can also help identify issues early.
What Type Of Refrigerant Does An Rv Ac Use?
Most RV air conditioners use R-134a or R-410a refrigerants. Check your unit’s manual for the specific type. Using the correct refrigerant is crucial for optimal performance.
Can I Recharge My Rv Ac Myself?
Yes, you can recharge your RV AC yourself. However, it requires proper tools and knowledge. If you’re unsure, it’s best to consult a professional for safety and efficiency.
How Often Should I Recharge My Rv Air Conditioner?
Recharge your RV air conditioner as needed, typically every 2-3 years. Regular maintenance can help identify when recharging is necessary. Always follow the manufacturer’s guidelines for best results.
Conclusion
Recharging your RV air conditioner is simple with the right steps. Regular maintenance keeps it working efficiently. Check the refrigerant levels often. Clean the coils and replace filters. These small tasks make a big difference. Stay cool and comfortable on your travels.
Happy RVing.


