
When your RV oven pilot light won’t stay lit, it can be frustrating. This problem is common and can interrupt your travel plans.
Understanding why the pilot light won’t stay lit is crucial. It can be due to several issues, such as a dirty pilot tube, a faulty thermocouple, or even a gas supply problem. Knowing the root cause helps in finding the right solution.
In this guide, we’ll explore the common reasons behind this problem and offer practical tips to fix it. Whether you’re a seasoned RV traveler or a beginner, these insights will help you get your oven working again. Stay with us as we dive into the details and ensure your next meal is cooked without a hitch.

Credit: www.youtube.com
Common Causes
Having trouble with your RV oven pilot light? It can be frustrating when the light won’t stay lit. Several common causes could be behind this issue. Let’s explore these causes to help you troubleshoot and fix the problem.
Gas Supply Issues
A faulty gas supply can cause the pilot light to go out. Ensure the gas valve is open. Check if the propane tank is full. Inspect the gas line for any leaks or blockages. A steady gas flow is crucial for the pilot light to stay lit.
Thermocouple Malfunctions
The thermocouple is a safety device. It senses if the pilot light is on. If it malfunctions, the gas supply will shut off. This leads to the pilot light going out. Inspect the thermocouple for dirt or damage. Sometimes, cleaning it can solve the problem. If cleaning doesn’t work, consider replacing the thermocouple.

Credit: www.youtube.com
Safety Precautions
Dealing with an RV oven pilot light that won’t stay lit can be frustrating. Safety is the top priority in such situations. Ensuring the correct safety measures can prevent accidents and maintain a safe environment.
Turn Off Gas Supply
First, turn off the gas supply to your RV oven. This step is crucial to prevent gas leaks. Locate the main gas valve and turn it off. Usually, you will find it near the oven or at the gas supply line. Make sure the valve is completely closed before proceeding.
Ventilate The Area
After turning off the gas supply, ventilate the area. Open windows and doors to allow fresh air to circulate. This helps to disperse any accumulated gas. Proper ventilation reduces the risk of inhaling harmful fumes. Ensure the area is well-ventilated before inspecting the pilot light.
Inspecting The Pilot Light
Having trouble with your RV oven pilot light not staying lit? This section will guide you through the process of inspecting the pilot light. Understanding the necessary steps can help you diagnose the issue. Follow these instructions for a thorough inspection.
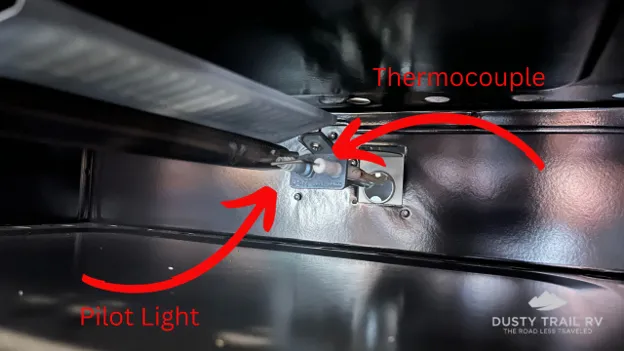
Pilot Light Location
Firstly, you need to locate the pilot light. Typically, the pilot light is found near the oven burner. Refer to your RV oven manual for the exact location. In most cases, it is at the back of the oven, near the burner assembly.
Visual Inspection Steps
Once you have located the pilot light, it’s time for a visual inspection. Follow these steps:
- Turn off the oven and let it cool.
- Open the oven door and remove any racks.
- Use a flashlight to get a clear view of the pilot light area.
- Check for any obstructions or debris around the pilot light.
- Look for any visible damage to the pilot light assembly.
| Inspection Step | Action |
|---|---|
| Turn off the oven | Ensure safety |
| Open oven door | Access pilot light |
| Use flashlight | Improve visibility |
| Check obstructions | Clear debris |
| Look for damage | Identify issues |
If you find any obstructions, remove them carefully. Debris can prevent the pilot light from staying lit. If there are visible signs of damage, it might be time for a replacement. A clean and clear pilot light area is essential for proper functioning.
Cleaning The Pilot Light
When your RV oven pilot light won’t stay lit, it might be due to dirt or debris. Cleaning the pilot light can help. This task is simple and requires minimal tools. Follow the steps below to ensure your pilot light stays lit.
Necessary Tools
- Small brush (a toothbrush works well)
- Compressed air canister
- Safety gloves
- Paper towels
- Small wrench
Cleaning Process
First, turn off the gas supply to your RV oven. Safety is crucial. Always wear safety gloves during this process.
- Locate the pilot light assembly. Use a small wrench to loosen any screws holding it in place.
- Remove the assembly carefully. Set it on a paper towel to avoid losing small parts.
- Use the small brush to gently clean around the pilot light. Remove any visible dirt or debris.
- Next, take the compressed air canister. Spray short bursts into the pilot light opening to dislodge any hidden particles.
- Wipe the assembly with a paper towel. Ensure it is dry and free of debris.
- Carefully reattach the pilot light assembly. Tighten the screws with the small wrench.
Once reassembled, turn the gas supply back on. Test if the pilot light stays lit. This simple cleaning process often resolves pilot light issues.
Checking Gas Supply
Is your RV oven pilot light not staying lit? First, check the gas supply. It’s crucial for the oven’s operation. Ensuring a steady gas flow can solve many problems.
Gas Line Connections
Start by inspecting the gas line connections. They should be tight and secure. Loose connections might cause gas leaks. These leaks can prevent the pilot light from staying lit.
Use a wrench to tighten any loose connections. Do not overtighten. Over-tightening can damage the lines. If you notice a strong gas smell, contact a professional immediately.
Pressure Testing
Next, test the gas pressure. Correct pressure ensures the oven functions well. Use a manometer for this task. Attach it to the gas line. Check the reading. It should match the manufacturer’s specifications.
If the pressure is too low or too high, adjust it. Low pressure might indicate a clogged line. High pressure could mean a regulator issue. Both need attention for safe and effective oven use.
Testing The Thermocouple
If the pilot light on your RV oven won’t stay lit, the thermocouple may be the issue. The thermocouple is a small device that ensures gas flow only when the pilot light is on. Testing the thermocouple can help you determine if it needs replacement.
Thermocouple Function
The thermocouple is a safety device. It senses heat from the pilot light. If it doesn’t sense heat, it stops the gas flow to prevent leaks. This tiny device has a big job.
When the pilot light is on, the thermocouple creates a small electrical current. This current keeps the gas valve open. If the pilot light goes out, the current stops, and the gas valve closes. This prevents gas leaks and ensures safety.
Multimeter Testing
You can test the thermocouple using a multimeter. This device measures electrical current. Follow these steps to test your thermocouple:
- Set the multimeter to millivolts (mV).
- Locate the thermocouple near the pilot light.
- Disconnect the thermocouple from the gas valve.
- Connect the multimeter probes to the thermocouple ends.
- Light the pilot light and wait for a minute.
- Check the multimeter reading. A working thermocouple should show 25-30 mV.
If the reading is lower, the thermocouple may need replacement. A low reading indicates it isn’t generating enough current to keep the gas valve open.
Testing the thermocouple is easy. It helps ensure your RV oven operates safely. If the pilot light won’t stay lit, start by testing the thermocouple.
Replacing The Thermocouple
Replacing the thermocouple can solve the issue of your RV oven pilot light not staying lit. This device senses the pilot flame and signals the gas valve to stay open. A faulty thermocouple can fail to detect the flame, causing the pilot light to go out. Here, we will discuss how to remove the old thermocouple and install a new one.
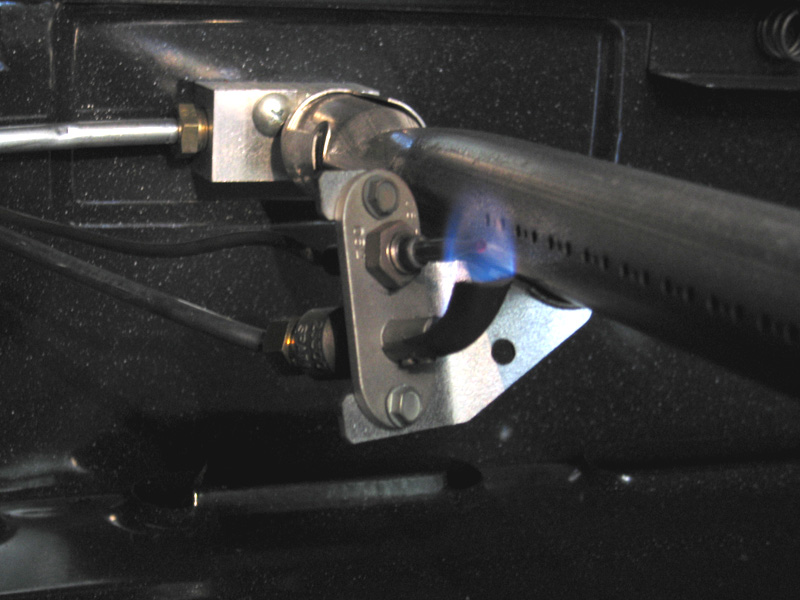
Removing The Old Thermocouple
First, turn off the gas supply to the oven. This is a safety step. Locate the thermocouple near the pilot light. It looks like a thin, copper rod. Use a wrench to loosen the nut connecting it to the gas valve. Gently pull the thermocouple out of its holder. Be careful not to damage other parts.
Installing A New Thermocouple
Take the new thermocouple and slide it into the holder. Make sure it is in the same position as the old one. Tighten the nut by hand, then use a wrench to secure it. Do not overtighten. Reconnect the other end to the gas valve. Turn the gas supply back on and light the pilot. Check that the flame stays lit. If it does, you have successfully replaced the thermocouple.
Credit: www.irv2.com
When To Call A Professional
Sometimes, fixing the RV oven pilot light on your own is not possible. In these cases, contacting a professional can save time and ensure safety. Knowing when to call a technician is important.
Signs Of Serious Issues
If the pilot light won’t stay lit after multiple attempts, it could signal a deeper problem. This may involve the gas supply or a malfunctioning component. A persistent gas smell is another red flag. This indicates a potential leak, which is dangerous and needs immediate attention.
Unusual noises like hissing or clicking from the oven are troubling. These sounds might point to issues with the gas line or ignition system. Do not ignore these signs as they could result in serious hazards.
Finding A Qualified Technician
Search for a technician with experience in RV appliances. They should have proper certifications and good reviews. Start by asking for recommendations from fellow RV owners. Online forums and social media groups are also great resources for finding trusted professionals.
Check the technician’s credentials before hiring. Ensure they have experience with RV ovens. This guarantees they understand the specific needs of RV appliances. Doing thorough research helps you find the right person for the job.
Frequently Asked Questions
Why Won’t My Rv Oven Pilot Light Stay Lit?
Your RV oven pilot light might not stay lit due to a clogged pilot orifice, faulty thermocouple, or insufficient gas pressure. Regular maintenance and cleaning can help resolve these issues.
How Do I Fix My Rv Oven Pilot Light?
To fix your RV oven pilot light, clean the pilot orifice, check the thermocouple connection, and ensure proper gas pressure. If the problem persists, seek professional help.
Can A Faulty Thermocouple Affect The Pilot Light?
Yes, a faulty thermocouple can prevent the pilot light from staying lit. It is crucial to inspect and replace a damaged thermocouple to maintain proper functionality.
What Causes A Clogged Pilot Orifice In An Rv Oven?
A clogged pilot orifice can be caused by dirt, debris, or residue buildup. Regular cleaning of the orifice can prevent clogging and ensure the pilot light stays lit.
Conclusion
Fixing an RV oven pilot light can seem tricky. But it’s doable. Start with simple checks. Clean the pilot light area. Ensure gas flow is steady. Replace faulty thermocouples if needed. Regular maintenance helps prevent issues. Keep your RV oven in top shape.
Safe travels and happy cooking!


