
RV delamination is a common issue that affects many RV owners. It occurs when moisture seeps into the RV walls, causing them to separate and bubble.
Repairing RV delamination by drilling holes is a practical and effective solution. This method involves drilling small holes into the affected area to release trapped moisture and apply adhesive. It’s crucial to address delamination promptly to prevent further damage and maintain your RV’s integrity.
In this blog post, we’ll explore how drilling holes can help repair RV delamination, offering a step-by-step guide to get your RV back in shape. Let’s dive into the details and ensure your RV remains in top condition for your travels.
Introduction To Rv Delamination
RV delamination is a common issue faced by RV owners. It occurs when the layers of the RV’s exterior walls start to separate. This separation can cause various problems. Properly addressing delamination is crucial to maintain the structural integrity and aesthetic appeal of your RV.
What Is Delamination?
Delamination refers to the process where the layers of the RV’s walls detach from each other. This can create a bubble or ripple effect on the surface. The outer fiberglass layer detaches from the inner wooden or foam core. This separation can weaken the structure of the RV.
Causes Of Delamination
| Cause | Description |
|---|---|
| Water Damage | Water seeps into the walls, weakening the adhesive bonds. |
| Poor Adhesion | Manufacturing defects can cause poor initial bonding of layers. |
| Age | Over time, adhesives can deteriorate, leading to delamination. |
| Temperature Fluctuations | Extreme temperatures can cause materials to expand and contract, breaking bonds. |
To fix delamination, drilling holes is a common method. By drilling small holes, you can inject adhesive into the separated areas. This helps re-bond the layers and restore the RV’s structural integrity.
Identifying Delamination
Delamination in RVs can lead to serious damage if not addressed promptly. Identifying delamination early is crucial for effective repair. This section will help you recognize the signs and symptoms and understand the tools needed for inspection.
Signs And Symptoms
Knowing the signs of delamination can save you from costly repairs. Look for these common symptoms:
- Bubbling or Wrinkling: Check for bubbles or wrinkles on the RV’s exterior walls.
- Soft Spots: Press on the walls to feel for soft or spongy areas.
- Cracks or Gaps: Look for cracks or gaps in the seams or joints.
- Water Damage: Inspect for water stains or mold on the interior walls.
Tools For Inspection
Having the right tools can make the inspection process easier. Here is a list of essential tools:
| Tool | Purpose |
|---|---|
| Flashlight | To inspect dark areas and corners. |
| Moisture Meter | To detect moisture inside walls. |
| Screwdriver | To remove panels for a closer look. |
| Inspection Mirror | To see behind tight spaces. |
| Camera | To document areas of concern. |
Using these tools, you can thoroughly inspect your RV for delamination. Early detection allows for timely and effective repairs.
Preparation For Repair
Preparing for RV delamination repair requires careful planning. You need to gather the right materials and follow safety precautions. Proper preparation ensures a smooth and successful repair process.
Gathering Materials
First, collect all the necessary materials. You will need a drill, drill bits, epoxy resin, and a syringe. Make sure you have sandpaper, clamps, and a putty knife too. Having these materials ready will save time.
Safety Precautions
Safety is crucial during the repair process. Wear safety goggles to protect your eyes. Use gloves to avoid contact with chemicals. Ensure proper ventilation in your workspace. This helps prevent inhaling harmful fumes. Double-check your tools to ensure they are in good condition. This prevents accidents.
Drilling Holes
Drilling holes is a crucial step in RV delamination repair. This process helps in stopping the spread of the delamination and allows for the application of adhesive to re-bond the layers. Proper technique and tools are essential.
Choosing The Right Drill Bit
Selecting the correct drill bit is vital. A standard wood drill bit usually works well. Ensure it is sharp. Sharp bits make cleaner holes. This reduces the risk of further damage. A 1/8-inch diameter is often ideal. It makes small, precise holes. This size also allows adhesive to penetrate effectively.
Drilling Technique
Drill holes around the delaminated area. Space them about two inches apart. This pattern ensures even adhesive distribution. Apply gentle pressure while drilling. Avoid forcing the bit. Forcing can cause more damage. Steady hands help maintain control. This keeps holes clean and precise.
After drilling, clean the area. Remove any dust or debris. Clean surfaces help adhesive bond better. Ensure all holes are clear before applying adhesive. This step is crucial for a successful repair.
Injecting Adhesive
Injecting adhesive into delaminated sections of your RV is a crucial step in the repair process. Properly done, it can restore the structural integrity of your vehicle. Let’s delve into the process of injecting adhesive, starting with the types of adhesives you can use and then the application methods.
Types Of Adhesives
Choosing the right adhesive is essential for a successful repair. There are several types you can consider:
- Epoxy Resin: Known for its strong bonding properties and durability.
- Polyurethane Adhesive: Offers excellent flexibility and resistance to moisture.
- Construction Adhesive: Ideal for large surfaces and provides a strong hold.
Application Methods
Once you have chosen the right adhesive, the application method is the next step. Here are some common methods:
- Drilling Holes: Drill small holes into the delaminated area.
- Injecting Adhesive: Use a syringe or injector to fill the holes with adhesive.
- Clamping: Apply pressure to ensure the adhesive spreads evenly.
Ensure you distribute the adhesive evenly to avoid weak spots. Proper clamping is crucial for a strong bond.
By following these steps and using the right adhesive, you can effectively repair delamination in your RV.

Credit: www.reddit.com
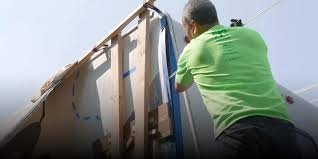
Clamping And Curing
Clamping and curing are crucial steps in RV delamination repair by drilling holes. Proper clamping ensures the adhesive bonds well, while curing allows the adhesive to set. Both steps are vital for a long-lasting repair.
Proper Clamping Techniques
Correct clamping distributes pressure evenly. It helps in bonding the layers. Use multiple clamps to cover the entire delaminated area. Avoid over-tightening the clamps. Too much pressure can squeeze out the adhesive. Place a piece of wood between the clamp and the RV surface. This protects the surface from damage.
Curing Time
Curing time is the period the adhesive needs to set. It varies based on the adhesive used. Check the adhesive instructions for specific times. Generally, it takes 24 to 48 hours. Do not rush this step. Proper curing ensures a strong bond. Keep the area undisturbed during this period. This helps in achieving the best results.
Finishing Touches
After drilling holes to repair RV delamination, the next step is perfecting the surface. This ensures the repair looks seamless and the RV remains protected. Here, we’ll discuss the crucial steps involved.
Sanding And Smoothing
Start by sanding the repaired area. Use medium-grit sandpaper for the initial pass. This helps to even out any ridges or uneven spots.
Next, switch to fine-grit sandpaper. Smooth the surface thoroughly. This prepares it for painting and sealing.
Ensure the entire area feels smooth to the touch. Remove any dust or debris with a clean, dry cloth.
Painting And Sealing
Apply a primer to the sanded area. Allow it to dry completely. This helps the paint adhere better and provides a uniform base.
Once the primer is dry, apply the paint. Match the color to your RV for a seamless look.
- Use a small brush for precision
- Apply thin, even coats
- Allow each coat to dry before applying the next
After the paint has dried, seal the area. Use a high-quality sealant. This protects the repair from moisture and further damage.
Apply the sealant evenly. Let it cure according to the manufacturer’s instructions.

Credit: www.rvwithtito.com
Preventing Future Delamination
After repairing RV delamination by drilling holes, it’s crucial to take steps to prevent future issues. By following simple maintenance tips and protective measures, you can keep your RV looking and functioning like new. Here are some practical tips and measures to help you avoid delamination in the future.
Regular Maintenance Tips
Regular maintenance is key to preventing delamination. Inspect your RV’s exterior frequently. Look for cracks, bubbles, or soft spots in the walls. Addressing these issues early can prevent major problems.
- Inspect Seals: Check all seals around windows, doors, and roof. Replace any damaged or cracked seals.
- Wash and Wax: Clean your RV regularly. Apply a protective wax coating to shield against moisture.
- Check Roof: Inspect the roof for any signs of wear or damage. Repair any issues immediately.
Protective Measures
Taking protective measures is essential for long-term delamination prevention. These actions can save time and money in the future.
- Use Covers: Invest in high-quality covers for your RV. They protect against harsh weather conditions.
- Store Indoors: If possible, store your RV in a garage or covered area. This reduces exposure to the elements.
- Apply Sealant: Use a high-grade sealant on all exterior surfaces. This adds an extra layer of protection against water and sun damage.
Frequently Asked Questions
What Causes Rv Delamination?
RV delamination occurs when moisture seeps between layers, weakening the adhesive bond. Poor maintenance and damage can also contribute.
How Do You Fix Rv Delamination?
Fixing RV delamination involves drilling holes, injecting adhesive, and clamping the area. Professional help may be necessary.
Can I Repair Rv Delamination Myself?
Yes, you can repair RV delamination yourself. Ensure you follow proper steps and use the right materials.
How Long Does Rv Delamination Repair Take?
RV delamination repair typically takes a few hours to a day. It depends on the damage extent and drying time.
Conclusion
Repairing RV delamination by drilling holes can seem challenging. But it’s doable. Follow the steps carefully. Ensure all tools are ready. Take your time. Check for hidden damage. Practice patience for the best results. Regular maintenance prevents future issues. Your RV will stay in good shape.
Enjoy safe travels with a solid RV.


