

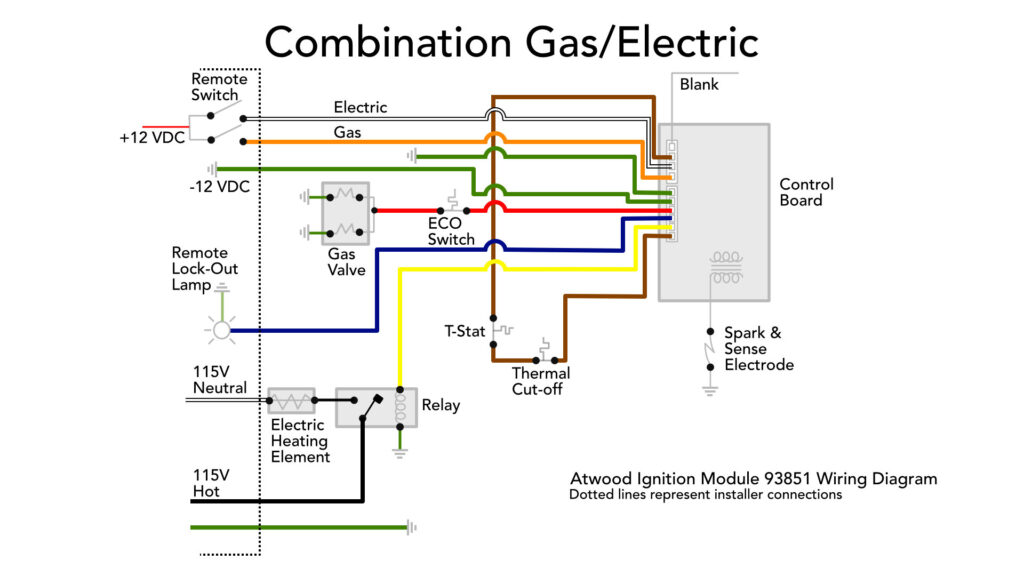
Understanding the wiring diagram of a 6 Gallon Atwood RV water heater is crucial. It ensures safe and efficient operation.
If you own an RV, you know how important the water heater is. It provides hot water for showers, washing dishes, and more. A 6 Gallon Atwood RV water heater is a popular choice due to its reliability. However, wiring it correctly can be challenging.
This blog post will help you understand the wiring diagram. We’ll break it down step by step. This way, you can be confident in handling the wiring process. Whether you are an experienced RV owner or a beginner, this guide will be useful. Let’s dive in and make the wiring task simple and safe.
Credit: johnmarucci.com
Introduction To Atwood Rv Water Heaters
Atwood RV water heaters are essential for a comfortable travel experience. They ensure you have hot water on demand, making your journeys more enjoyable. Understanding the wiring diagram of your 6-gallon Atwood RV water heater helps in troubleshooting and maintenance.
Importance Of Water Heaters
Water heaters provide hot water for showers, washing dishes, and other needs. They play a crucial role in ensuring comfort and hygiene during your travels. Without a reliable water heater, your RV trips could become less pleasant.
Overview Of Atwood Models
Atwood offers various models of RV water heaters. Each model caters to different needs and preferences. The 6-gallon Atwood RV water heater is popular for its efficiency and size. It fits well in most RVs, providing ample hot water without taking up too much space.
These models come with detailed wiring diagrams. Understanding these diagrams is key to proper installation and maintenance. Knowing how to read them ensures your water heater works efficiently, reducing the risk of malfunctions.
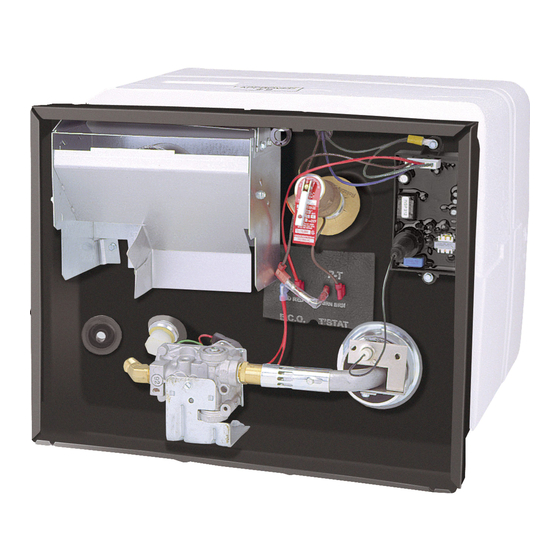
Key Components
The 6 Gallon Atwood RV Water Heater is a popular choice for many RV owners. Understanding its key components can help with troubleshooting and maintenance. Here, we delve into the essential parts that make up the wiring diagram of this water heater.
Thermostat
The thermostat controls the water temperature inside the heater. It ensures the water stays within a safe range. If the water gets too hot, it shuts off the heating element. A faulty thermostat can lead to inconsistent water temperatures.
Heating Element
The heating element is the core of the water heater. It heats the water to the desired temperature. The element receives power through the wiring system. If the element burns out, the water will stay cold.
Pressure Relief Valve
The pressure relief valve is crucial for safety. It releases excess pressure from the tank. If pressure builds up too much, it can cause damage. This valve prevents potential accidents by releasing pressure when needed.
Safety Precautions
Handling a 6 Gallon Atwood RV Water Heater Wiring Diagram requires careful attention to safety. Here are key precautions to ensure a safe and efficient installation. Pay attention to electrical components and prevent leaks for an optimal setup.
Handling Electrical Components
Working with electrical components can be risky. Follow these steps to stay safe:
- Turn off the power: Always disconnect the power source before starting.
- Wear safety gear: Use insulated gloves and safety glasses.
- Check for frayed wires: Replace any damaged wires immediately.
- Use the correct tools: Ensure you have the right tools for the job.
- Follow the diagram: Stick closely to the wiring diagram to avoid errors.
Preventing Leaks
Leaks can cause significant damage. Take these steps to prevent them:
- Inspect connections: Ensure all water connections are tight and secure.
- Use Teflon tape: Apply Teflon tape to threaded connections to seal them.
- Check for cracks: Look for cracks in pipes or fittings and replace if necessary.
- Test the system: After installation, run water through the system to check for leaks.
Following these safety precautions will help ensure a safe and effective installation of your 6 Gallon Atwood RV Water Heater.
Credit: www.irv2.com
Tools And Materials Needed
Before starting your 6 Gallon Atwood RV Water Heater wiring project, gather all the tools and materials you need. This step ensures a smooth and efficient process. Having everything ready saves time and reduces stress.
Essential Tools
You’ll need a few basic tools for this wiring job. A screwdriver set is crucial. Both flathead and Phillips types are necessary. Wire strippers are also essential. They help you strip the insulation from the wires with ease. Pliers are handy for bending and cutting wires. A voltage tester ensures that the power is off before you start working. Safety goggles protect your eyes from debris and sparks. A flashlight or headlamp helps you see in dark corners of the RV.
Required Materials
The materials list includes several important items. You will need electrical tape to secure connections. Wire nuts are useful for capping and securing wire ends. Have a wiring diagram specific to your water heater model on hand. This will guide you through the process. It is also important to have the correct gauge of wire. Check your water heater manual for specifications. Finally, have a roll of conduit to protect and organize your wires.
Step-by-step Wiring Instructions
Understanding the 6 Gallon Atwood RV Water Heater Wiring Diagram can seem complicated. But with a clear guide, you can handle it. Follow these step-by-step wiring instructions to ensure your heater works safely and efficiently.
Disconnecting Power
Before starting, ensure you disconnect the power to your RV. This is crucial to prevent any electrical shock or damage.
- Turn off the main breaker.
- Unplug the RV from any external power sources.
- Use a voltage tester to confirm no power is flowing.
Connecting Wires
Once the power is off, you can start connecting the wires.
- Locate the wiring compartment on the water heater.
- Identify the main power wires (black and white).
- Connect the black wire to the heater’s black wire using a wire nut.
- Connect the white wire to the heater’s white wire.
- Secure the ground wire to the heater’s grounding screw.
Testing Connections
After wiring, it’s important to test the connections to ensure everything works correctly.
- Turn the main breaker back on.
- Plug the RV into an external power source.
- Turn on the water heater and check for any issues.
- If the heater works and no issues are found, your wiring is correct.
- If there are issues, turn off the power and recheck your connections.
Following these step-by-step wiring instructions ensures your 6 Gallon Atwood RV Water Heater is wired correctly. Always prioritize safety and double-check your work.
Credit: www.manualslib.com
Troubleshooting Common Issues
Understanding your 6 Gallon Atwood RV Water Heater wiring diagram can help resolve common issues. Knowing these will save time and avoid frustration. Let’s dive into some typical problems and their solutions.
No Hot Water
No hot water can be frustrating. First, check if the water heater is getting power. Use a multimeter to test the power supply. Ensure the circuit breaker is not tripped. If power is not the issue, inspect the thermostat and heating element. These parts may need replacement.
| Step | Action |
|---|---|
| 1 | Check power supply |
| 2 | Inspect the circuit breaker |
| 3 | Test the thermostat |
| 4 | Check the heating element |
Inconsistent Temperature
Inconsistent temperature can indicate a thermostat issue. Ensure it is set correctly. If the thermostat is faulty, replace it. Sediment build-up in the tank can also cause temperature fluctuations. Regularly flush the tank to remove sediment.
- Check thermostat settings
- Replace faulty thermostat
- Flush the tank to remove sediment
Water Leaks
Water leaks can cause damage. Inspect all connections and fittings for tightness. Replace any worn-out gaskets or seals. Sometimes, leaks come from the tank itself. If this is the case, the tank might need to be replaced.
Common areas to check:
- Inlet and outlet connections
- Heating element gasket
- Tank seams
Maintenance Tips
Easily maintain your 6 Gallon Atwood RV water heater with a clear wiring diagram. Keep connections tight and clean for efficient operation. Regular checks ensure reliable hot water during your travels.
Maintaining your 6 Gallon Atwood RV Water Heater is crucial. It extends its life and ensures it functions well. Here are some practical maintenance tips.Regular Inspections
Inspect your water heater every few months. Look for leaks, rust, or any unusual sounds. Check the wiring diagram to ensure all connections are secure. Regular inspections can help catch small issues before they become big problems.Cleaning The Heater
Cleaning your water heater improves its efficiency. Drain the water heater to remove sediment buildup. Use a brush to clean around the connections and heating elements. Always refer to your wiring diagram to avoid damaging any parts during cleaning.Replacing Parts
Sometimes parts need replacing. If a part shows wear or damage, replace it promptly. Use the wiring diagram to guide you. Ensure you are using the correct replacement parts to avoid malfunctions. Replacing parts when needed helps keep your water heater running smoothly. “`Frequently Asked Questions
How Do I Wire A 6 Gallon Atwood Rv Water Heater?
To wire a 6 gallon Atwood RV water heater, follow the manufacturer’s wiring diagram. Connect the power supply wires to the corresponding terminals. Ensure all connections are secure and follow safety guidelines.
What Tools Are Needed For Wiring An Atwood Water Heater?
You will need a screwdriver, wire strippers, and a multimeter. These tools help you make secure and accurate connections.
Can I Install The Water Heater Myself?
Yes, you can install it yourself. Follow the wiring diagram and safety guidelines. If unsure, consult a professional.
Where Can I Find The Wiring Diagram?
The wiring diagram is usually in the user manual. You can also find it on the manufacturer’s website.
Conclusion
Understanding the 6 Gallon Atwood RV water heater wiring diagram is crucial. It ensures safe and efficient operation of your RV water heater. Always follow the wiring diagram closely. This guarantees proper installation and avoids potential issues. Don’t skip any steps or overlook details.
Doing so can lead to problems down the road. Keep this guide handy for future reference. Safe travels and enjoy your heated water!


