
Understanding the Coleman Mach RV thermostat wiring diagram can be quite helpful. It ensures your RV’s heating and cooling systems function correctly.
The Coleman Mach RV thermostat controls the temperature inside your RV, making it a comfortable home away from home. Wiring it correctly is crucial for optimal performance. Incorrect wiring can lead to system failures or inefficient operation. This guide aims to simplify the wiring process.
We will break down the wiring diagram and explain each connection step-by-step. Whether you are a DIY enthusiast or just want to understand your RV better, this post will provide the clarity you need. By the end, you will feel more confident in handling your RV’s thermostat wiring. Let’s dive into the details and make your RV experience even better!
Credit: janeandjohn.org
Introduction To Coleman Mach Rv Thermostat
The Coleman Mach RV Thermostat is an essential device in RVs. It helps maintain the perfect temperature inside your RV, ensuring comfort during your travels. Understanding its wiring diagram is crucial for proper installation and maintenance.
Importance In Rvs
Temperature control in RVs is vital for a comfortable experience. The Coleman Mach thermostat ensures your RV stays cool in summer and warm in winter. This system provides precise temperature management, enhancing your travel comfort.
Common Models
There are several models of Coleman Mach thermostats, each with unique features:
- Coleman Mach 8330-3851: Basic model with manual controls.
- Coleman Mach 6535-3441: Digital display and programmable settings.
- Coleman Mach 9430-3382: Advanced model with Wi-Fi connectivity.
Understanding the wiring diagram for each model is essential. It helps ensure the thermostat functions correctly and maintains optimal temperature control.
Basic Wiring Principles
Understanding the basic wiring principles of the Coleman Mach RV thermostat is crucial. It ensures a smooth installation process and proper functioning. This guide will help you with essential wiring knowledge.
Safety Precautions
Before starting any wiring work, follow these safety precautions:
- Turn off all power sources to avoid electrical shock.
- Use insulated tools to prevent accidental shorts.
- Wear safety goggles to protect your eyes from sparks.
Necessary Tools
Gather the necessary tools before you begin:
- Wire strippers and cutters for preparing wires.
- Screwdrivers for securing connections.
- Multimeter to check voltage and continuity.
Here is a table of the tools:
| Tool | Purpose |
|---|---|
| Wire Strippers | Preparing wires |
| Screwdrivers | Securing connections |
| Multimeter | Checking voltage |
Using the right tools makes the job easier and safer.
Identifying Thermostat Wires
Identifying thermostat wires in your Coleman Mach RV thermostat can seem tricky. Understanding the wiring diagram is crucial for proper installation and functionality. In this section, we break down the process, focusing on wire color codes and their functions.
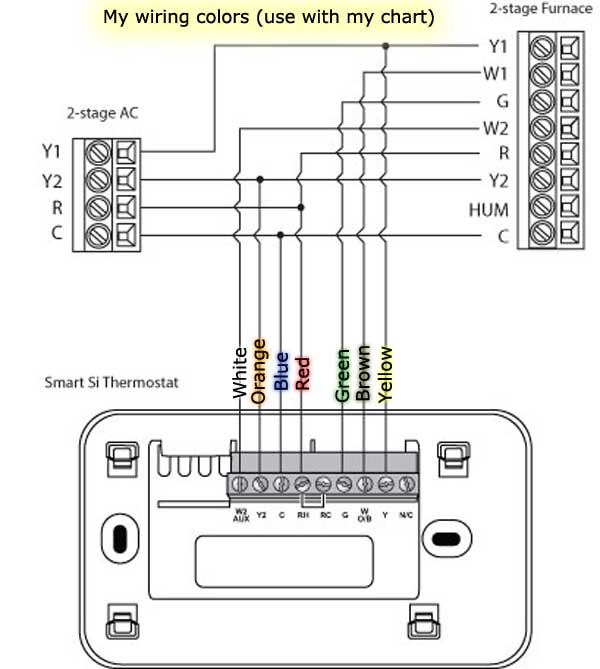
Color Codes
Thermostat wires in RVs follow specific color codes. These colors help identify the wires’ purposes. Here are the common colors you will find:
- Red (R): This wire connects to the power supply.
- White (W): This wire is for the heating system.
- Yellow (Y): This wire controls the cooling system.
- Green (G): This wire operates the fan.
- Blue or Black (C): This wire is the common wire for the power return.
Function Of Each Wire
Each wire in your thermostat has a unique function. Understanding these functions ensures the correct setup:
- Red (R): Supplies power to the thermostat. It usually comes from a 12V DC source.
- White (W): Activates the heating system. Connect this wire to the furnace or heat pump.
- Yellow (Y): Triggers the air conditioning. It connects to the AC compressor.
- Green (G): Controls the fan. It turns the fan on and off as needed.
- Blue or Black (C): Serves as the common wire. It completes the circuit by returning power to the source.
Knowing these color codes and functions helps in identifying and connecting the wires correctly. This ensures your Coleman Mach RV thermostat works efficiently.

Credit: community.goodsam.com
Wiring Diagrams And Schematics
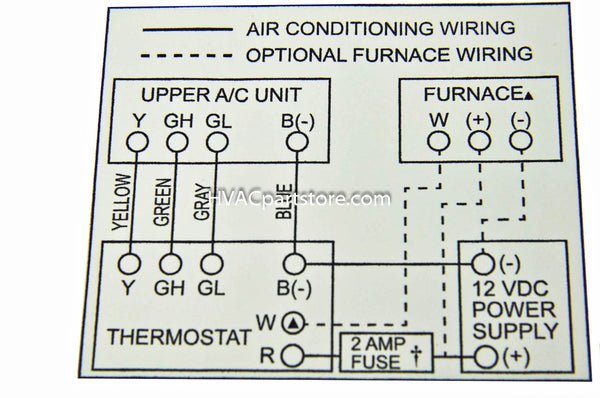
The Coleman Mach RV thermostat wiring diagram helps you connect your thermostat correctly. It shows each wire’s purpose, ensuring proper setup and function. This guide is essential for maintaining a comfortable RV environment.
Understanding wiring diagrams and schematics for your Coleman Mach RV thermostat is crucial. These diagrams show how all parts connect and function together. They help you troubleshoot problems and make repairs.Reading Diagrams
Reading wiring diagrams might seem challenging at first. But with practice, it becomes easier. Each line represents a wire. Each symbol represents a component. Follow the lines to see where each wire goes. Look for labels. They tell you the wire colors and their destinations. This helps you understand the wiring layout better. Always refer to the diagram when making any changes.Common Symbols
Common symbols in wiring diagrams include circles, squares, and triangles. Each symbol represents a different component. For example, a circle might represent a thermostat. A square could be a switch. Learn these symbols. They make it easier to understand the wiring. The more familiar you are with these symbols, the easier it is to read the diagram. Using the correct wiring diagram is important. It ensures all parts work properly. Misreading a diagram can lead to mistakes. This might cause your thermostat to malfunction. Always double-check your work against the diagram. This ensures accuracy. It also helps prevent future issues. Proper wiring ensures the longevity and efficiency of your thermostat. “`Step-by-step Wiring Instructions
If you’re planning to install or replace your Coleman Mach RV thermostat, you’ll need a clear understanding of the wiring process. This guide provides step-by-step wiring instructions to help you get the job done efficiently. Follow these steps to ensure a smooth installation.
Preparation Steps
Before you begin, gather all the necessary tools and materials. This will help you avoid any delays during the wiring process.
- Screwdriver
- Wire strippers
- Electrical tape
- Wiring diagram
Turn off the power supply to your RV. This is crucial for your safety. Remove the old thermostat if there is one. Keep the wires accessible for the new installation.
Connecting Wires
Refer to the wiring diagram provided by Coleman Mach. This will help you identify the correct wires for connection.
- Strip about 1/2 inch of insulation from each wire.
- Connect the red wire to the “R” terminal. This is the power wire.
- Attach the yellow wire to the “Y” terminal. This controls the air conditioner.
- Connect the green wire to the “G” terminal. This is for the fan.
- Attach the white wire to the “W” terminal. This controls the heater.
Secure all connections with electrical tape. This will prevent any loose connections. Finally, mount the thermostat on the wall using the screws provided. Turn the power back on and test the thermostat to ensure it works properly.
Credit: library.coleman-mach.com
Troubleshooting Wiring Issues
Dealing with wiring issues in your Coleman Mach RV thermostat can be frustrating. Understanding common problems and diagnostic tips can help you resolve these issues quickly. This guide will help you troubleshoot and fix wiring problems effectively.
Common Problems
Several wiring issues can affect your RV thermostat. Knowing these problems can help you identify and fix them faster.
- Loose connections: Wires that are not tightly connected can cause the thermostat to malfunction.
- Short circuits: Damaged wires may lead to short circuits, disrupting the thermostat’s function.
- Corrosion: Corroded wires can interrupt the electrical flow.
- Incorrect wiring: Incorrectly connected wires can prevent the thermostat from working properly.
Diagnostic Tips
Follow these tips to diagnose wiring issues in your Coleman Mach RV thermostat.
- Visual inspection: Check for loose, damaged, or corroded wires. Tighten any loose connections.
- Use a multimeter: Test the wires for continuity and voltage. Ensure the readings match the thermostat’s specifications.
- Check the wiring diagram: Compare the actual wiring to the diagram to ensure it is correctly connected.
- Inspect the fuse: A blown fuse can cause the thermostat to stop working. Replace it if necessary.
Use these tips to identify and fix wiring issues. Ensure your thermostat functions smoothly.
Upgrading Your Thermostat
Upgrading your RV thermostat can make a huge difference in comfort. A new thermostat can provide more accurate temperature control and improved energy efficiency. This can lead to better air quality and a more enjoyable RV experience.
Benefits Of Upgrading
An upgraded thermostat offers precise temperature control. It can maintain your desired temperature with less fluctuation. This means your RV stays comfortable in all seasons. Newer models often include programmable settings. You can set different temperatures for day and night. This can save energy and reduce wear on your HVAC system.
Modern thermostats are also easier to use. They often feature digital displays and touch controls. Some even connect to your smartphone. This allows you to adjust the temperature from anywhere. These features add convenience and make managing your RV’s climate simple.
Installation Tips
Before starting, turn off the power to your HVAC system. This ensures safety during installation. Remove the old thermostat and take note of the wiring. Each wire should be labeled with its function. This helps when connecting the new thermostat.
Refer to the wiring diagram of your new Coleman Mach RV thermostat. Match each wire to its corresponding terminal. Secure the wires firmly to avoid any loose connections. Once wired, mount the new thermostat on the wall. Turn the power back on and test the system. Ensure the thermostat responds correctly to your settings.
If you encounter any issues, consult the user manual. It can provide additional troubleshooting tips. You can also seek help from a professional if needed. Proper installation ensures your new thermostat works efficiently. This upgrade can enhance your RV living experience significantly.
Maintenance And Care
Maintaining your Coleman Mach RV thermostat ensures it works efficiently and lasts longer. Regular checks and proper cleaning can prevent issues and keep the system running smoothly. Follow these maintenance and care tips to keep your thermostat in top condition.
Regular Inspections
Inspect your Coleman Mach RV thermostat every few months. Look for loose wires or connections. Tighten any loose screws. Check for signs of wear or damage on the wiring. Regular inspections help catch problems early. This prevents bigger issues later.
Cleaning Tips
Dust and dirt can affect your thermostat’s performance. Clean the thermostat cover with a soft cloth. Use a can of compressed air to remove dust from the inside. Avoid using water or liquid cleaners. They can damage the electrical components. Keeping it clean ensures accurate temperature readings.
Expert Tips And Best Practices
The Coleman Mach RV thermostat is a vital component of your RV’s HVAC system. Proper wiring ensures optimal performance and comfort during your travels. Here, we share expert tips and best practices to help you with wiring your Coleman Mach RV thermostat.
Avoiding Mistakes
Incorrect wiring can lead to malfunction or damage. Follow these tips to avoid common mistakes:
- Double-check connections: Ensure each wire is securely connected to the correct terminal.
- Use the right tools: A wire stripper and a multimeter can help you make precise connections.
- Refer to the manual: Always have the wiring diagram from the manual handy. It is your most reliable guide.
Take your time. Rushing can cause mistakes that are hard to fix.
Maximizing Efficiency
Proper wiring can improve the efficiency of your HVAC system. Here are some tips to help you:
- Label wires: Use labels to identify each wire. This prevents confusion during installation.
- Check wire gauge: Use the correct wire gauge as recommended in the manual. This ensures safe and efficient operation.
- Secure connections: Tighten all connections securely. Loose connections can cause inefficiency and safety hazards.
Ensure that you test your system after wiring. This helps you catch any issues early and fix them before they become bigger problems.
Frequently Asked Questions
How Do I Wire A Coleman Mach Rv Thermostat?
Wiring a Coleman Mach RV thermostat involves connecting specific wires to designated terminals. Follow the wiring diagram provided in the manual. Ensure that the power is off before starting. Match wire colors to the corresponding terminals. Consult a professional if unsure.
What Color Wires Go To Rv Thermostat?
Typically, red is power, white is heat, green is fan, and yellow is cooling. Always refer to your specific wiring diagram for accuracy. Wire colors can vary by model, so double-check your manual.
Why Is My Rv Thermostat Not Working?
Check for loose connections and ensure the power supply is on. Verify that the thermostat settings are correct. If the issue persists, the thermostat might be faulty or there could be a wiring problem. Consult a technician for a thorough inspection.
Can I Replace My Rv Thermostat Myself?
Yes, you can replace your RV thermostat yourself. Turn off the power before starting. Follow the wiring diagram closely. Ensure you connect the wires to the correct terminals. If you’re not confident, seek help from a professional.
Conclusion
Understanding the Coleman Mach RV thermostat wiring diagram is essential. It ensures proper installation and functionality. This guide helps you connect the wires correctly. Follow the steps carefully to avoid issues. Proper wiring prevents potential damage and improves efficiency. Regular maintenance extends your thermostat’s lifespan.
Enjoy a comfortable RV experience with a well-wired thermostat. Feel free to refer back to this guide anytime. Safe travels and happy camping!


