
Flushing your RV hot water heater is crucial for its maintenance. It ensures your heater runs efficiently and lasts longer.
An RV hot water heater can accumulate sediment and mineral deposits over time. These deposits can affect the heater’s performance and even cause damage. Regular flushing helps remove these deposits, keeping your system clean. This process can seem daunting, but with the right steps, it is straightforward.
In this guide, you will learn how to flush your RV hot water heater easily. Whether you are new to RV maintenance or experienced, this step-by-step approach will help you maintain your heater effectively. Stay tuned to keep your RV’s hot water system in top shape.

Credit: www.youtube.com
Preparation
Before you start flushing your RV hot water heater, it’s essential to prepare. Proper preparation ensures a smooth and safe process. Let’s break down the steps for getting ready.
Gather Tools
First, gather all the necessary tools. Here’s a list of what you’ll need:
- Wrench
- Garden hose
- Bucket
- RV water heater flush wand
- Gloves
Having these tools ready will make the job easier. A wrench will help you remove the drain plug. A garden hose will help rinse out the tank. The bucket will catch any water or debris. The flush wand will reach inside the tank. Gloves will protect your hands.
Turn Off Power
Safety is crucial. Before you do anything, turn off the power to the hot water heater.
For electric heaters, switch off the power at the breaker. For gas heaters, turn off the gas supply. Make sure the heater is completely off before proceeding.
Turning off the power prevents accidents and injuries. Always double-check to ensure the heater is off.
Draining The Water Heater
Flushing your RV hot water heater removes sediment and improves efficiency. Start by turning off the heater and water supply. Drain the tank completely before refilling.
Draining your RV hot water heater is essential for maintenance. It helps remove sediment and ensures efficient operation. Follow these steps to drain your water heater properly.Locate Drain Plug
First, find the drain plug on your RV water heater. It is usually at the bottom of the tank. Check your RV manual if you are unsure. Use a wrench to remove the plug. Be careful as the water might be hot.Open Pressure Relief Valve
Next, open the pressure relief valve. This step allows air to enter the tank. It helps the water drain faster. The valve is usually near the top of the water heater. Flip it to the open position. This will start the draining process. By following these steps, you can drain your RV hot water heater easily. Regular maintenance ensures your water heater works efficiently for a long time. “`Flushing The Tank
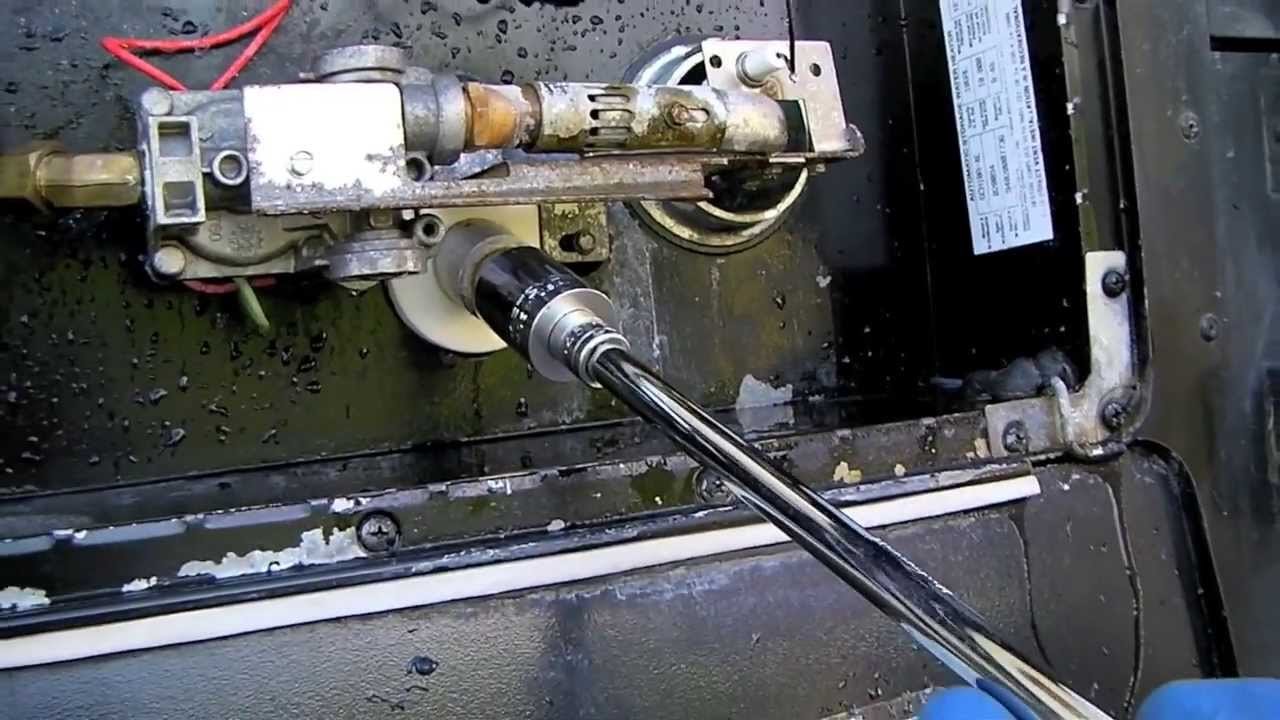
Flushing your RV hot water heater tank is essential. It helps remove sediment buildup. This ensures efficient water heating. Follow these steps to flush the tank properly.
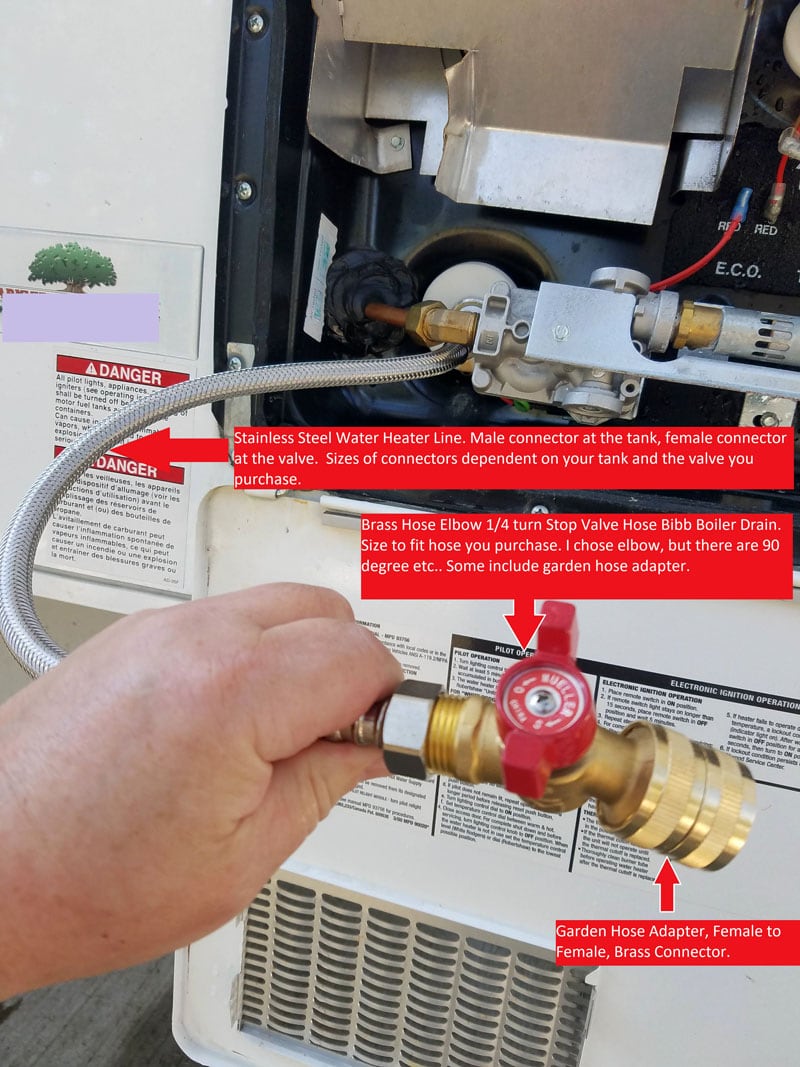
Attach Hose
First, attach a garden hose to the water heater’s drain valve. Ensure the hose is secure. This prevents leaks during the flushing process.
Next, place the other end of the hose outside. Direct it to a suitable drainage area. This helps avoid water damage inside your RV.
Flush With Clean Water
Open the drain valve on the water heater. Let the water flow out through the hose. This removes sediment and debris from the tank.
After the tank is empty, close the drain valve. Refill the tank with clean water. Turn on the water supply to the RV. Allow water to fill the tank completely.
Finally, open the drain valve again. Let the clean water flush out any remaining sediment. Repeat this step until the water runs clear. This indicates the tank is clean.

Credit: www.amazon.com
Inspecting The Anode Rod
Inspecting the anode rod is a crucial step in maintaining your RV hot water heater. The anode rod helps protect the tank from corrosion. Regular inspection ensures that your heater functions properly and lasts longer. Let’s dive into how to inspect the anode rod effectively.
Remove Anode Rod
First, turn off the water supply to your RV. Then, relieve the pressure from the hot water heater by opening a hot water faucet. Locate the anode rod; it’s usually found at the top or side of the tank.
Use a socket wrench to loosen and remove the anode rod. Be careful, as water might spill out. Have a bucket handy to catch any water.
Check For Corrosion
Examine the anode rod for signs of corrosion. A corroded rod will have pits and missing chunks. If the rod is more than 75% corroded, it needs replacing.
A healthy rod will have a smooth surface with minor wear. If the rod looks okay, you can reinstall it. If not, replace it with a new one to protect your tank.
Cleaning The Tank
Cleaning your RV hot water heater tank is essential. It ensures your water remains fresh and your system functions efficiently. A clean tank prevents sediment build-up, which can damage the heater. Follow these steps for a thorough cleaning.
Use A Cleaning Wand
A cleaning wand is a useful tool. It helps remove sediment from the tank. Attach the wand to a garden hose. Insert it into the drain hole of the water heater. Turn on the water and move the wand around. This process will flush out debris and sediment. Repeat until the water runs clear.
Scrub Interior
After flushing, inspect the tank interior. If you notice any residue, use a long brush. Scrub the inside walls gently. This helps remove any remaining sediment. Be thorough but gentle to avoid damaging the tank. Once done, rinse the tank again.
Reassembling Components
After draining and cleaning your RV hot water heater, the next step is reassembling components. This involves replacing the drain plug and reinstalling the anode rod. Ensuring each part is properly put back will help maintain the efficiency of your hot water system.
Replace Drain Plug
Begin by locating the drain plug. This is usually found at the bottom of the heater tank. Carefully inspect the plug for any signs of wear or damage. If it looks worn out, consider replacing it with a new one. Here’s how to replace the drain plug:
- Wrap the threads of the new plug with Teflon tape. This helps prevent leaks.
- Insert the plug into the drain hole.
- Hand-tighten the plug, then use a wrench to give it an additional quarter turn.
- Avoid over-tightening to prevent damage to the threads.
Reinstall Anode Rod
The anode rod is crucial for preventing tank corrosion. Reinstalling it correctly ensures your tank remains in good condition. Follow these steps:
- Inspect the anode rod. Replace it if more than 75% of it has worn away.
- Wrap the threads of the new or existing rod with Teflon tape.
- Insert the rod into the designated opening at the top of the tank.
- Hand-tighten the rod, then use a wrench for an additional quarter turn.
By following these steps, you can ensure that your RV hot water heater functions efficiently. Regular maintenance like this prolongs the life of your heater and provides reliable hot water during your travels.
Refilling The Water Heater
Refilling the RV hot water heater is an essential step after flushing out the old water. Proper refilling ensures your water heater functions efficiently and is ready for use. This section will guide you through the necessary steps to refill your water heater correctly.
Close Valves
First, ensure all the valves are closed. This includes the drain valve and any bypass valves. Closing these valves will prevent water from escaping and ensure the heater fills correctly.
- Check the drain valve.
- Ensure bypass valves are in the correct position.
- Double-check all connections.
Turn On Water Supply
Next, turn on the water supply to the RV. This will start filling the hot water heater. You may hear some air escaping as the tank fills up. This is normal.
- Locate the main water supply valve.
- Turn the valve to the on position.
- Wait for the tank to fill completely.
Once the tank is full, you can turn on a hot water faucet to release any remaining air. This step ensures that the heater is completely filled with water and ready for use.
Final Checks
After flushing your RV hot water heater, it’s time for the final checks. This ensures the system runs smoothly and safely. We’ll cover two key areas: Check for Leaks and Restore Power. Let’s dive in!
Check For Leaks
First, inspect all connections around the hot water heater. Look closely at the inlet and outlet valves.
- Ensure all fittings are tight and secure.
- Check the pressure relief valve for any drips.
- Look around the anode rod and drain plug for moisture.
If you find any leaks, tighten the connections. If the leak persists, you may need to replace a faulty part. Consistent leaks can lead to water damage and mold.
Restore Power
Once you confirm there are no leaks, you can restore power to the heater. Follow these simple steps:
- Turn the water heater switch to the “on” position.
- If your heater is electric, reconnect the power cord.
- For gas heaters, open the propane valve and light the pilot.
Wait a few minutes and check if the heater starts properly. Listen for any unusual sounds. Ensure the water heats up as expected.
Performing these final checks ensures your RV hot water heater is ready for use. Enjoy hot water on your next adventure!
Credit: www.truckcampermagazine.com
Frequently Asked Questions
How Often Should I Flush My Rv Hot Water Heater?
You should flush your RV hot water heater at least once a year. Regular maintenance prevents sediment build-up and extends the heater’s lifespan.
What Tools Do I Need To Flush An Rv Hot Water Heater?
You need a hose, a water heater flush wand, and a bucket. These tools help you effectively remove sediment from the heater.
Can I Use Vinegar To Flush My Rv Hot Water Heater?
Yes, you can use vinegar to flush your RV hot water heater. Vinegar helps dissolve mineral deposits and cleans the tank effectively.
Is It Necessary To Turn Off Power Before Flushing?
Yes, turn off the power before flushing your RV hot water heater. This ensures safety and prevents damage to the heating element.
Conclusion
Flushing your RV hot water heater is essential. It prevents buildup and damage. Regular maintenance extends the heater’s life. Follow these steps carefully to ensure efficiency. Clean water means better performance and less stress. Enjoy worry-free travels with a well-maintained heater.
Your RV adventures will be smoother. Happy camping!


