

Replacing an RV fridge with a residential one is simpler than you think. It can offer more space and efficiency.
Living on the road has its challenges, and a reliable fridge is crucial. Your RV fridge might not meet your needs. Switching to a residential fridge could be the answer. It provides better cooling and more storage. This guide will help you through the process.
We will discuss tools, steps, and tips to make the replacement smooth. You don’t need to be an expert. With some patience, you can do it yourself. Ready to upgrade your RV fridge? Let’s get started!
Gather Necessary Tools
Replacing your RV fridge with a residential model can be a great upgrade. Before you start, it is important to gather all the necessary tools. Having everything ready will make the process smoother and safer.
Essential Tools List
You will need a few essential tools for this task. A screwdriver set is a must. Both flathead and Phillips are useful. Pliers and a wrench set are also essential. A tape measure will help ensure the new fridge fits correctly. A utility knife can assist with any cutting tasks. You might need a drill for securing the new fridge. Do not forget a level to ensure everything is straight.
Safety Gear
Safety should always be a priority. Wear gloves to protect your hands. Safety goggles will keep your eyes safe from debris. If you are using power tools, ear protection is important. A dust mask can help if you are cutting or drilling. Always have a first-aid kit nearby in case of minor injuries.
Measure Your Space
Replacing your RV fridge with a residential one can be a great upgrade. But first, you need to make sure it fits. This means you have to measure your space correctly. Here’s how to do it.
Measuring The Old Fridge
Start by measuring your old fridge. Use a tape measure for accuracy. Measure the height, width, and depth. Write these numbers down. Make sure to measure from the floor to the top for height. For depth, measure from the back wall to the front edge.
Here is a simple table to help you record the measurements:
| Measurement | Size (in inches) |
|---|---|
| Height | ___ |
| Width | ___ |
| Depth | ___ |
Finding The Right Fit
Now that you have the measurements, it’s time to find a new fridge. Look for a residential fridge that matches these numbers. Make sure it will fit in the space. It’s important to leave some extra space for ventilation. At least one inch on each side is a good rule. This helps the fridge work better and last longer.
Check the door swing. The fridge door should open easily without hitting anything. Measure the space around the fridge to ensure it fits well. Take note of any obstacles, such as cabinets or counters.
Consider the weight of the new fridge. Residential fridges can be heavier. Check if your RV floor can support it. Also, think about how you will get the new fridge into the RV. It might be a tight fit through the door.
By following these steps, you can ensure your new fridge fits perfectly. Happy upgrading!
Choose The Right Fridge
When planning to replace your RV fridge with a residential one, choosing the right fridge is crucial. This choice impacts not only the efficiency but also the convenience of your travel experience. Let’s break down the essential factors you need to consider.
Energy Efficiency
Opt for a fridge with high energy efficiency. RVs rely on limited power sources, so an energy-efficient fridge helps conserve power. Look for models with an Energy Star rating. This rating ensures the fridge uses less electricity, saving you power and money.
Consider the type of power your RV uses. Some fridges operate on 12V DC, 120V AC, or propane. Choose one compatible with your RV’s power system for seamless integration.
Size And Capacity
Size and capacity are critical. Measure the space in your RV where the fridge will go. Ensure the new fridge fits well without obstructing other areas.
Here is a simple table to help you compare different sizes:
| Fridge Size | Width | Height | Depth |
|---|---|---|---|
| Small | 20-24 inches | 30-40 inches | 24-28 inches |
| Medium | 24-28 inches | 50-60 inches | 28-34 inches |
| Large | 28-36 inches | 60-70 inches | 34-40 inches |
Consider the capacity of the fridge. Think about how much food you usually store. A larger capacity fridge may be ideal for long trips. For shorter trips, a smaller fridge might suffice.
Here are some key points to keep in mind:
- Ensure the fridge door can open fully.
- Check for adequate ventilation around the fridge.
- Consider the weight of the fridge. Heavier fridges may affect your RV’s balance.
Choose a fridge that balances size and capacity with your needs.
Credit: calarestaurante.com
Disconnect The Old Fridge
Replacing your RV fridge with a residential one can be a game-changer. The first step in this process is to disconnect the old fridge. This ensures safety and prevents any damage to your RV’s electrical system. Follow these easy steps to safely remove your old RV fridge.
Turning Off Power
Before you begin, it’s crucial to turn off the power to your RV. This step ensures you avoid any electrical hazards.
- Locate the main power switch for your RV.
- Turn off the power at the main switch.
- Unplug the fridge from its power source.
Removing Connections
Now that the power is off, you can safely remove the connections to your old fridge.
Follow these steps:
- Disconnect the gas line, if your fridge uses propane. Make sure the gas valve is closed.
- Unscrew the water line if your fridge has a water dispenser or ice maker.
- Remove the screws holding the fridge in place. Use a screwdriver to loosen them.
- Carefully slide the fridge out of its compartment. You may need a second person to help.
With these steps, your old fridge will be disconnected and ready for removal. This prepares the space for installing your new residential fridge.
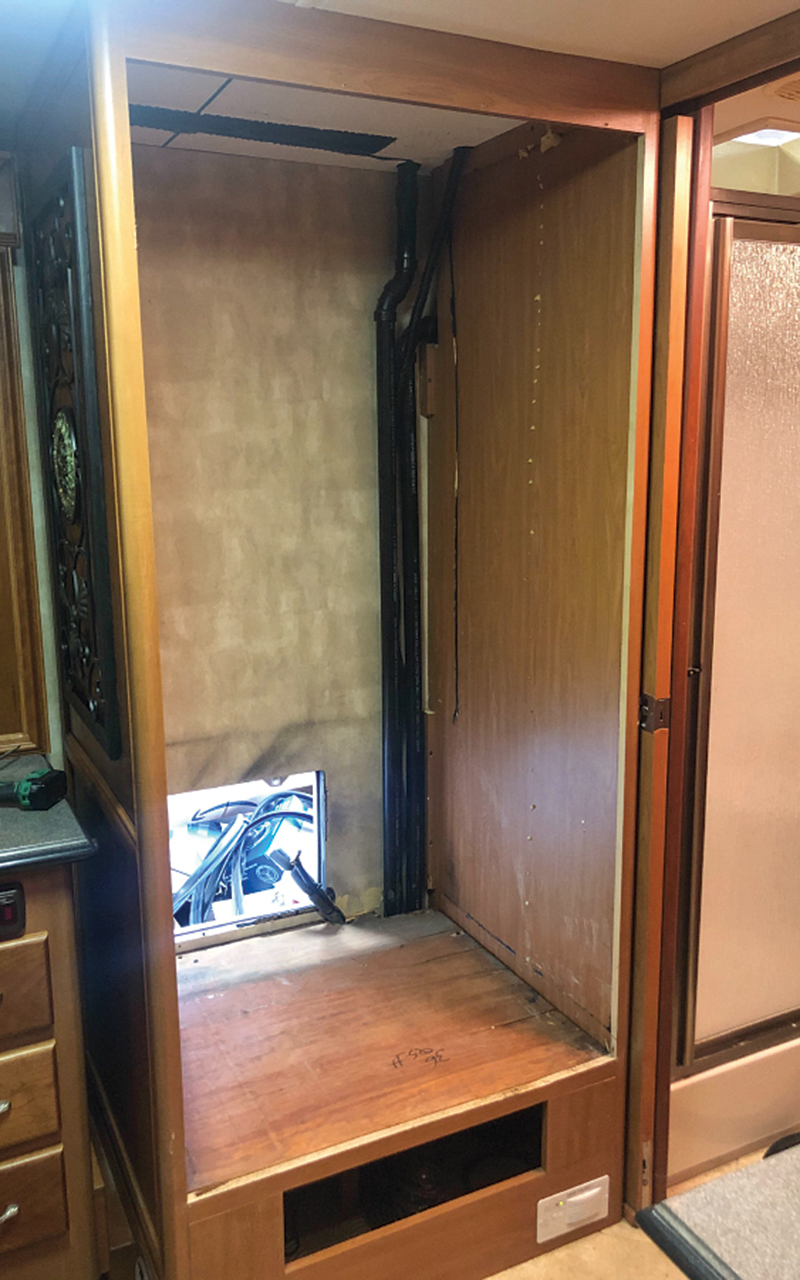
Prepare The Space
Preparing the space for your new residential fridge is crucial. This step ensures a smooth installation process. Follow these steps carefully to avoid any issues later. Let’s start by cleaning the area and making necessary adjustments.
Cleaning The Area
First, remove the old RV fridge. Carefully detach it from any electrical and gas connections. Next, clean the area thoroughly. Dust and debris can hinder the new fridge’s performance. Use a vacuum and a damp cloth to clean every corner. Ensure the space is dry before proceeding.
Making Necessary Adjustments
Measure the space where the new fridge will go. Residential fridges are often larger than RV fridges. You may need to adjust the cabinetry. Use a saw to cut any excess wood. Ensure the fridge will fit snugly in the new space.
Check the electrical connections. Residential fridges typically need more power. Verify that your RV can handle the load. You might need to upgrade the wiring or add a new circuit. Consult an electrician if you’re unsure.
Consider ventilation. Residential fridges require proper airflow. Ensure there is enough space around the fridge for air to circulate. You may need to add vents or fans.
Install The New Fridge
Replacing an RV fridge with a residential one can boost efficiency and comfort. Installing the new fridge correctly ensures it works well and lasts long. Follow these steps to install your new residential fridge in your RV.
Positioning The Fridge
First, measure the space where your new fridge will go. The fridge should fit snugly, with a bit of room for ventilation. You might need to remove or adjust cabinets or panels for a perfect fit. Make sure the fridge doors can open fully without hitting anything.
Next, use a dolly to move the fridge into place. Be careful not to scratch the floor or walls. Center the fridge in the space and ensure it is level from side to side and front to back. This helps the fridge to cool evenly and prevents any damage.
Securing And Leveling
Once the fridge is in position, secure it to prevent movement. RVs are often on the road, so a secure fridge is essential. Use brackets or straps to hold the fridge in place. Attach these to the fridge and the RV wall or floor.
After securing the fridge, check the level again. Adjust the leveling legs if needed. A level fridge works better and lasts longer. Use a bubble level tool to ensure accuracy. Place the level on top of the fridge and adjust the legs until it is perfectly level.
Finally, plug in the fridge and turn it on. Check that it starts cooling. If everything works, you have successfully installed your new residential fridge in your RV.
Reconnect Power And Test
Once the installation of your new residential fridge in your RV is complete, it’s time to reconnect power and test its functionality. This crucial step ensures everything is working correctly before you start using your new appliance. Let’s go through the process step-by-step to make sure your fridge operates smoothly.
Reconnecting Electrical Supply
First, plug the fridge into the RV’s electrical outlet. Make sure the plug fits securely. Double-check all connections to avoid any loose wires or potential hazards. If your RV has a dedicated circuit for the fridge, ensure it is switched on.
Next, turn on the RV’s main power supply. This includes checking the breaker panel. Ensure all switches are in the correct position. This step is essential for providing power to the fridge.
Testing Functionality
Once the power is connected, it’s time to test the fridge. Open the fridge door and see if the interior light turns on. This indicates that the fridge is receiving power.
Set the fridge to your desired temperature. Wait for a few hours and check if the fridge starts cooling. Place a thermometer inside to monitor the temperature accurately.
Listen for any unusual noises. A steady, gentle hum is normal. Any loud or irregular sounds could indicate a problem.
Finally, test the freezer section. Ensure it reaches the appropriate freezing temperature. This completes the testing process, confirming your new fridge is ready for use.

Credit: www.youtube.com
Final Touches
After successfully installing your new residential fridge in your RV, it’s time to ensure everything is perfect with the final touches. These steps will ensure your fridge runs efficiently and looks great.
Sealing And Insulating
Proper sealing and insulation are crucial for maintaining the efficiency of your fridge. Start by checking the gaps around the fridge. Use foam tape or weatherstripping to seal these gaps. This prevents air from leaking in or out.
Next, insulate the area around the fridge. Use rigid foam insulation panels. Cut them to fit the sides and top of the fridge. Secure them in place with adhesive spray. This added insulation will help maintain the fridge’s temperature and reduce energy consumption.
Organizing Interior Space
Organizing the interior space of your new fridge is essential for maximizing its capacity and convenience. Here are some tips:
- Use clear bins to group similar items. This keeps the fridge tidy.
- Label shelves and bins. This helps you find items quickly.
- Place frequently used items in accessible spots. This reduces the time the fridge door stays open.
Consider using a table to plan the organization of your fridge:
| Section | Items |
|---|---|
| Top Shelf | Dairy, Leftovers |
| Middle Shelf | Meats, Eggs |
| Bottom Shelf | Vegetables, Fruits |
| Door | Condiments, Drinks |
Maintenance Tips
Maintaining your RV fridge after replacing it with a residential model is crucial. Proper care ensures optimal performance and extends its lifespan. This section covers essential maintenance tips for your newly installed residential fridge.
Regular Cleaning
Regular cleaning is vital for keeping your fridge in top condition. Wipe down the interior with a mild detergent and warm water every month. This prevents the buildup of food particles and bacteria.
Clean the exterior with a damp cloth to remove dust and dirt. Don’t forget the seals and gaskets. Use a toothbrush to reach tight spots. A clean fridge performs better and stays fresh longer.
Troubleshooting Common Issues
Sometimes, issues arise. Knowing how to troubleshoot common problems can save you time and money. If your fridge isn’t cooling, check the thermostat settings first. Ensure they are correctly set.
Inspect the power source. Ensure the unit is plugged in and receiving power. Check the circuit breakers if necessary.
If you notice strange noises, inspect the compressor and fan. Clean any dirt or debris. This can often resolve noise issues.

Credit: blog.goodsam.com
Frequently Asked Questions
Why Replace Rv Fridge With Residential Fridge?
Replacing an RV fridge with a residential fridge offers more space, better cooling efficiency, and easier maintenance.
Is It Difficult To Install A Residential Fridge?
Installing a residential fridge in an RV is manageable with basic tools and instructions. Follow a step-by-step guide.
What Tools Are Needed For Fridge Replacement?
You will need a screwdriver, wrench, tape measure, and possibly a dolly for moving the fridge.
Will A Residential Fridge Fit In My Rv?
Measure your RV’s fridge space and compare it to the dimensions of the residential fridge to ensure a proper fit.
Conclusion
Replacing an RV fridge with a residential one can be simple. With careful planning, you ensure a seamless fit and proper power setup. This upgrade offers more storage and better cooling. Always follow the manufacturer’s guidelines for installation. Your trips will be more enjoyable with a residential fridge in your RV.
Happy travels and enjoy your new fridge!


