
Wondering how to put Freon in your RV air conditioner? It’s simpler than you think.
This guide will walk you through the process step-by-step. Maintaining your RV’s air conditioner is crucial for those summer trips. Sometimes, the unit stops cooling well because it needs more Freon. Freon is the refrigerant that keeps the air cool inside your RV.
Without enough Freon, your air conditioner can’t do its job. Adding Freon might sound technical, but with some basic tools and a bit of know-how, it’s manageable. This introduction will give you the confidence to tackle this task. Whether you are a seasoned RV traveler or new to the road, keeping your air conditioner in top shape is key to a comfortable journey. Let’s dive into the details.
Credit: www.rvtechmag.com
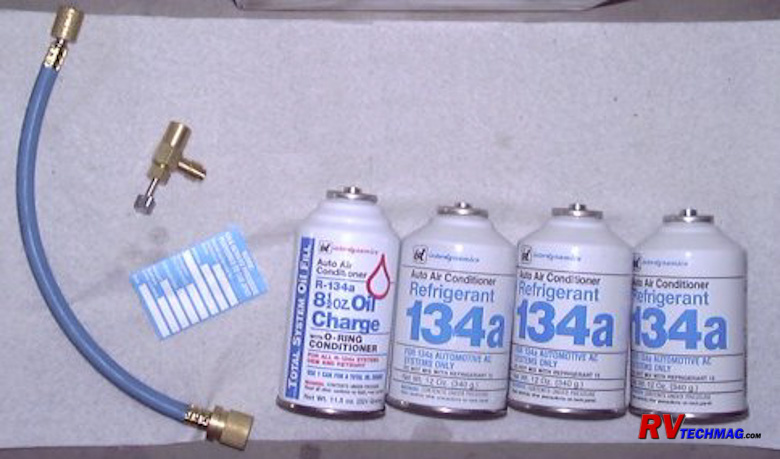
Tools And Materials
Putting Freon in your RV air conditioner requires some preparation. You need the right tools and materials to get the job done. This section will guide you through what you need.
Required Tools
To start, gather the following tools:
- Wrench set
- Refrigerant gauge set
- Leak detector
- Screwdriver
- Safety gloves
- Protective eyewear
These tools will help ensure you can safely and effectively add Freon.
Necessary Materials
Next, you need the right materials:
- Freon (R-22 or R-410A, check your unit’s requirements)
- Replacement O-rings
- Lubricant for O-rings
- Sealing tape
Having these materials on hand will help you complete the task smoothly.

Credit: www.youtube.com
Preparing The Rv
Before you add Freon to your RV air conditioner, you need to prepare the RV. Proper preparation ensures safety and efficiency. Follow these steps carefully to avoid mistakes.
Parking And Power Off
First, find a flat and stable surface to park your RV. This will prevent any accidental movements. Engage the parking brake for added safety. Once parked, turn off the RV engine. Also, disconnect the main power supply. This ensures there is no risk of electric shock.
Accessing The Air Conditioner
Next, locate the air conditioning unit. Most RV air conditioners are on the roof. Use a sturdy ladder to reach the roof. Ensure the ladder is on a stable surface. Carefully climb up to the roof. Look for the air conditioner’s outer cover. Use a screwdriver to remove the cover. Keep the screws in a safe place for later.
With the cover off, you can see the inner components. Find the service port for the Freon. This is usually marked with a cap. Remove the cap gently. Now, you are ready to check the Freon levels and add more if needed.
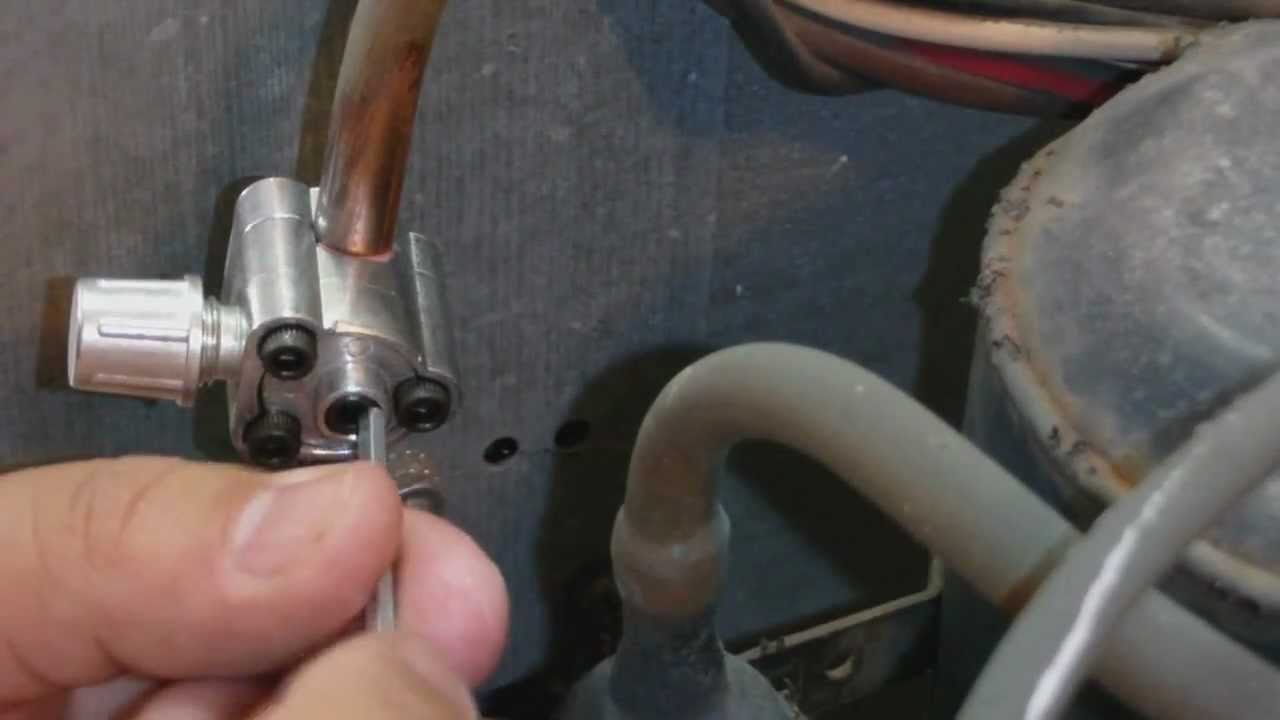
Locating The Service Port
Adding Freon to your RV air conditioner can seem challenging. But it starts with finding the service port. This is a crucial step. It ensures you connect the Freon correctly.
Identifying The Port
The service port is usually on the side of the air conditioning unit. Look for a small, metal valve. This valve is often covered by a cap. The cap might be blue or black. Remove the cap to access the port.
Check your RV’s manual. It may have diagrams showing the exact location. Some models have ports in different places. Knowing where to look can save you time.
Checking For Leaks
Before adding Freon, check for leaks. Use a leak detection spray. Spray it around the service port. Look for bubbles. Bubbles mean a leak is present. Fix any leaks before proceeding.
Leaks can cause the system to lose Freon quickly. This makes your efforts useless. Plus, it can harm the environment. Ensuring a leak-free system is essential.
Connecting The Gauges
Connecting the gauges to your RV air conditioner is a critical step. This ensures you add the correct amount of Freon. Follow these steps to do it correctly.
Attaching The Hose
First, attach the hose to the low-pressure service port. This port is usually on the larger of the two pipes coming from the compressor. Make sure the connection is snug and secure.
Second, connect the hose to the high-pressure service port. This port is on the smaller pipe. Again, make sure the connection is tight to avoid leaks.
Ensuring Proper Fit
Ensure the hoses fit properly on the service ports. A loose connection can lead to Freon leaks, which can harm your AC unit. Listen for a click or feel for a snap to ensure the hose is secure.
Check the gauges to ensure they are reading correctly. If the readings are off, double-check the connections and adjust as needed.
Using a table can help you remember the correct steps:
| Step | Description |
|---|---|
| 1 | Attach the hose to the low-pressure service port |
| 2 | Attach the hose to the high-pressure service port |
| 3 | Ensure connections are tight and secure |
Following these steps ensures your RV air conditioner runs smoothly.
Adding The Freon
Adding Freon to your RV air conditioner is crucial. It ensures efficient cooling. This process might seem complex, but it is manageable. Follow these steps to add Freon properly.
Releasing Air From Hose
Before adding Freon, release air from the hose. Attach the hose to the low-pressure port on the AC unit. Press the valve to let out any trapped air. This step prevents air from entering the system. It ensures the system works efficiently.
Adding Freon Slowly
Once the air is released, start adding Freon slowly. Connect the Freon can to the hose. Turn the valve to allow Freon to flow. Add Freon in small amounts. Check the pressure gauge frequently. Make sure not to overfill. Overfilling can damage the AC unit. Add Freon until the gauge shows the correct level.
This careful process ensures your RV stays cool. Your air conditioner will run smoothly. Enjoy your travels with a well-functioning AC.
Monitoring The Process
Monitoring the process while adding Freon to your RV air conditioner is crucial. It ensures optimal performance and prevents damage. Paying attention to details keeps the system running smoothly. Let’s dive into the key steps to monitor the process effectively.
Checking Pressure Levels
First, check the pressure levels. Use a gauge to measure the current pressure. This tells you if the Freon levels are low. Connect the gauge to the low-pressure service port. Read the gauge carefully. Make sure the pressure is within the recommended range. If not, add Freon slowly.
Avoiding Overfilling
Avoiding overfilling is vital. Too much Freon can harm the air conditioner. It can cause system failures and leaks. Add Freon in small amounts. Check the gauge after each addition. Stop adding Freon when the pressure is correct. Overfilling leads to costly repairs.
Final Steps
Completing the process of adding Freon to your RV air conditioner involves a few final steps. These steps ensure your air conditioner functions correctly. Follow these steps carefully for optimal results.
Removing The Gauges
First, ensure the system is stable. Check that the Freon level is adequate. Carefully disconnect the gauges from the low and high-pressure ports. Use a wrench to loosen the connectors. Be gentle to avoid damaging the ports. Store the gauges properly for future use.
Testing The Air Conditioner
Next, turn on the air conditioner. Set it to the lowest temperature. Allow it to run for 15 minutes. Check the air temperature coming out of the vents. It should be cold. Listen for any unusual noises. If the air is not cold, there may be another issue. Consult a professional if needed.
Finally, ensure all tools are stored safely. Clean the area around the air conditioner. This keeps your RV in good condition. Enjoy your cool and comfortable space!
Maintenance Tips
Maintaining your RV air conditioner ensures it runs efficiently and lasts longer. Regular checks and addressing issues early can help you avoid costly repairs. In this section, we will cover essential maintenance tips to keep your RV air conditioner in top shape.
Regular Inspections
Inspect your RV air conditioner regularly. Look for any signs of wear and tear. Clean the filters every two weeks. Dirty filters reduce airflow and efficiency. Check the coils for dirt and debris. Clean them with a soft brush or cloth. Ensure the fan and motor are in good condition. Listen for unusual noises or vibrations.
Examine the unit for leaks. Leaks can lead to low Freon levels. Inspect the electrical connections. Loose or damaged wires can cause malfunctions. Regular inspections help you spot problems early.
Signs Of Low Freon
Low Freon levels affect your air conditioner’s performance. Watch for these signs. The air conditioner blows warm air. This is a common indicator. The unit takes longer to cool the RV. It may also cycle on and off frequently. Another sign is ice buildup on the coils. This happens when there’s not enough Freon.
Listen for hissing or bubbling sounds. These noises indicate a Freon leak. If you notice any of these signs, check the Freon level. Adding Freon may be necessary. Always follow safety guidelines when handling Freon.
Frequently Asked Questions
How Do You Add Freon To An Rv Air Conditioner?
To add Freon, locate the service port, connect the refrigerant, and follow the manufacturer’s instructions. Ensure the system is off before starting.
What Type Of Freon Does My Rv Ac Need?
Check your RV air conditioner’s manual for the specific type of Freon required. Common types include R-22 and R-134a.
Can I Put Freon In My Rv Ac Myself?
Yes, you can, but it’s recommended to have a professional do it. Incorrect handling can damage the system.
How Often Should I Check Freon Levels In My Rv Ac?
Check Freon levels annually or if you notice reduced cooling performance. Regular maintenance helps ensure optimal functionality.
Conclusion
Adding Freon to your RV air conditioner can seem daunting. But with the right tools and safety precautions, you can do it. Always follow the manufacturer’s instructions. This ensures proper handling and prevents damage. Regular maintenance keeps your RV cool and comfortable.
Remember to check for leaks and wear protective gear. By doing this, you extend the lifespan of your air conditioner. Enjoy your travels with a well-cooled RV. Stay safe and happy camping!


