
Understanding the 12-volt RV battery wiring diagram is essential for RV owners. It ensures your electrical system works safely and efficiently.
In this blog post, we will explore the basics of 12-volt RV battery wiring. Whether you are new to RVing or a seasoned traveler, knowing how to wire your RV battery can save you time and money. Proper wiring ensures your lights, appliances, and other devices work correctly.
This guide will break down the wiring process into simple steps. We will also cover common mistakes to avoid. By the end of this post, you’ll have a clear understanding of 12-volt RV battery wiring. Let’s dive in and make your RV adventures more enjoyable!
Credit: www.youtube.com
Introduction To 12 Volt Rv Batteries
Understanding 12 Volt RV batteries is crucial for any RV owner. These batteries are the heart of your RV’s electrical system. They provide power for various devices and systems. Without them, your RV would be just a shell.
Basics Of 12 Volt Batteries
12 Volt batteries are a common choice for RVs. They are reliable and efficient. Each battery consists of six cells. Each cell produces 2.1 volts. Combined, they give a total of 12.6 volts when fully charged.
These batteries come in different types. The most popular are lead-acid and lithium-ion. Lead-acid batteries are affordable. Lithium-ion batteries last longer and charge faster.
Charging your 12 Volt battery is simple. Use a compatible charger. Ensure the connections are secure. Overcharging can damage the battery. Always monitor the charging process.
Importance In Rvs
12 Volt batteries play a vital role in RVs. They power lights, appliances, and other devices. Without them, your trip could be less comfortable.
These batteries also support your RV’s engine. They provide the necessary power to start the engine. A reliable battery ensures a smooth start every time.
Maintaining your 12 Volt battery is essential. Regular checks can prevent unexpected failures. Clean the terminals and check the electrolyte levels. Replace the battery if it shows signs of wear.
Types Of 12 Volt Rv Batteries
When setting up your RV, choosing the right 12-volt battery is crucial. Different types of batteries offer unique advantages and disadvantages. Understanding these types will help you make an informed decision.
Lead-acid Batteries
Lead-acid batteries are the most common type used in RVs. They are reliable and have been around for many years. There are two main types of lead-acid batteries:
- Flooded Lead-Acid Batteries: These require regular maintenance. You need to check water levels and ensure the terminals are clean.
- Sealed Lead-Acid Batteries: These are maintenance-free. They are also known as AGM (Absorbent Glass Mat) or Gel batteries.
Lead-acid batteries are affordable and widely available. However, they are heavy and have a shorter lifespan compared to other types.
Lithium-ion Batteries
Lithium-ion batteries are newer and becoming popular for RV use. They offer several advantages over lead-acid batteries:
- Lighter Weight: They are much lighter, making them easier to handle and install.
- Longer Lifespan: These batteries can last up to 10 years. They can handle more charge-discharge cycles.
- Faster Charging: They charge faster and more efficiently.
Lithium-ion batteries are more expensive initially. But their long-term benefits often outweigh the cost.
| Feature | Lead-Acid Batteries | Lithium-Ion Batteries |
|---|---|---|
| Weight | Heavy | Light |
| Lifespan | 3-5 years | Up to 10 years |
| Maintenance | Required | Minimal |
| Cost | Affordable | Expensive |
Choosing between lead-acid and lithium-ion batteries depends on your needs and budget. Each type has its pros and cons. Knowing these can help you make the right choice for your RV.
Essential Tools For Wiring
Wiring your RV’s 12-volt battery system can seem daunting. But with the right tools, it gets easier. Having the necessary equipment ensures a smooth process. Safety is also key. Using proper safety gear can prevent accidents.
Required Tools And Equipment
To start, gather essential tools. A wire stripper is crucial. It helps remove insulation from wires. A multimeter checks voltages and continuity. It ensures connections are correct. Wire cutters are also needed. They cut wires to the right length. Crimping tools secure connectors to wires. Don’t forget electrical tape. It insulates and protects connections.
Safety Gear
Always prioritize safety. Wear safety goggles. They protect your eyes from sparks and debris. Use insulated gloves. They prevent electric shock. Have a fire extinguisher nearby. It’s a precaution against electrical fires. Ensure your workspace is dry. Water increases the risk of shock. Good lighting helps you see clearly. It reduces mistakes and hazards.
Credit: rvbasics.com
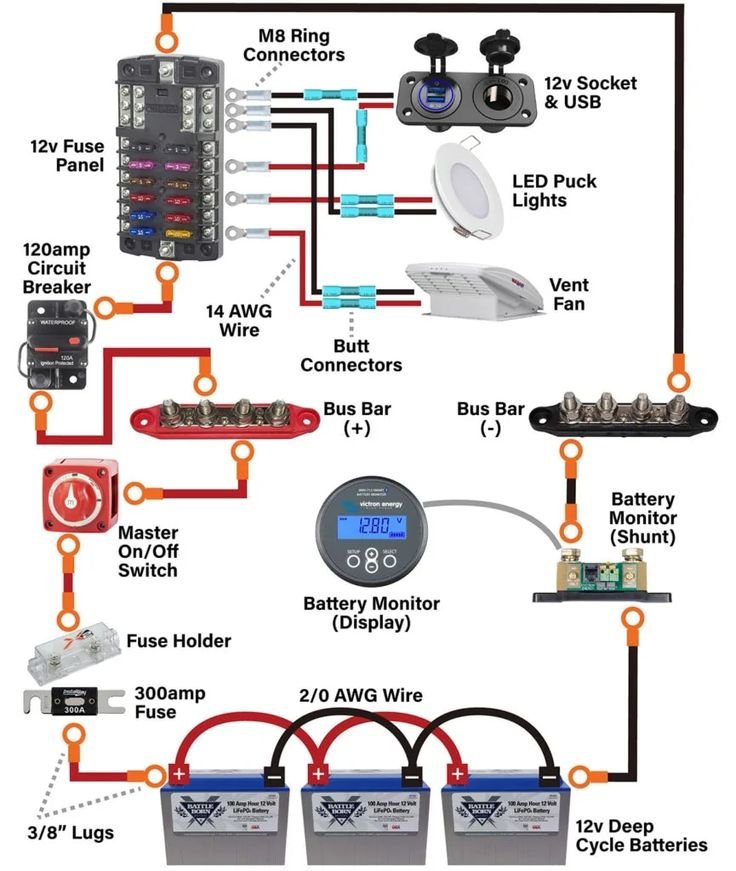
Steps To Wire A 12 Volt Rv Battery
Understanding how to wire a 12-volt RV battery is essential. This process ensures your RV runs smoothly and safely. By following the proper steps, you can avoid common pitfalls and ensure your battery setup is efficient and effective.
Preparation And Planning
Before you start, gather all necessary tools and materials. You’ll need:
- 12-volt RV battery
- Battery cables
- Wrench set
- Wire cutters
- Multimeter
- Protective gloves and goggles
Wear protective gloves and goggles for safety. Ensure the RV is turned off to avoid electric shocks. Check the battery’s voltage with a multimeter to confirm it’s fully charged. Plan the wiring route to keep cables away from sharp edges and moving parts.
Connecting The Cables
Start by connecting the positive cable. Follow these steps:
- Identify the positive terminal on the battery, usually marked with a “+”.
- Connect the red battery cable to the positive terminal.
- Secure the connection with a wrench to prevent any loose connections.
Next, connect the negative cable:
- Identify the negative terminal, marked with a “-”.
- Attach the black cable to the negative terminal.
- Ensure the connection is tight and secure.
Double-check all connections to ensure they are secure and tight. Test the setup with a multimeter to ensure the voltage is correct. This step confirms that the battery is wired correctly and ready to use.
By following these steps, you ensure your 12-volt RV battery is wired correctly. Proper wiring is crucial for the safe and efficient operation of your RV.
Parallel Vs. Series Wiring
Understanding the wiring of your 12 Volt RV battery system is crucial. There are two main ways to wire batteries: parallel and series. Each method has its unique advantages. Choosing the right one depends on your power needs.
Parallel Wiring Benefits
Parallel wiring connects all positive terminals together and all negative terminals together. This keeps the voltage the same but increases the capacity.
- Increased Capacity: More batteries mean more storage.
- Stable Voltage: Voltage remains at 12 volts.
- Redundancy: If one battery fails, others keep working.
| Number of Batteries | Total Voltage | Total Capacity |
|---|---|---|
| 2 | 12V | Double the capacity of one battery |
| 3 | 12V | Triple the capacity of one battery |
Series Wiring Benefits
Series wiring connects the positive terminal of one battery to the negative terminal of the next. This increases the voltage while keeping the capacity the same.
- Increased Voltage: More batteries mean higher voltage.
- Efficient Charging: Higher voltage can improve charging efficiency.
- Reduced Wire Size: Higher voltage can reduce the size of wires needed.
| Number of Batteries | Total Voltage | Total Capacity |
|---|---|---|
| 2 | 24V | Same as one battery |
| 3 | 36V | Same as one battery |
Both wiring methods have their pros and cons. Choose the one that best fits your RV’s power requirements.
Troubleshooting Wiring Issues
Dealing with wiring issues in your 12-volt RV battery setup can be frustrating. Faulty connections or damaged wires can cause many problems. You need to identify and fix these issues to keep your RV running smoothly.
Common Wiring Problems
Several common wiring problems can occur in RV battery setups. Loose connections are a frequent issue. They can cause intermittent power loss or complete failure. Corroded terminals also pose a significant problem. They can impede the flow of electricity. Damaged wires are another common issue. These can result from wear and tear or rodent damage.
Quick Fixes And Solutions
You can fix loose connections by tightening the screws or bolts. Ensure each connection is secure. For corroded terminals, clean them with a wire brush. Apply some dielectric grease to prevent future corrosion. If you find damaged wires, you should replace them. Use wires that match the original specifications.
Remember to turn off the power before working on the wiring. Safety comes first. If you are unsure, consult a professional. They can help you resolve more complex issues.
Maintaining Your Rv Battery Setup
Maintaining your RV battery setup is crucial for ensuring reliable power during your travels. A well-maintained battery setup can extend the life of your batteries and keep your RV running smoothly. Here are some essential tips to help you maintain your 12-volt RV battery wiring diagram.
Regular Maintenance Tips
Check your battery connections often. Ensure they are clean and tight. Use a wire brush to clean any corrosion on the terminals. Inspect the wiring for any signs of wear or damage. Replace any damaged wires immediately to prevent power issues.
Monitor the battery water level. Add distilled water if the level is low. Avoid overfilling the battery cells. Use a battery hydrometer to check the electrolyte levels. Ensure they are within the recommended range.
Extending Battery Life
Avoid deep discharges of your battery. Keep the charge level above 50% whenever possible. Use a quality battery charger with an automatic shut-off feature. This prevents overcharging and extends battery life.
Store your RV batteries properly during the off-season. Keep them in a cool, dry place. Disconnect the batteries from the RV to avoid any power drain. Charge them fully before storage and check the charge periodically.
Install a battery monitor system. This helps you track the charge and usage of your batteries. It provides valuable information to manage your power consumption effectively.
Advanced Wiring Techniques
Advanced wiring techniques can greatly improve the efficiency and safety of your RV’s electrical system. Understanding these methods allows you to maximize your battery’s potential and integrate additional power sources like solar panels. Let’s explore some of these advanced techniques in detail.
Using Battery Isolators
Battery isolators help manage multiple batteries in your RV. They ensure that each battery charges properly without draining others. This technique prevents one dead battery from impacting the entire system. Isolators also protect against overcharging, prolonging battery life. They are crucial for maintaining a reliable power supply while on the road.
Incorporating Solar Panels
Solar panels are a sustainable power source for RVs. Integrating solar panels into your wiring diagram can reduce dependence on traditional power sources. They charge your batteries during the day, providing free energy. Proper wiring ensures efficient energy transfer. Using a charge controller prevents battery overcharging, maintaining optimal battery health. Solar panels also offer flexibility, allowing you to camp off-grid with ease.

Credit: www.pinterest.com
Frequently Asked Questions
What Is A 12-volt Rv Battery?
A 12-volt RV battery is a rechargeable power source for recreational vehicles. It provides electricity for various RV systems, such as lighting and appliances, when off-grid.
How Do You Wire A 12-volt Rv Battery?
To wire a 12-volt RV battery, connect the positive terminal to the RV’s positive cable. Then, connect the negative terminal to the RV’s ground cable.
What Type Of Wire Is Best For Rv Batteries?
Use marine-grade, stranded copper wire for RV batteries. This type of wire offers flexibility, corrosion resistance, and durability, ensuring safe and efficient power transfer.
How Do You Maintain A 12-volt Rv Battery?
Maintain a 12-volt RV battery by regularly checking its water levels, keeping terminals clean, and ensuring it’s charged properly. Avoid overcharging or completely discharging the battery.
Conclusion
Understanding a 12-volt RV battery wiring diagram is crucial. It ensures safe connections. Following the steps outlined helps avoid common mistakes. This guide simplifies the process for beginners. Proper wiring guarantees efficient power distribution. Your RV adventures will be more enjoyable.
Remember to always double-check connections. Safety should always be a priority. Happy travels with your well-wired RV!


